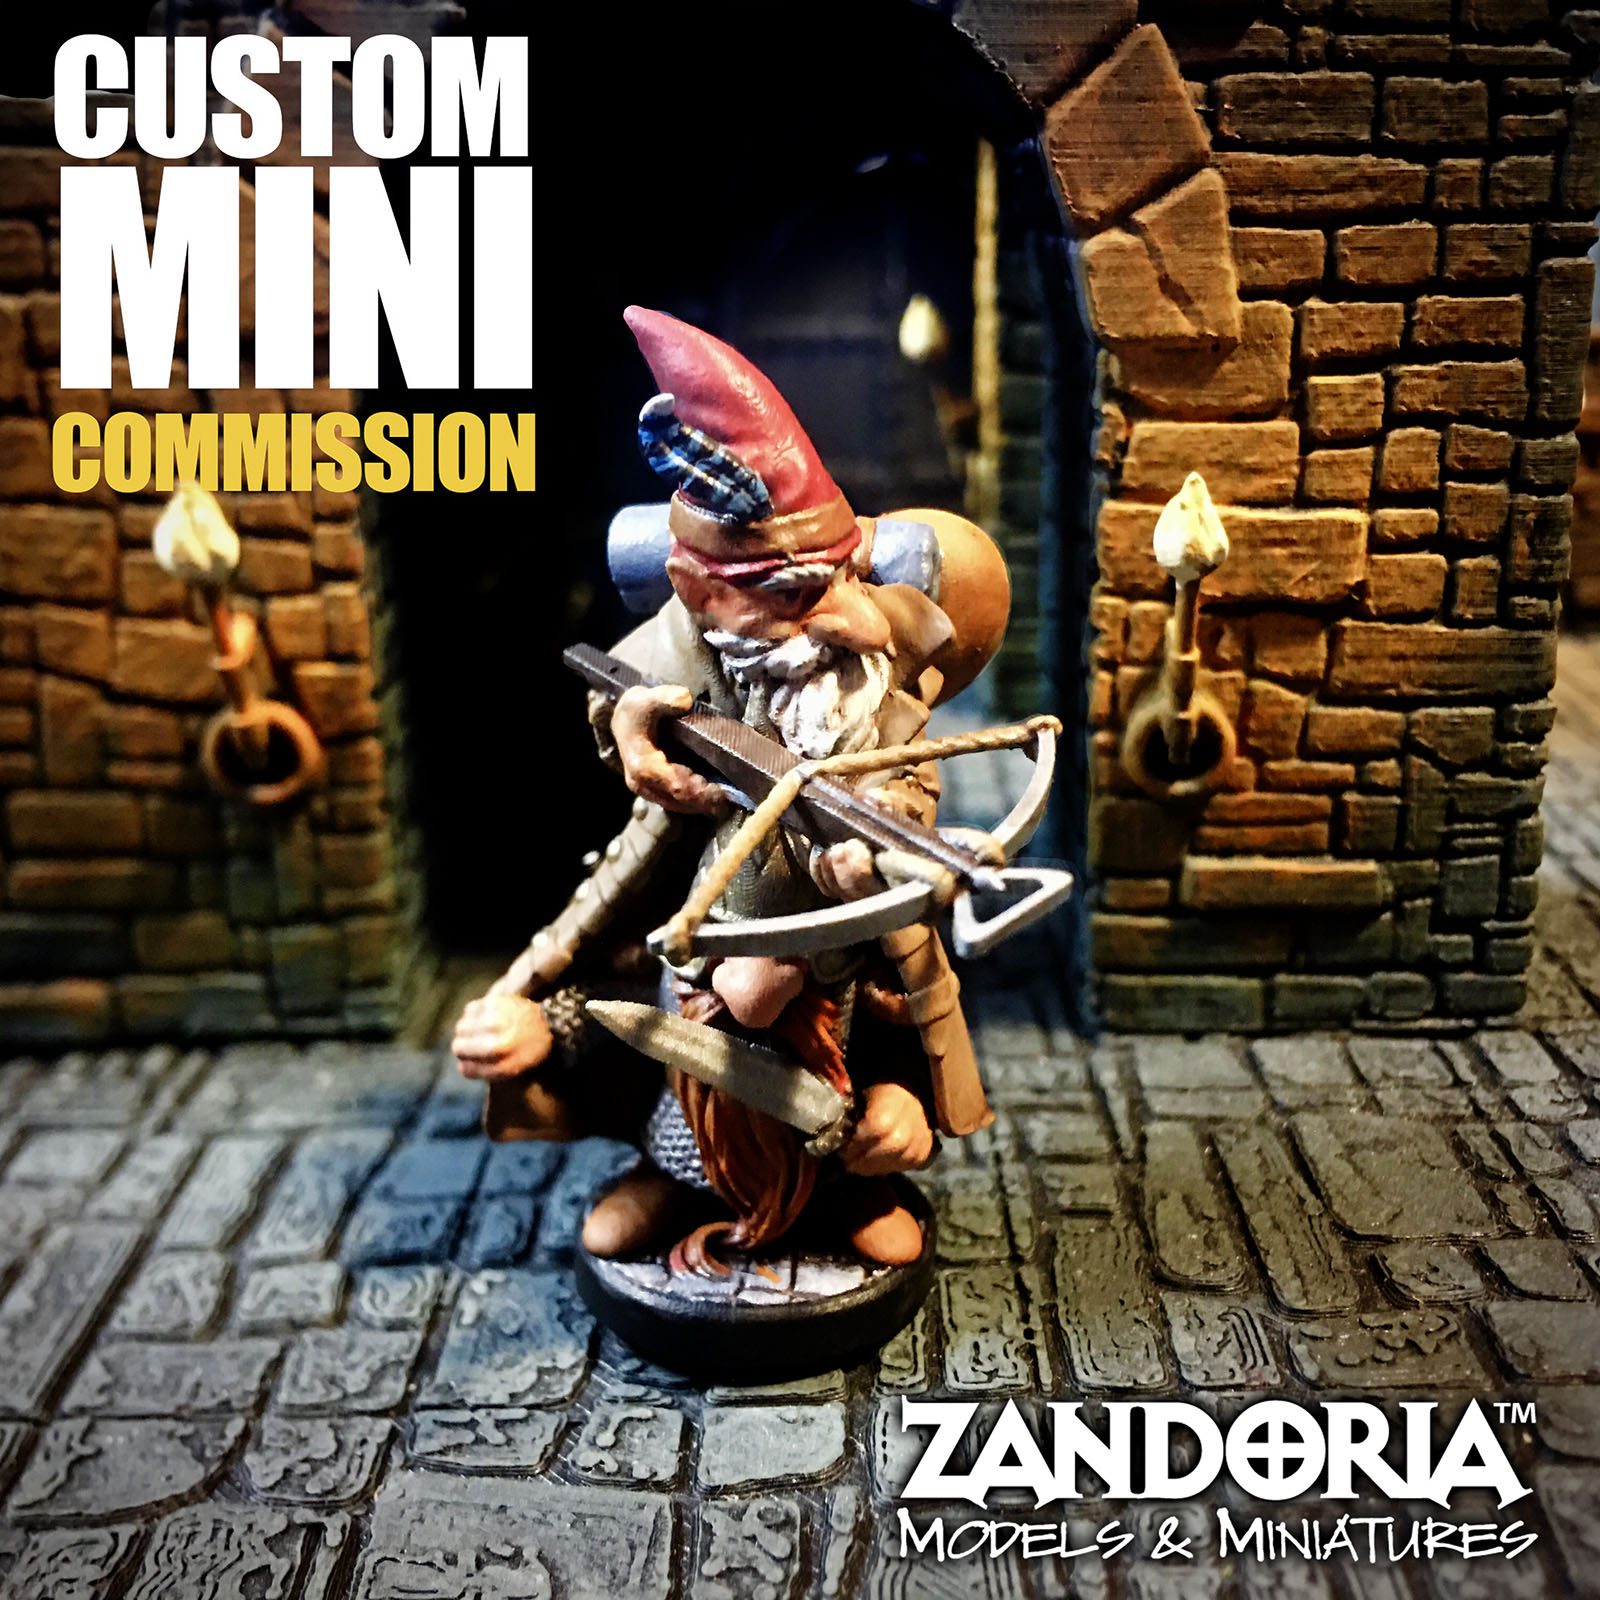
Tired of trying to find a mini to match your favorite character? I will sculpt your character from scratch, and create a one-of-a-kind miniature of your character!
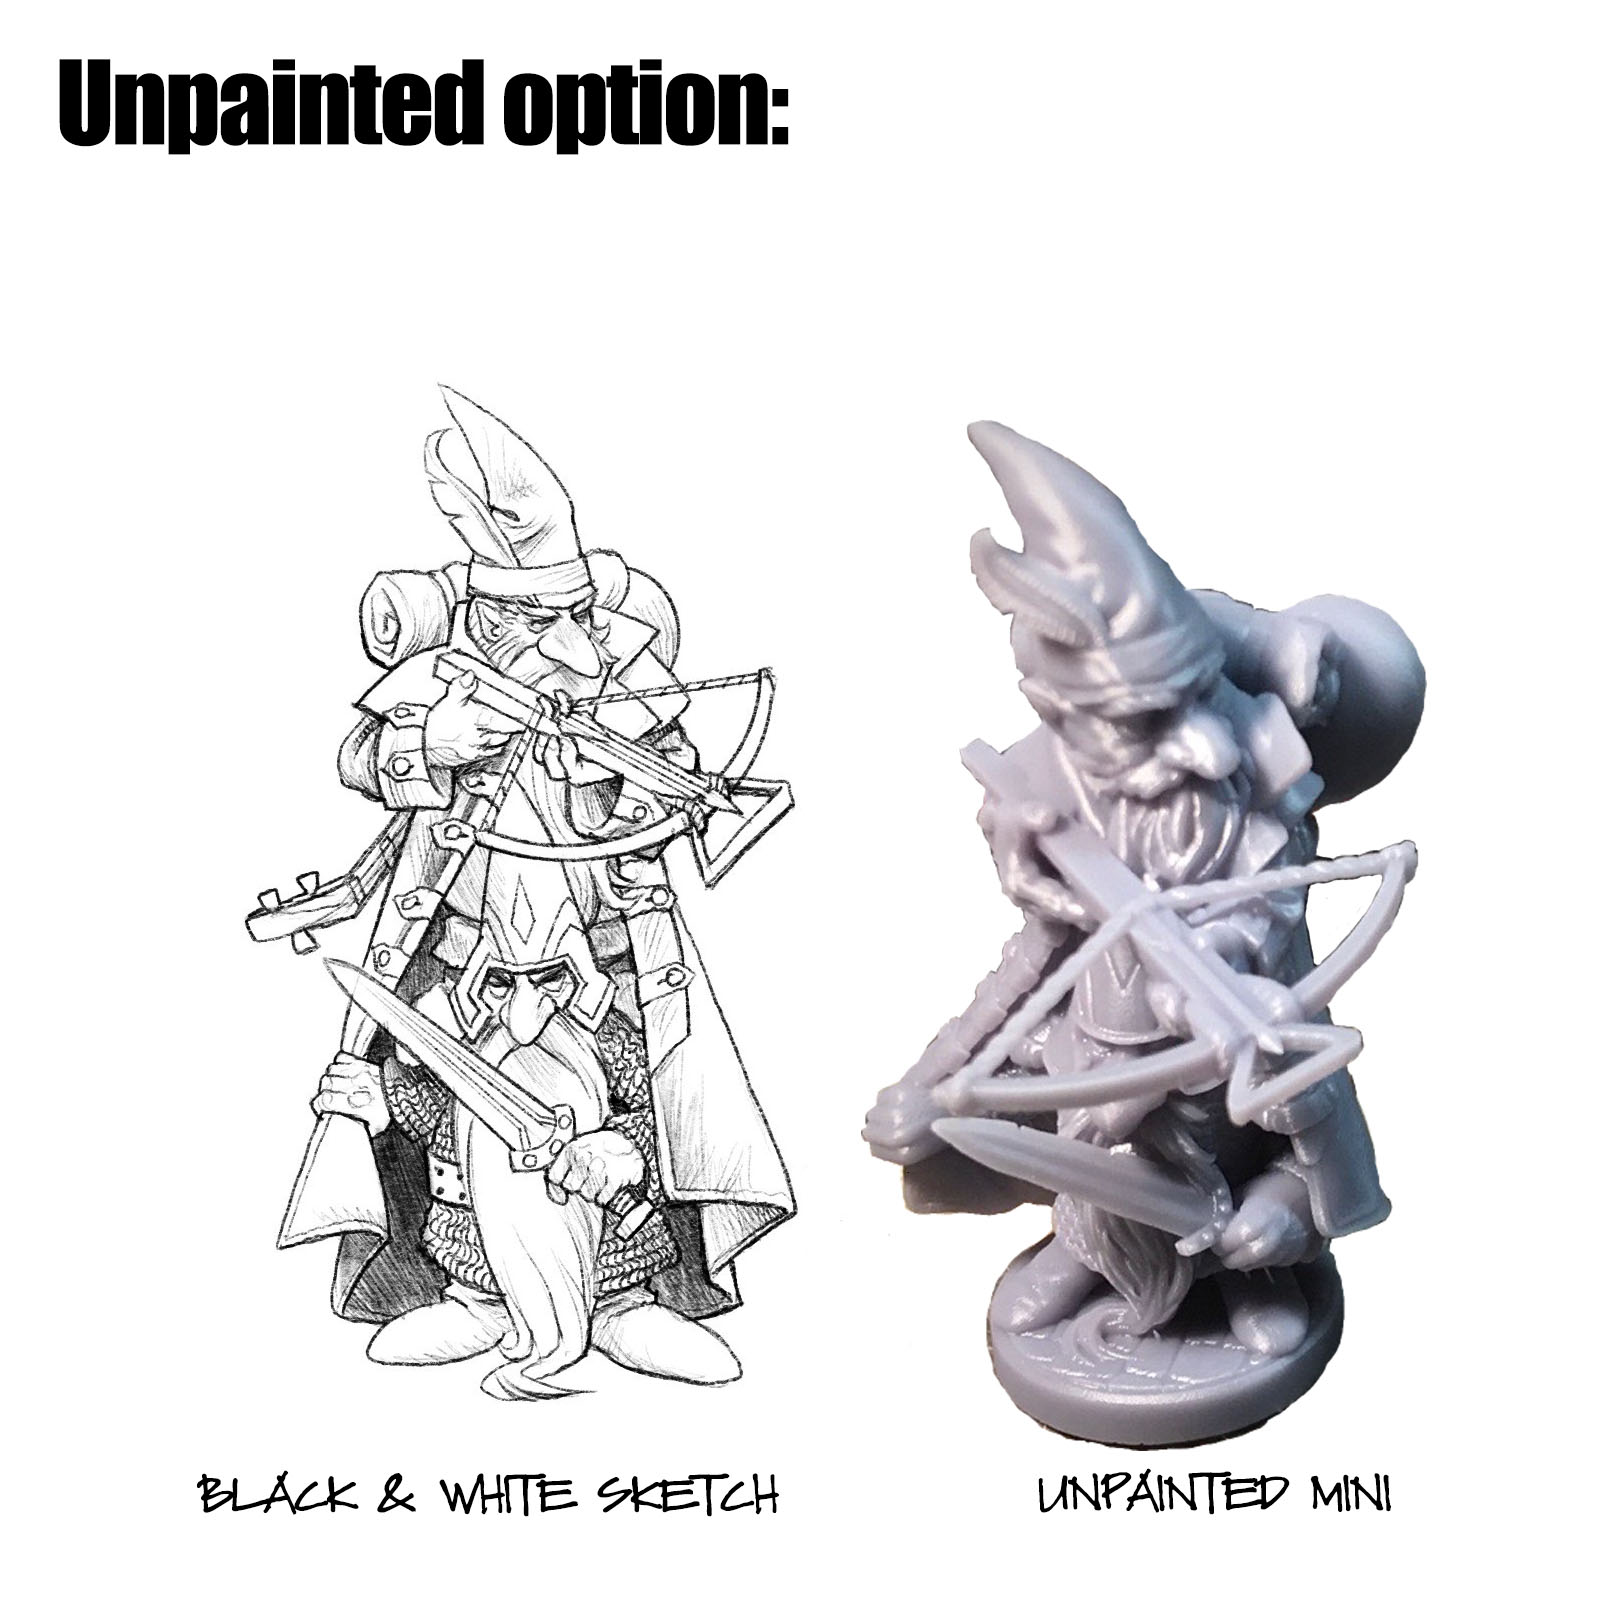
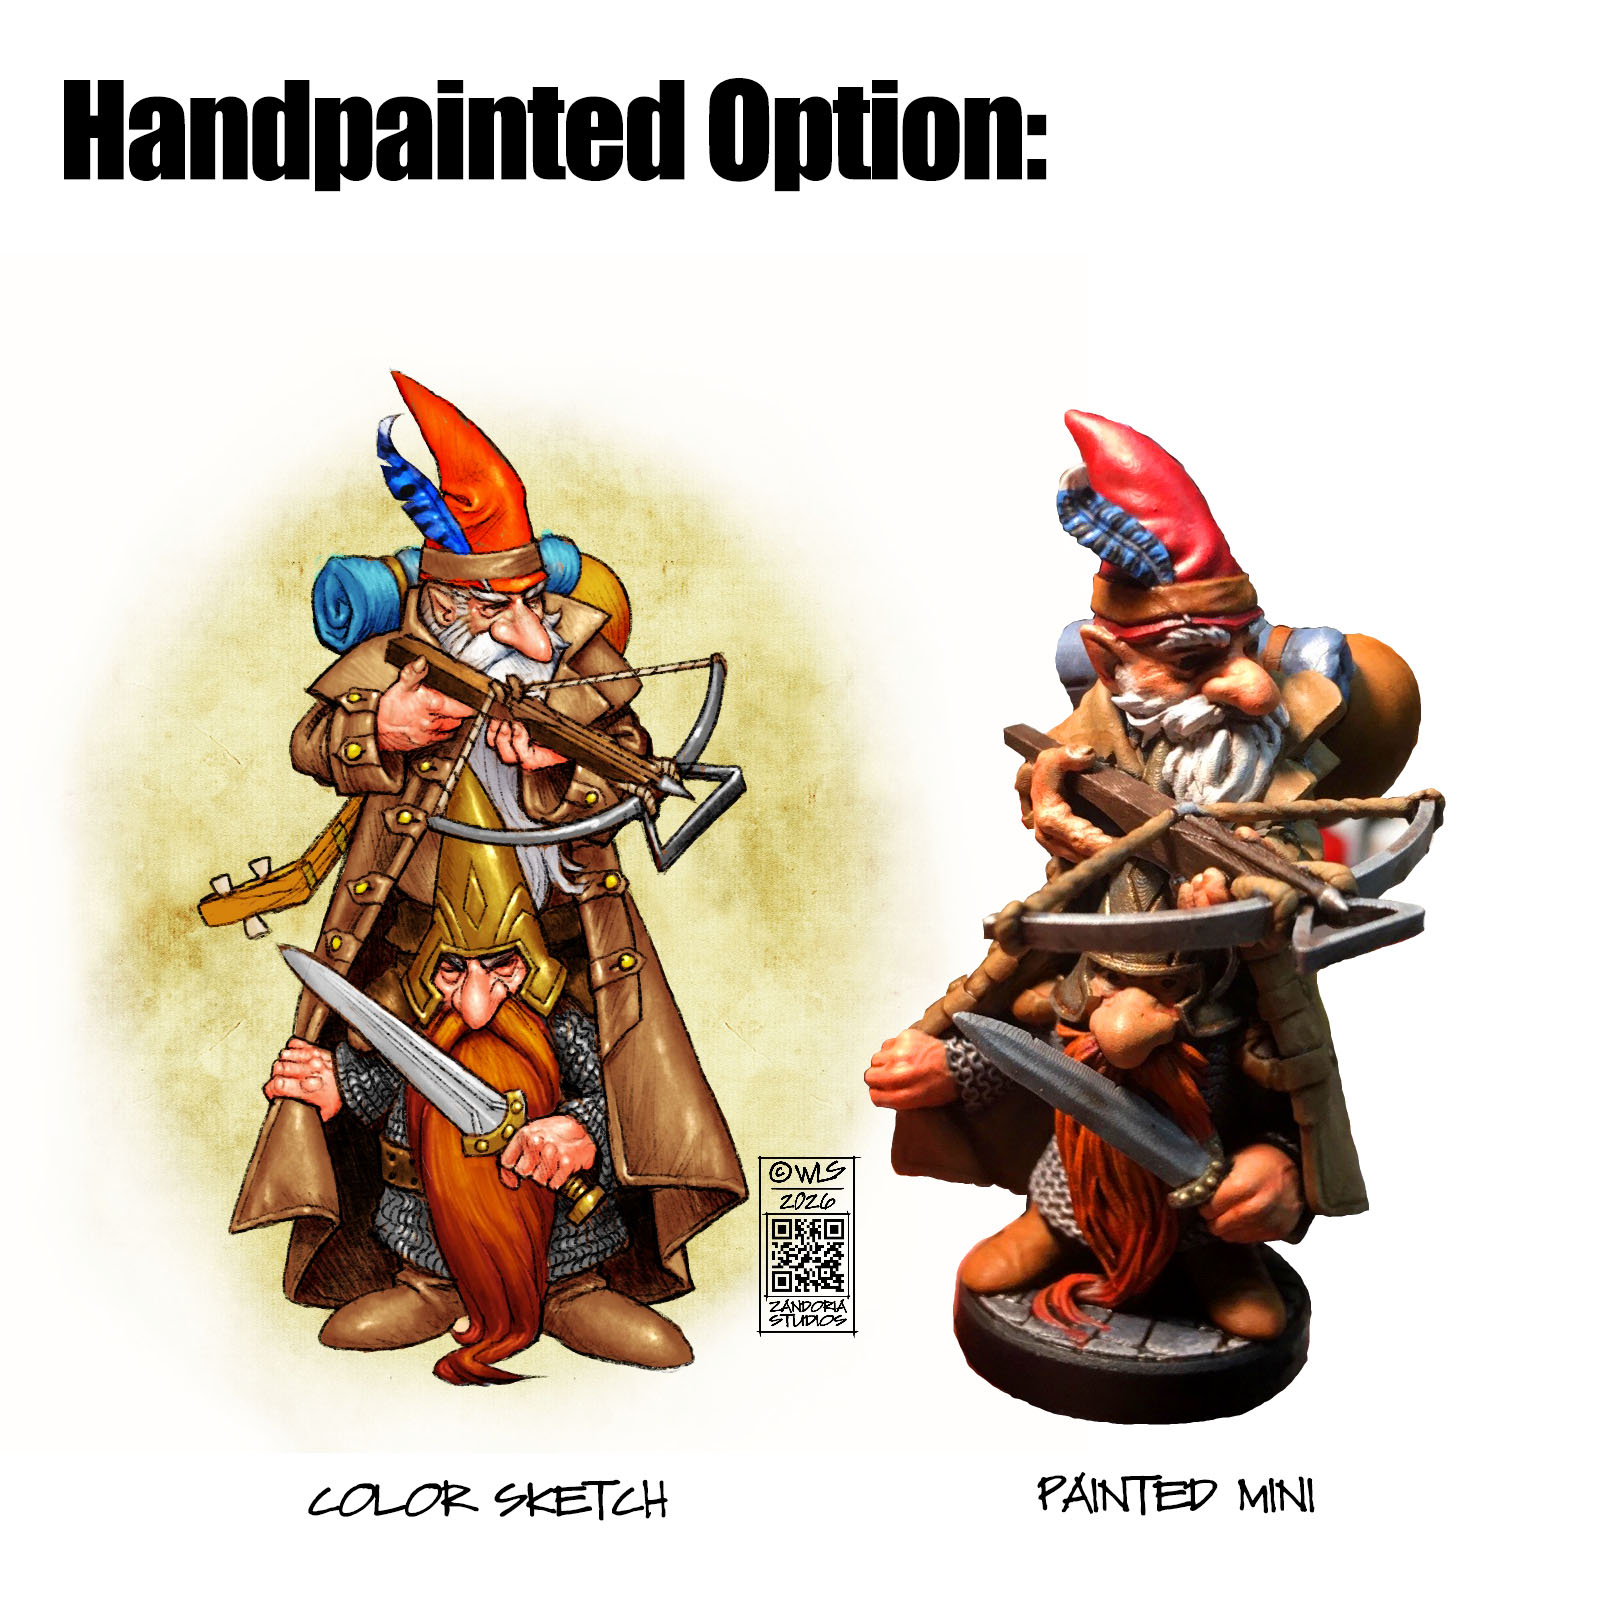
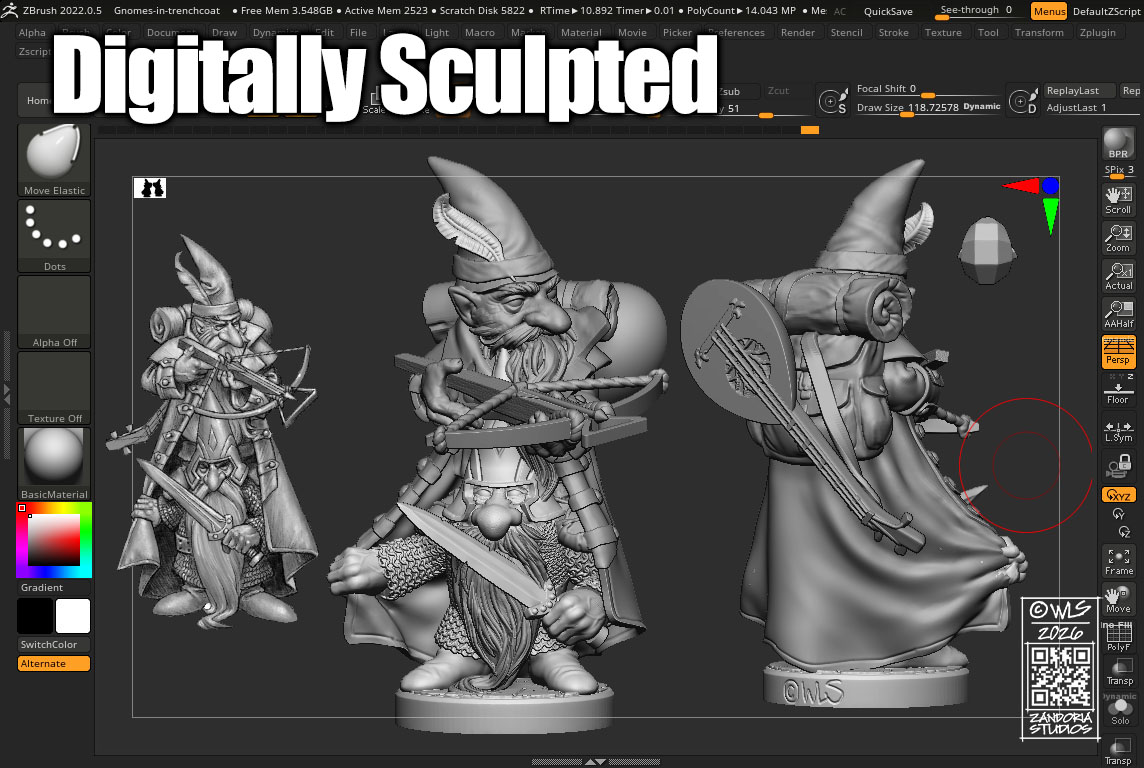
Based on your character description, I will sketch out your mini for approval, and then digitally sculpt to bring your character to life!
Since I have to draw your character as part of my process, you also get a character sketch as well as a mini!
I sculpt the miniatures in 1:60 scale which is perfect for Dungeons & Dragons characters. 1:60 means that 1 inch equals 5 feet–this is often referred to as 28mm scale. Because the sculpture is digital, I can also 3Dprint it at different sizes.
With your order I will print a tabletop, D&D sized mini (If you prefer what is know as “Heroic” sized, let me know) as well as a larger 200% sized one for display. I will also provide a copy of the STL file for your personal use.
I’m offering this custom mini commission in an UNPAINTED or HAND-PAINTED option. If the listing is SOLD-OUT, just check back the next week–I am limiting the QTY so that there is only 1 spot available at a time.
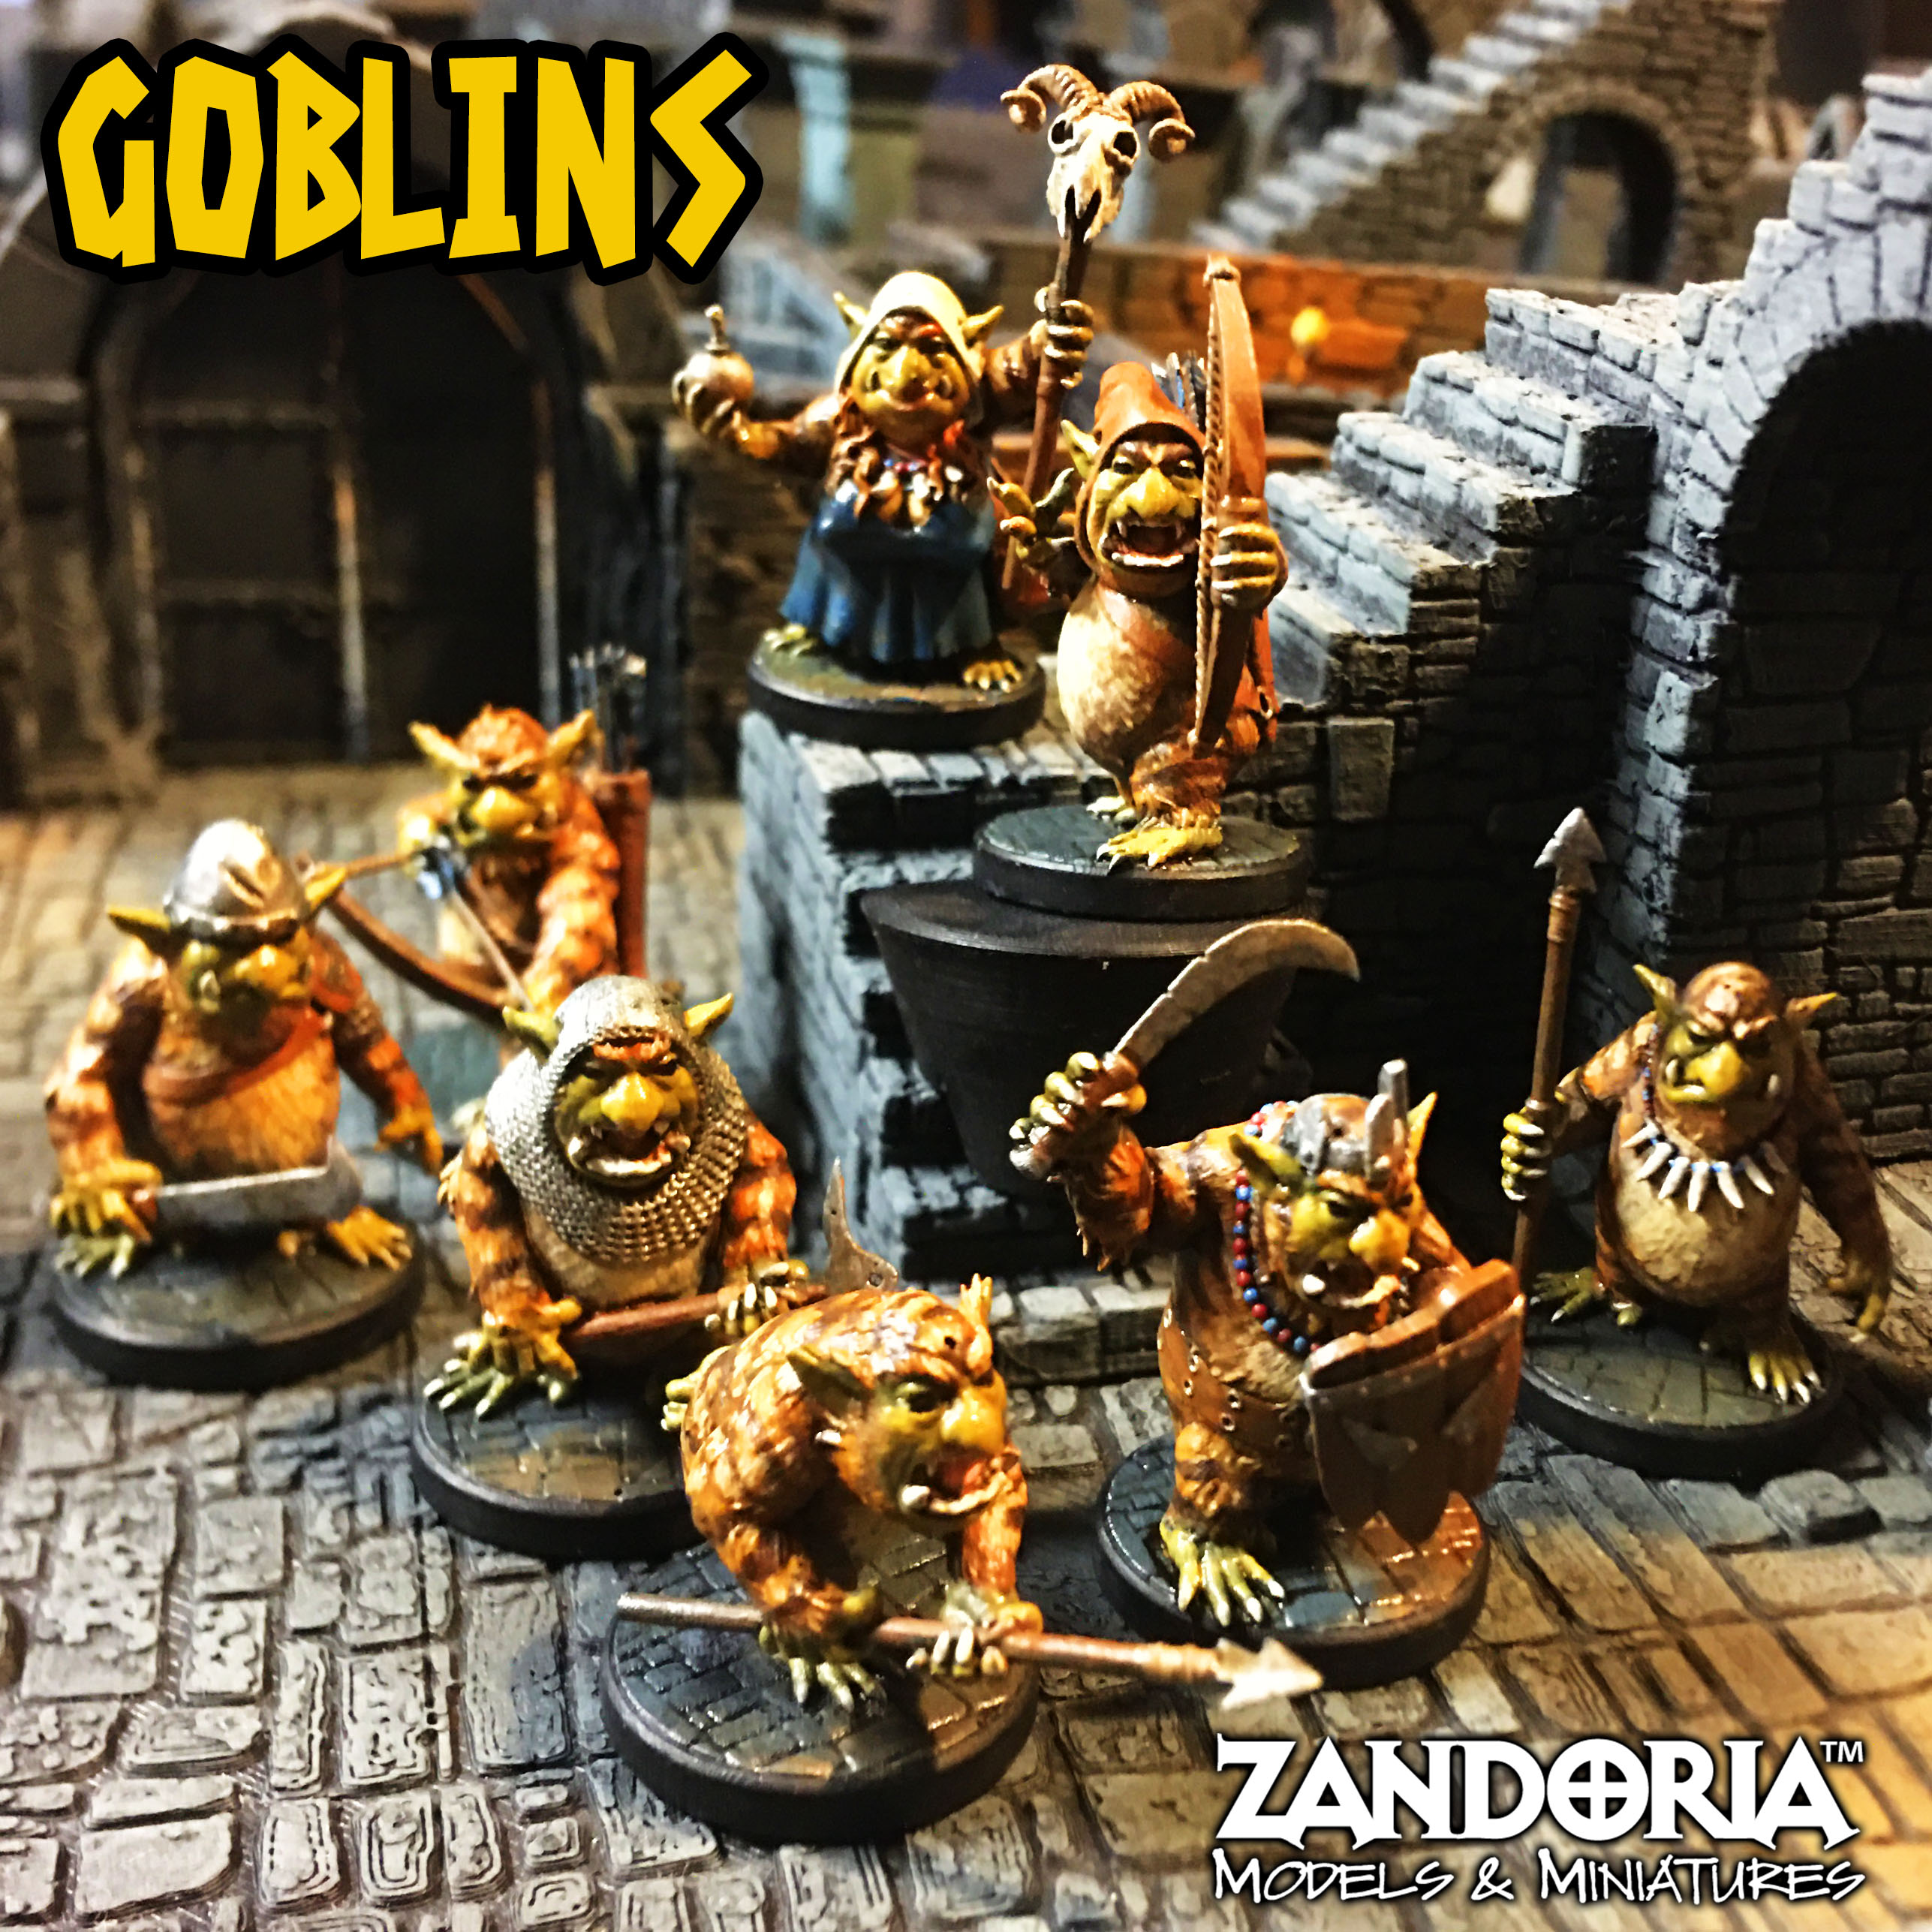
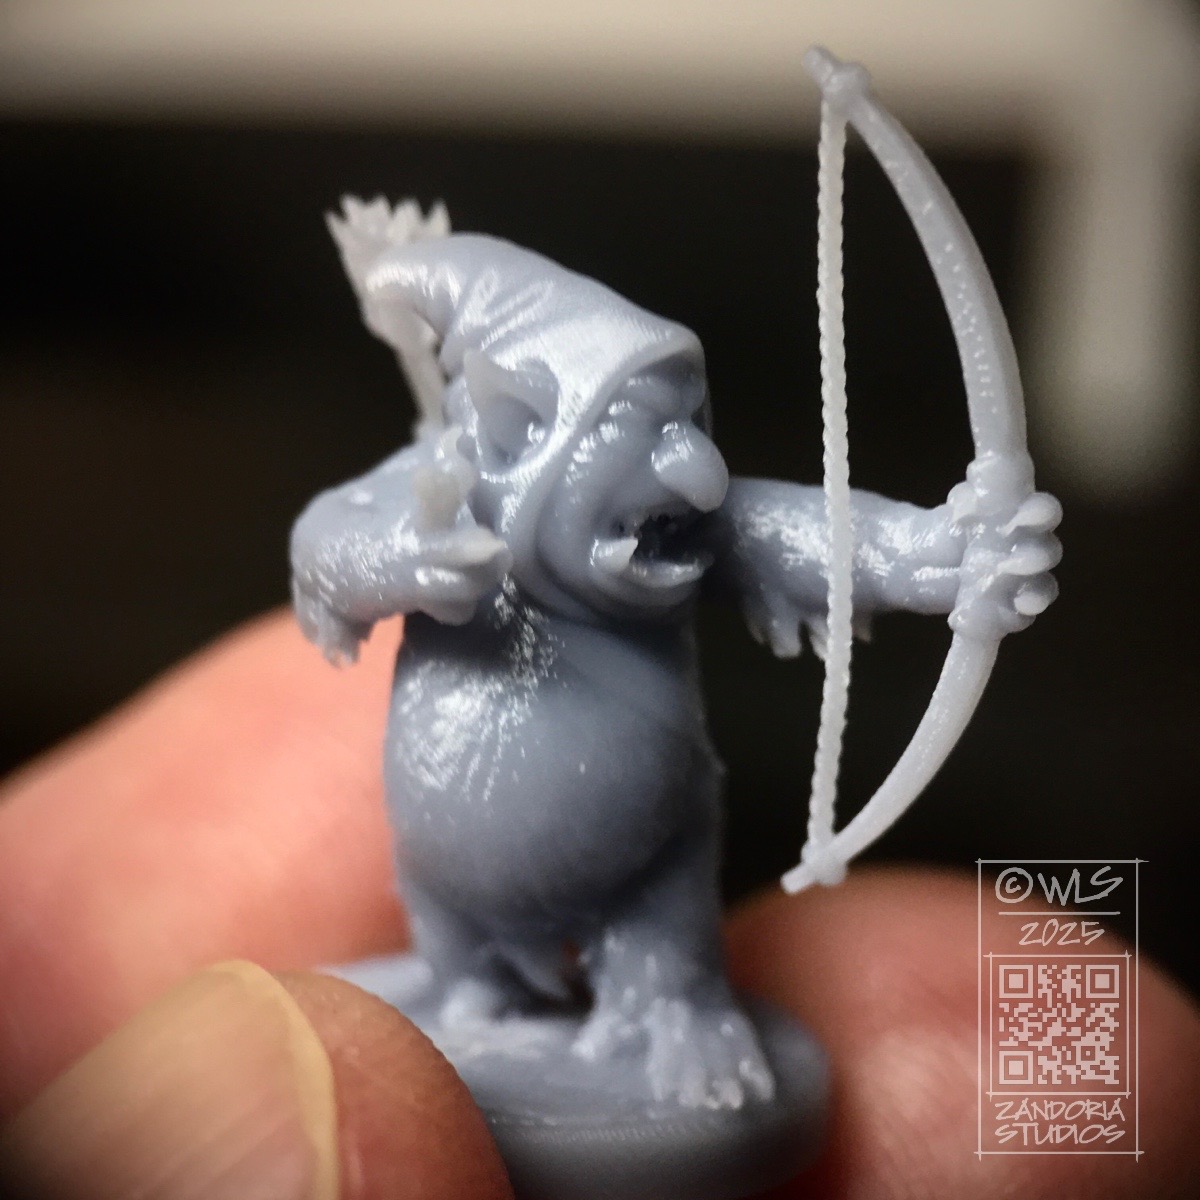
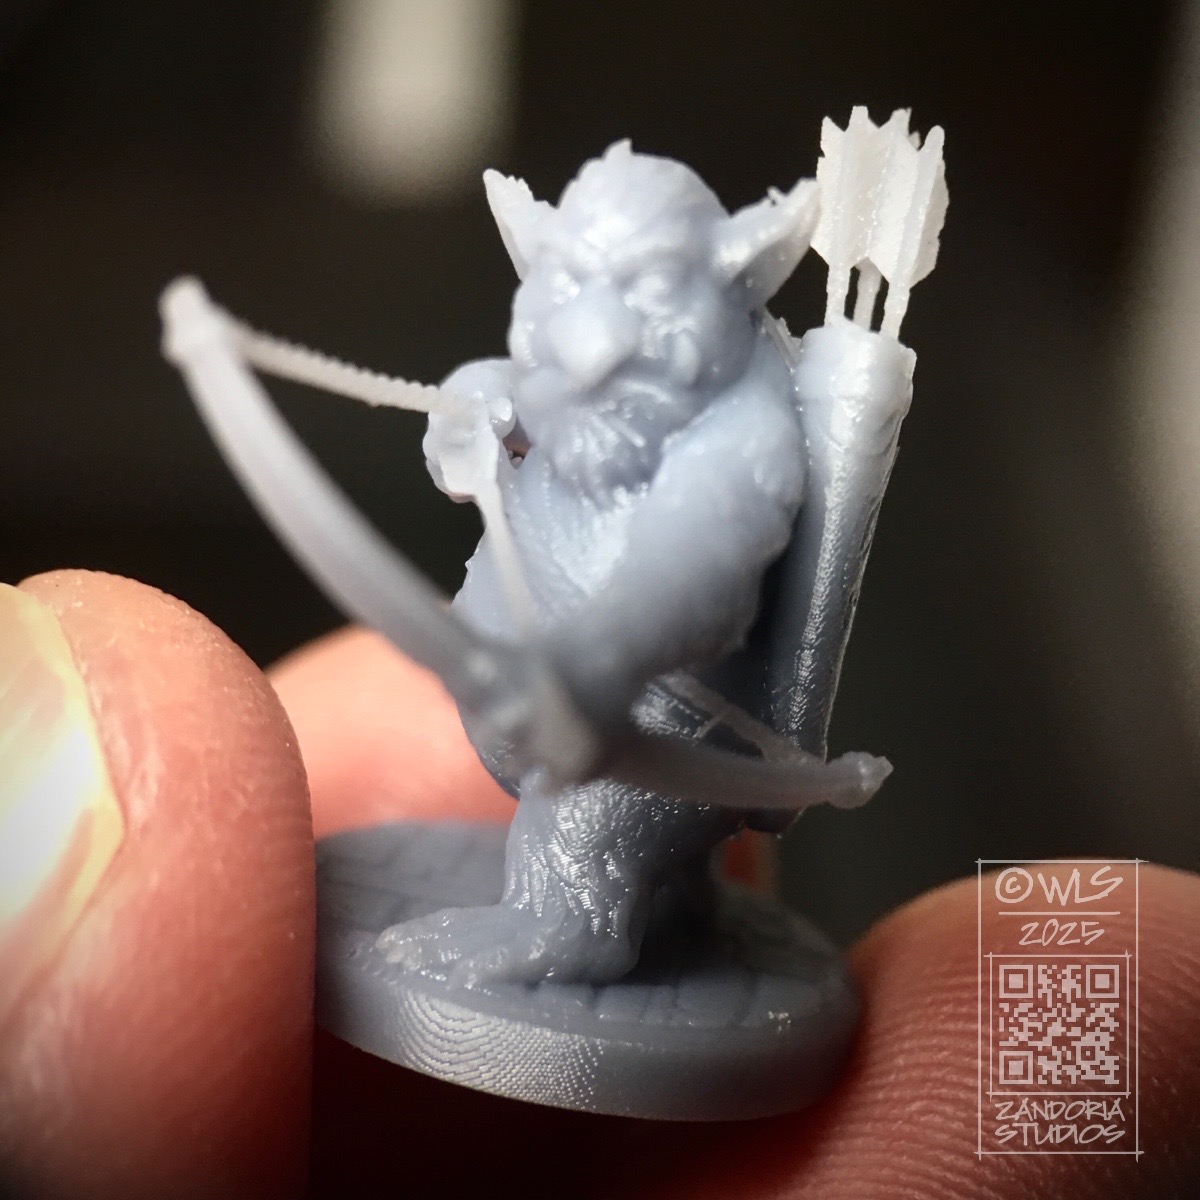
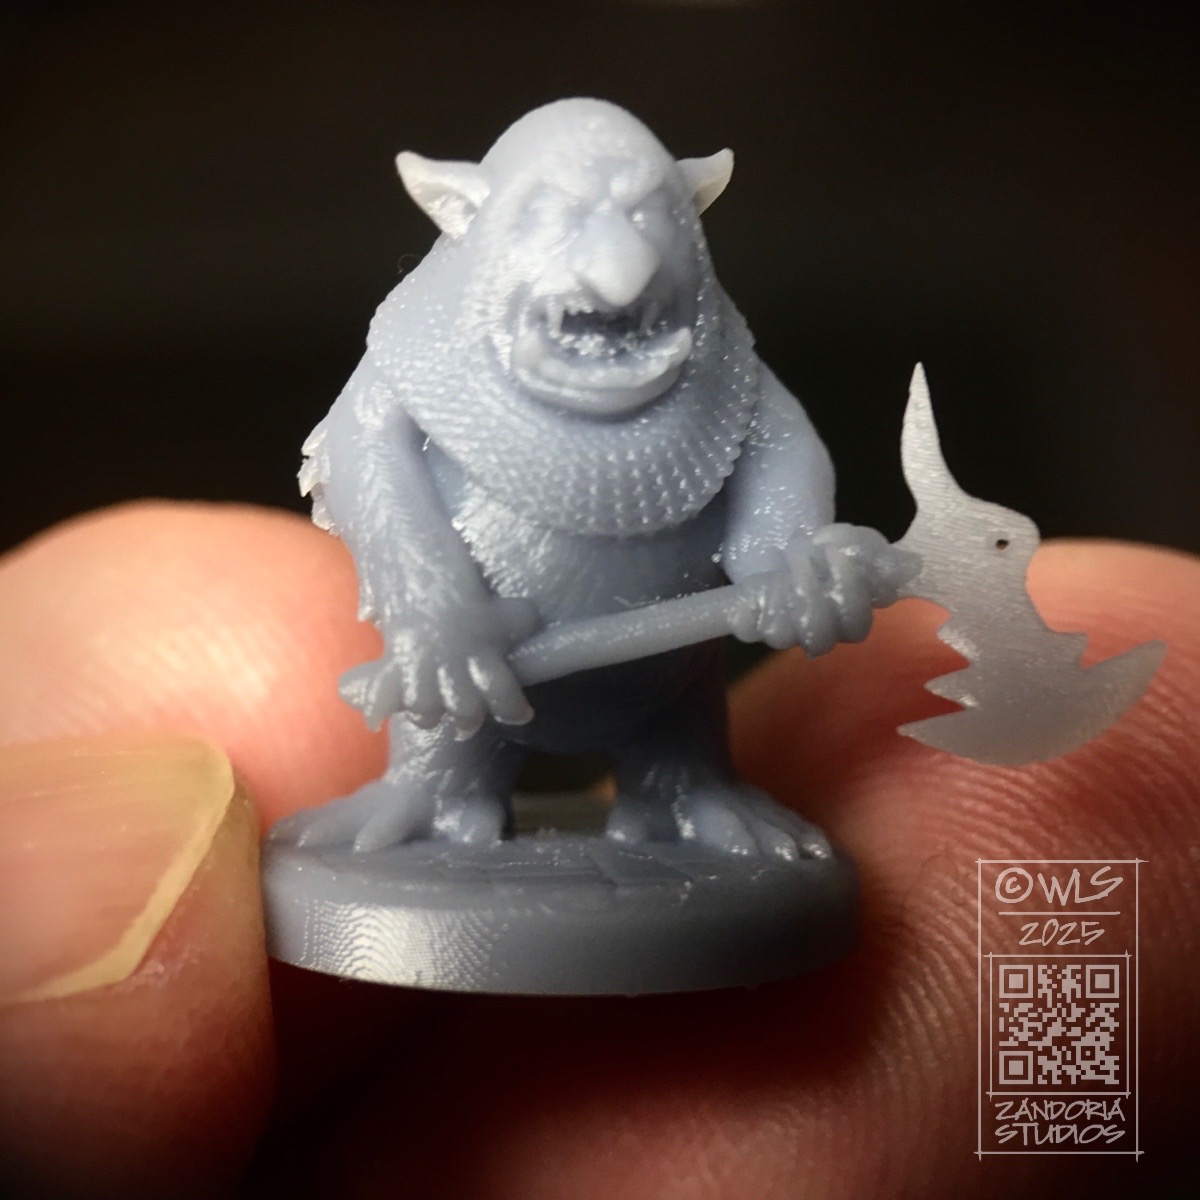
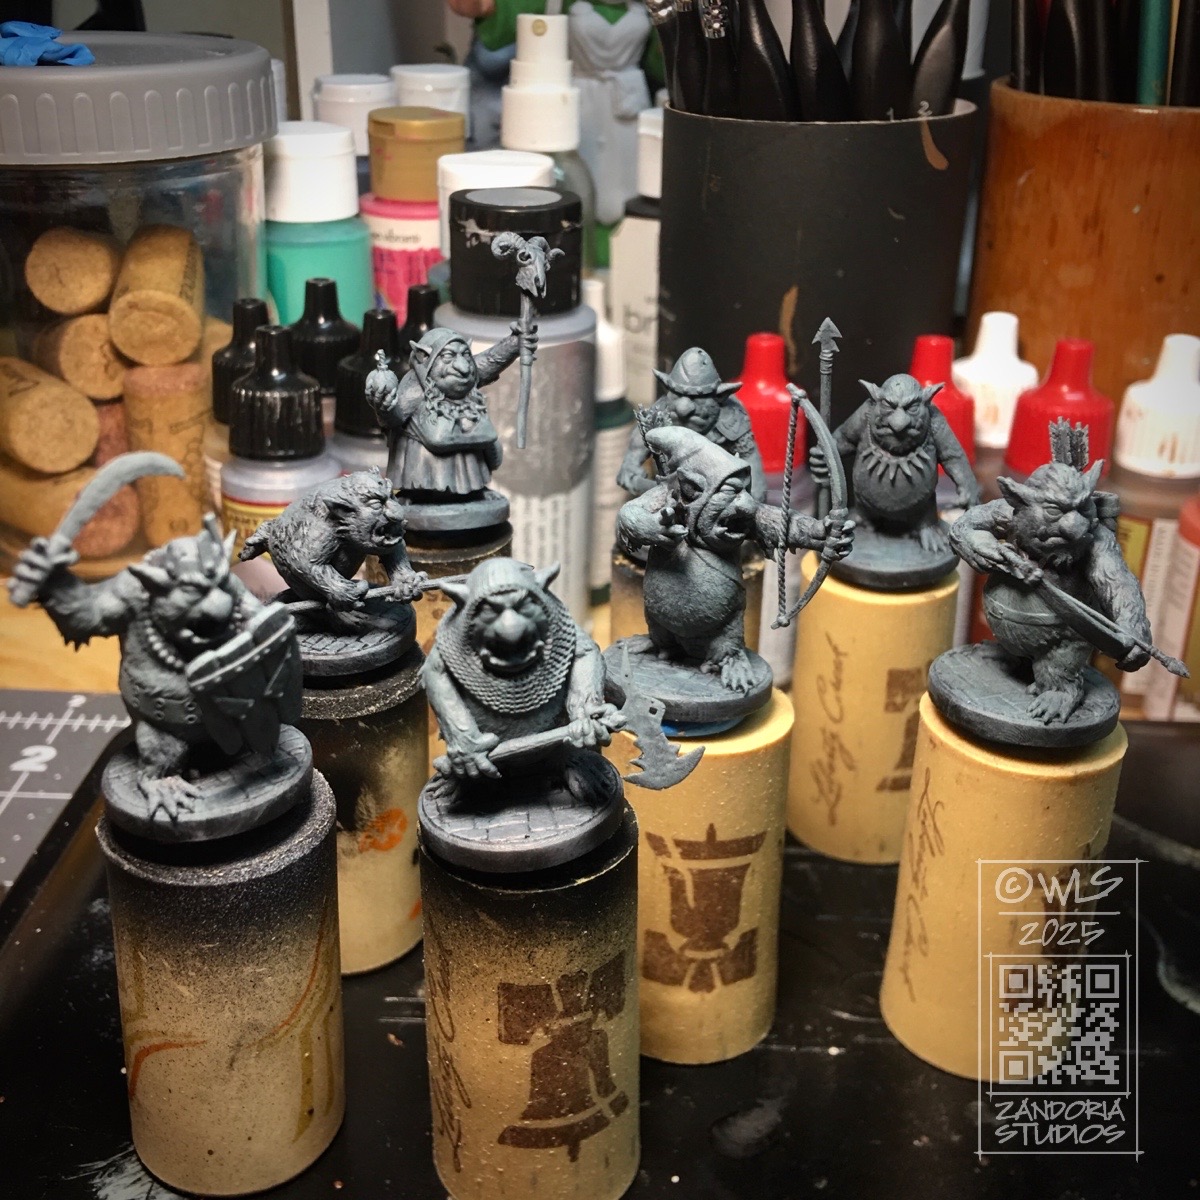
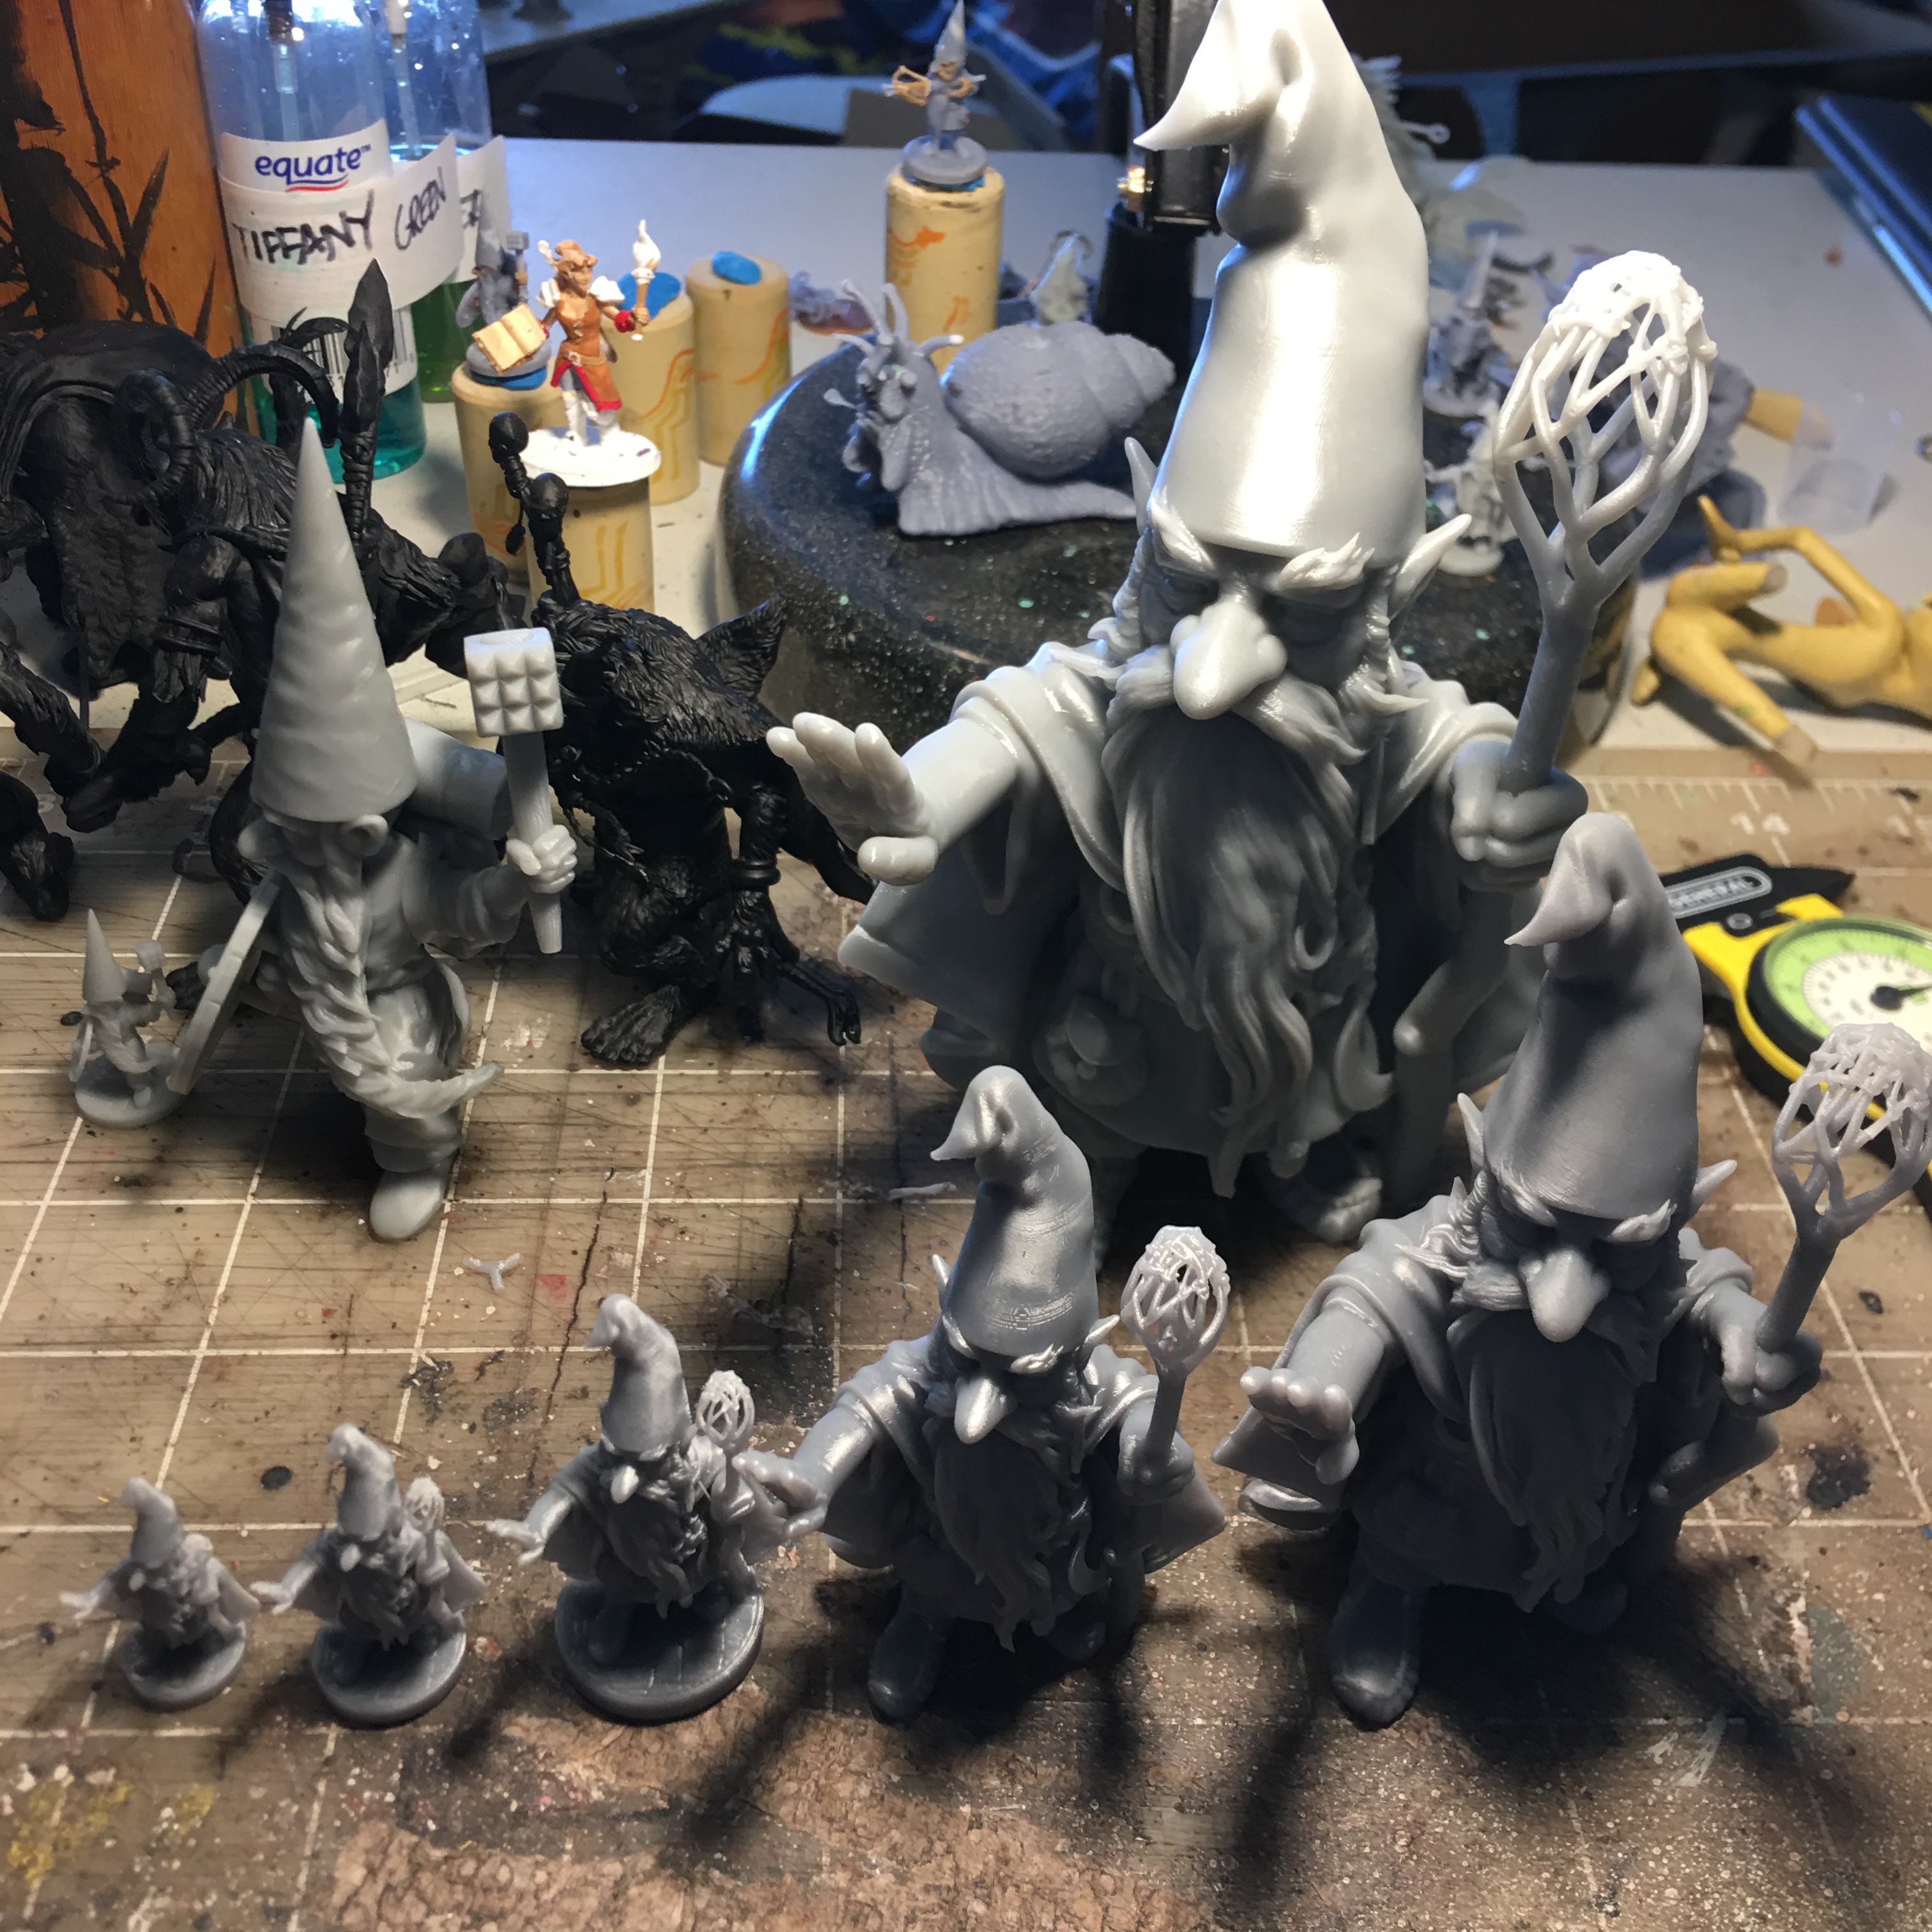
This is a set of 3Dprintable goblins that I just finished. They are bestial and vicious, covered in fur, with large teeth and claws. Their weapons and armor are scavenged scraps that they have collected from raiding,
Goblins combined foul and stinky substances from their caves–batshit, sulpher, ashes–accidentally discovered a crude gunpowder, and invented the goblin bomb! This goblin mother is the leader of her pack. She has a bomb in one claw, and a magic staff topped with a goat skull in the other.
There are 8 different goblins in this set. I have them available in resin on my shop, or you can also buy the files to print them yourself.
Playing D&D is great fun, and I have been adventuring with my friends for many years. We have always played the game around the table with just our character sheet, notes and dice. The DM might have a hand drawn map, but for the most part all encounters are just described in what is called the Theater-of-the-Mind style of play.
TotM can lead to confusion. “Wait, how many goblins are left?”, or “I said I was hiding behind the pillar!”, or the classic: “I didn’t ask you how big the room is–I cast Fireball!” Many of the rules in D&D are very tactical in nature. Players are aware how many feet they can move per turn, their weapon ranges, what the bonuses are for 1/2 or 3/4 cover, and are constantly peppering the DM with questions to clarify the described situation. Miniatures solve many of these issues.
With terrain and miniatures, it is very easy to see who is in the area of effect when the Fireball spell goes off. Miniatures provide clarity vs. chaos, save time and avoid unnecessary arguments.
Theater-of-the-mind may be great for most D&D encounters, and some players think that playing with minis will make the game feel too much like a boardgame. This is a valid. If the Dungeon Master gives a great description of the boss encounter, it can really come to life in the players imagination. However, what gets imagined is going to be slightly different for each player….
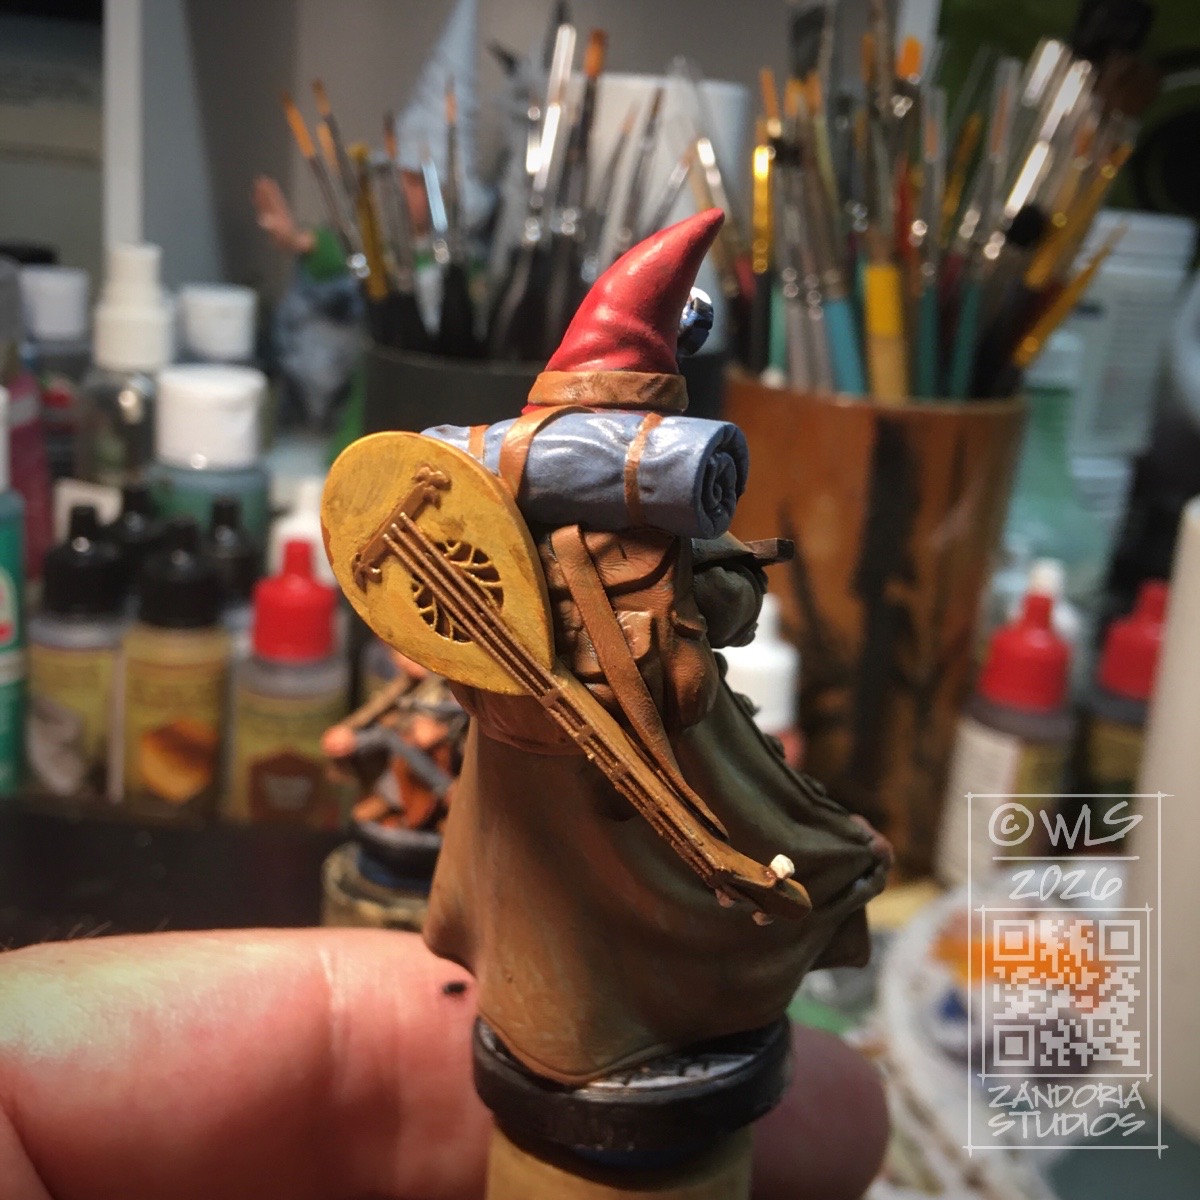
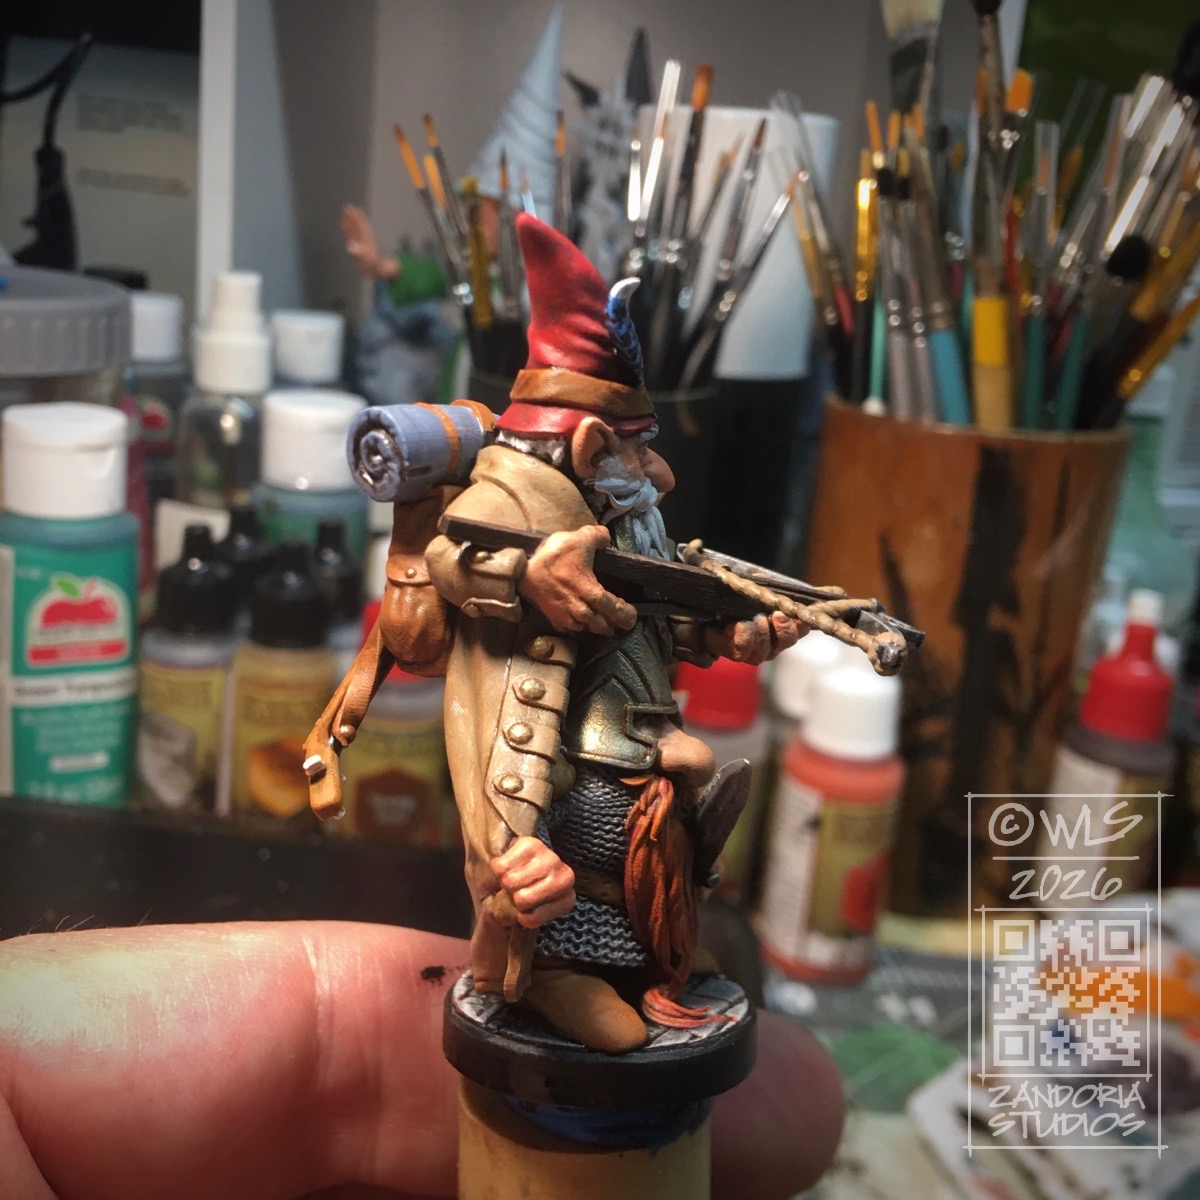
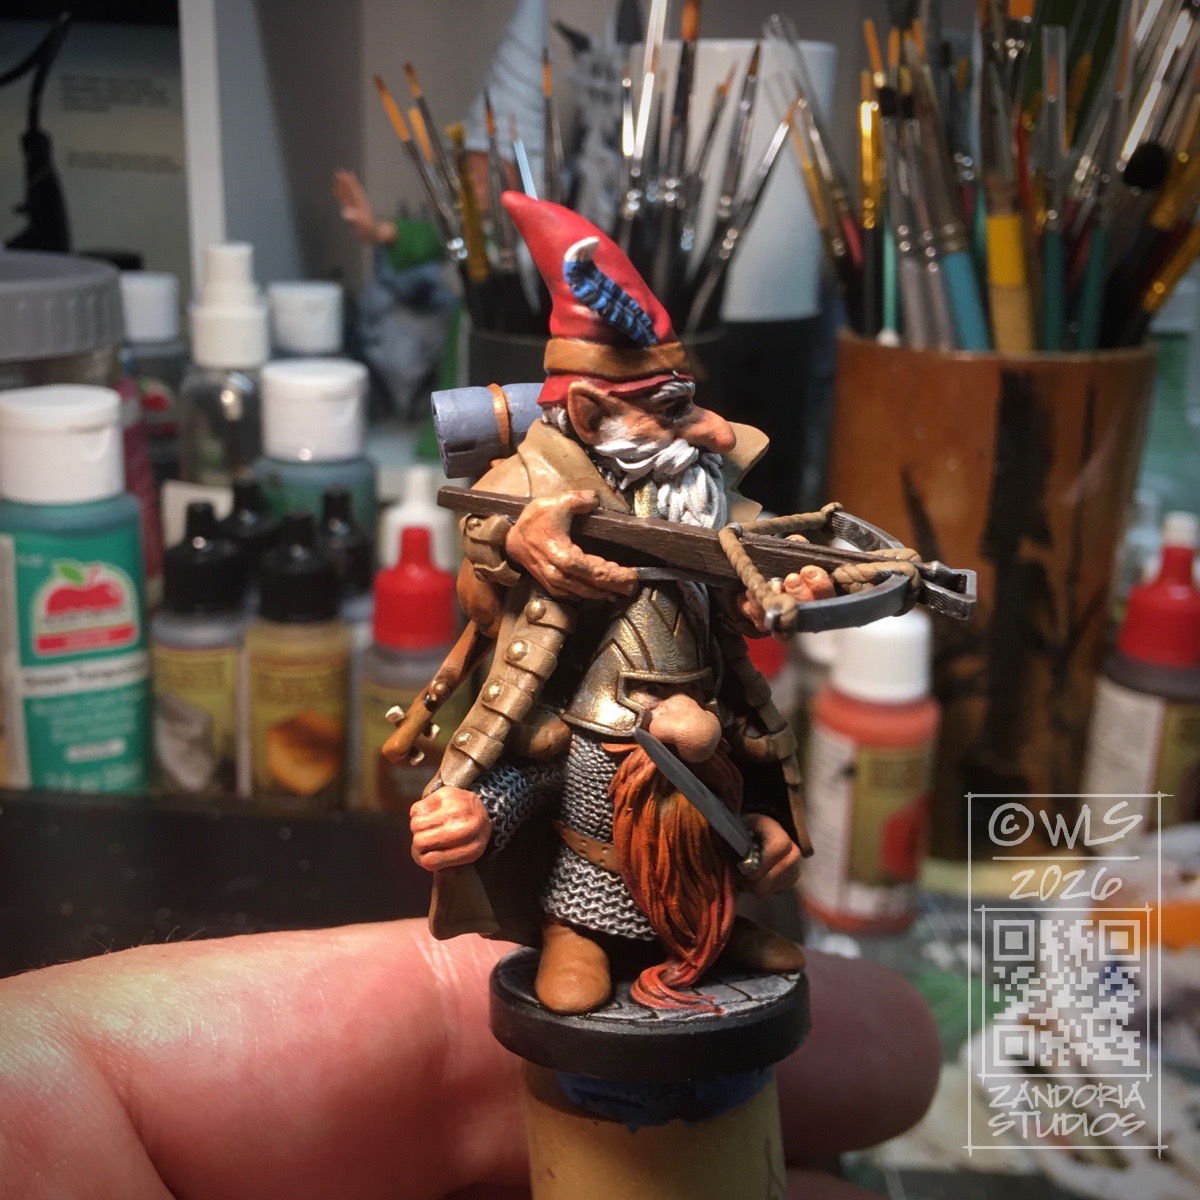
This party of gnome adventures is exploring the room, when behind them they hear the scrape of stone on stone…
The Dungeon Master says, “You turn and see a large mountain troll, with a stone axe”. As a player you may wonder what a mountain troll looks like, or how big it is relative to you; whether you should start running or draw your sword.
The DM says, “roll initiative” ominously, as he places the mountain troll mini onto the table. The players eyes go wide. They see it’s size. The immediate, visceral understanding of the threat is an “oh $#!%” moment.
Don’t just describe the threat. Make them feel it…
The moment you place that troll on the table, the game’s tension skyrockets. It is no longer an abstract concept; it’s a physical problem they need to solve. Miniatures are not mere game pieces, but are tools for creating sharper, more dramatic, and more memorable stories at your table.
These are all miniatures and terrain that I have sculpted, and are available in my shop
Maybe you are a “Theater of the Mind” player that has avoided using minis and terrain… Sometimes there just isn’t room on the table for terrain. I see very impressive 8′ long tables with thousands of dollars worth of Dwarven Forge tiles, and while it looks awesome, it just isn’t going to work for a group of players at the kitchen table.
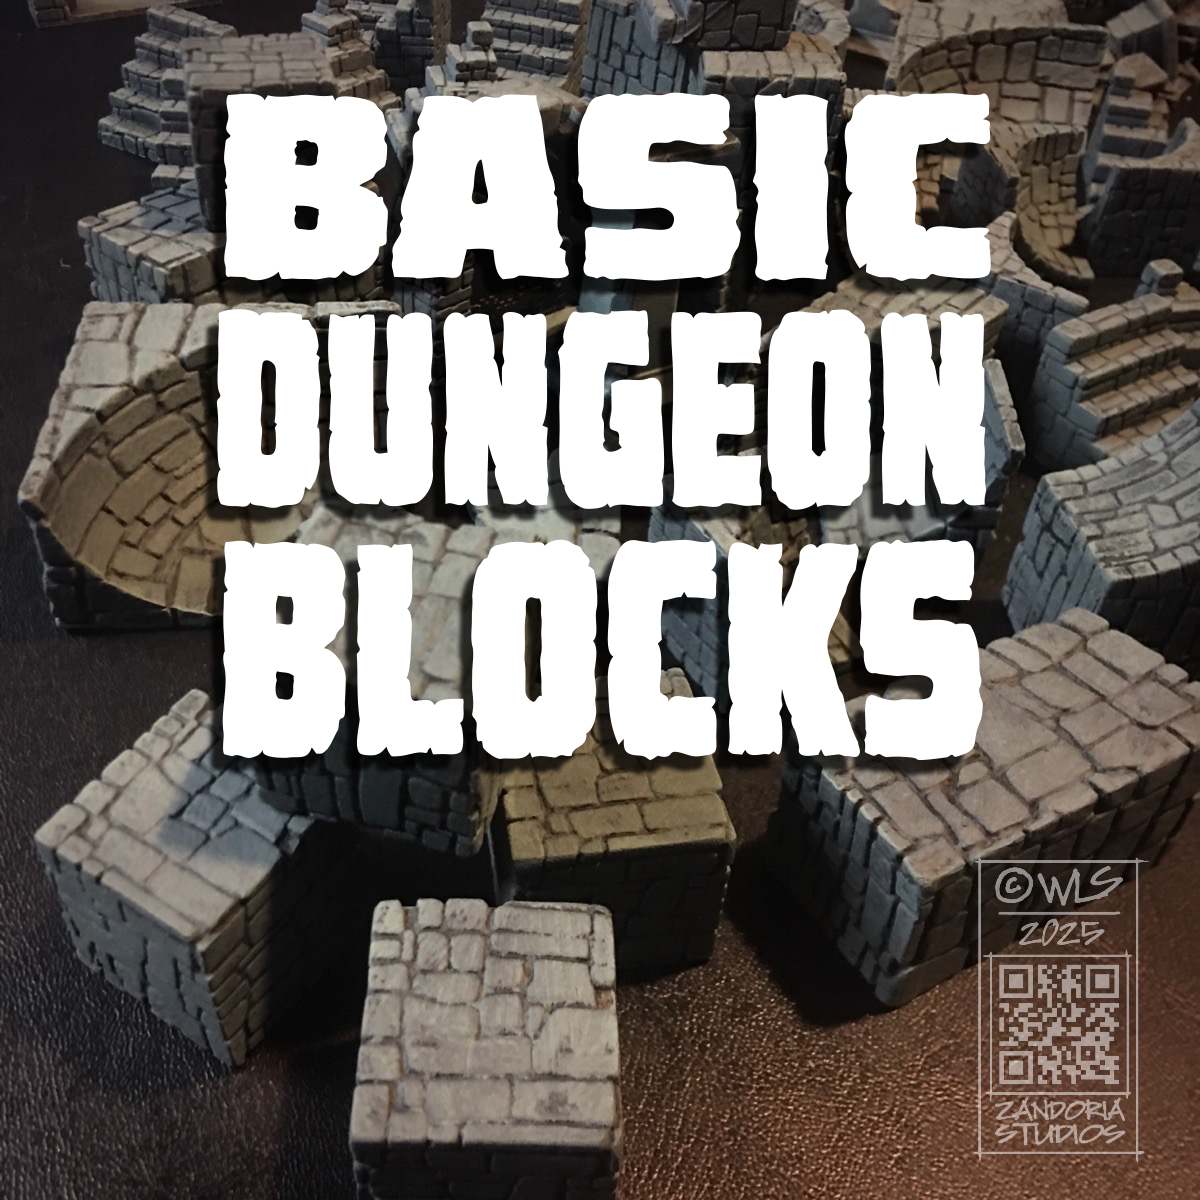
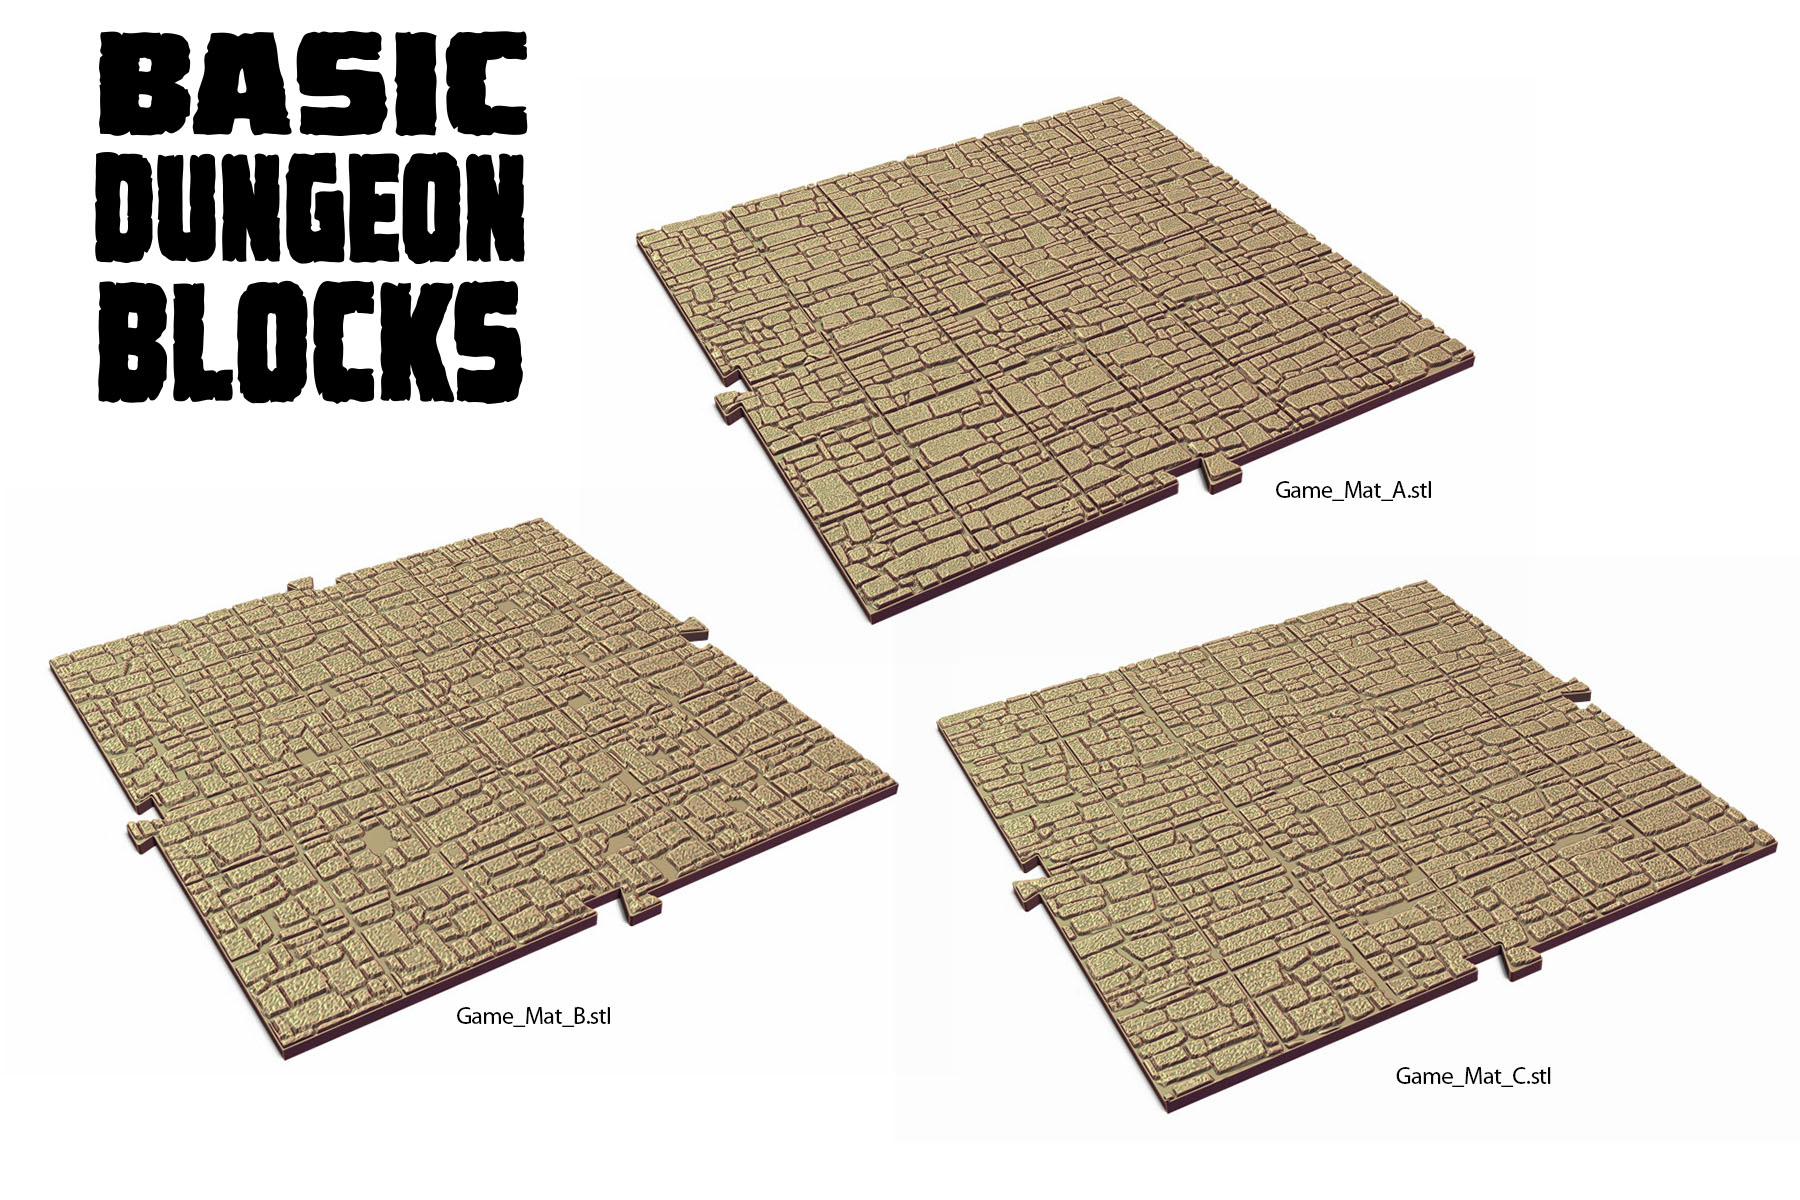
While a dry-erase mat is a good compromise, it lacks the appeal of seeing your carefully painted minis in their natural setting–the Dungeon. I felt there was a need for something small and simple, that would allow the DM to quickly layout the map for a combat encounter or boss battle. That led me to creating these Basic Dungeon Blocks. You arrange them and stack them just like children’s toy blocks!
They are simple building blocks based on a 1″ cube. There is also a game mat made from 6″ tiles, so that you have a gridded surface to build and play on.
Using these building blocks, you can quickly layout the dimensions of the room or corridor. How many times have you had a player insist that they weren’t in the room when you asked their character to roll a saving throw? Having some terrain and minis avoids confusion and allows the DM to be clear with the obstacles that the characters are facing.
There are a variety of Blocks, stairs, arches, doorways (with working doors), pillars. Even curved blocks for building a sewer–Or a Dwarven Skatepark! And because they are based on 1″ cubes, they can also be used with ANY other terrain system (such as PuzzleLock Dungeon II) to customize an area.
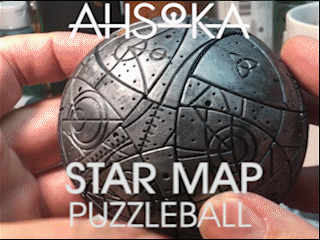
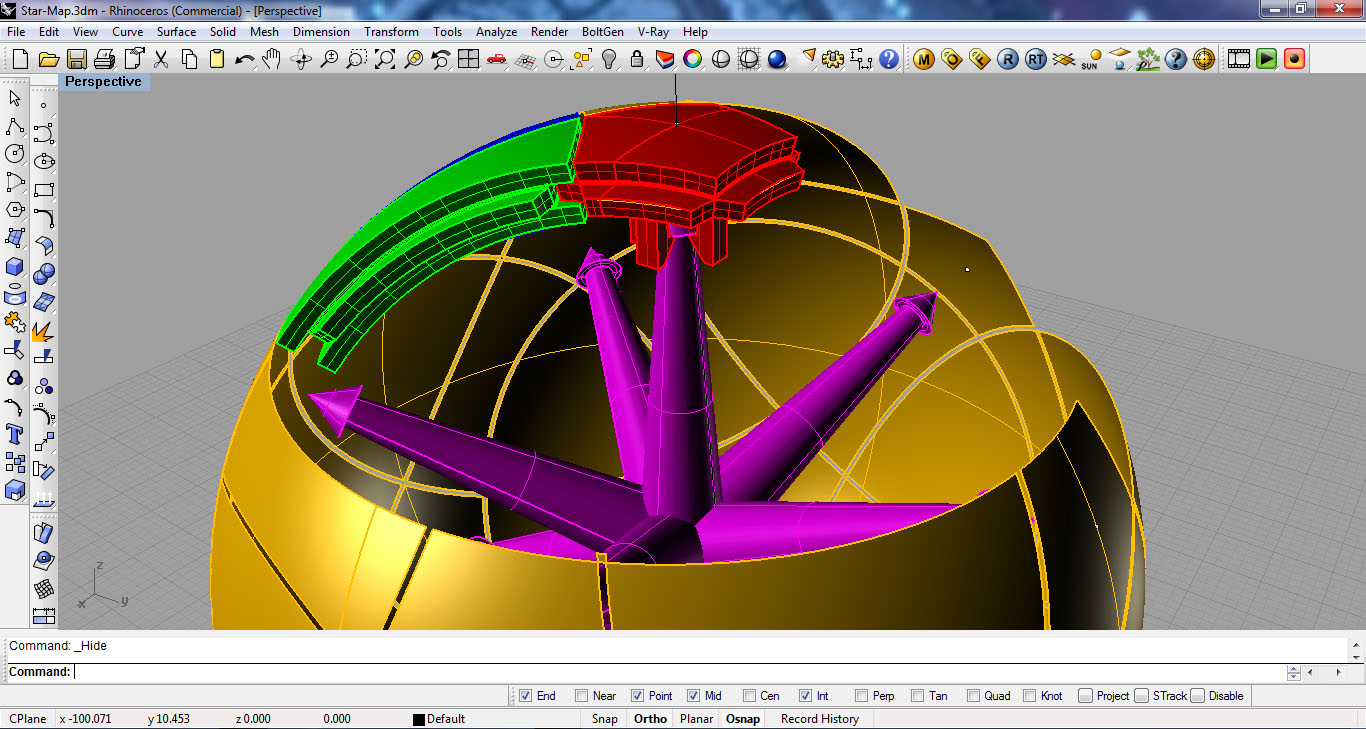
When I first saw the Ahsoka Star Wars show, I was fascinated with the Star Map prop. I thought it would be awesome as a 3Dprintable project. It turned out to be very challenging to engineer the pieces. there are 62 moving parts and 12 axis of rotation!
The prop in the Ahsoka TV show seemed to be a repurposed Megaminx puzzle with engraved star map. I couldn’t find a Megaminx ball (it looks like it was last manufactured in 2008), so I had to figure out how to interlock the shapes as well as how to make it work.
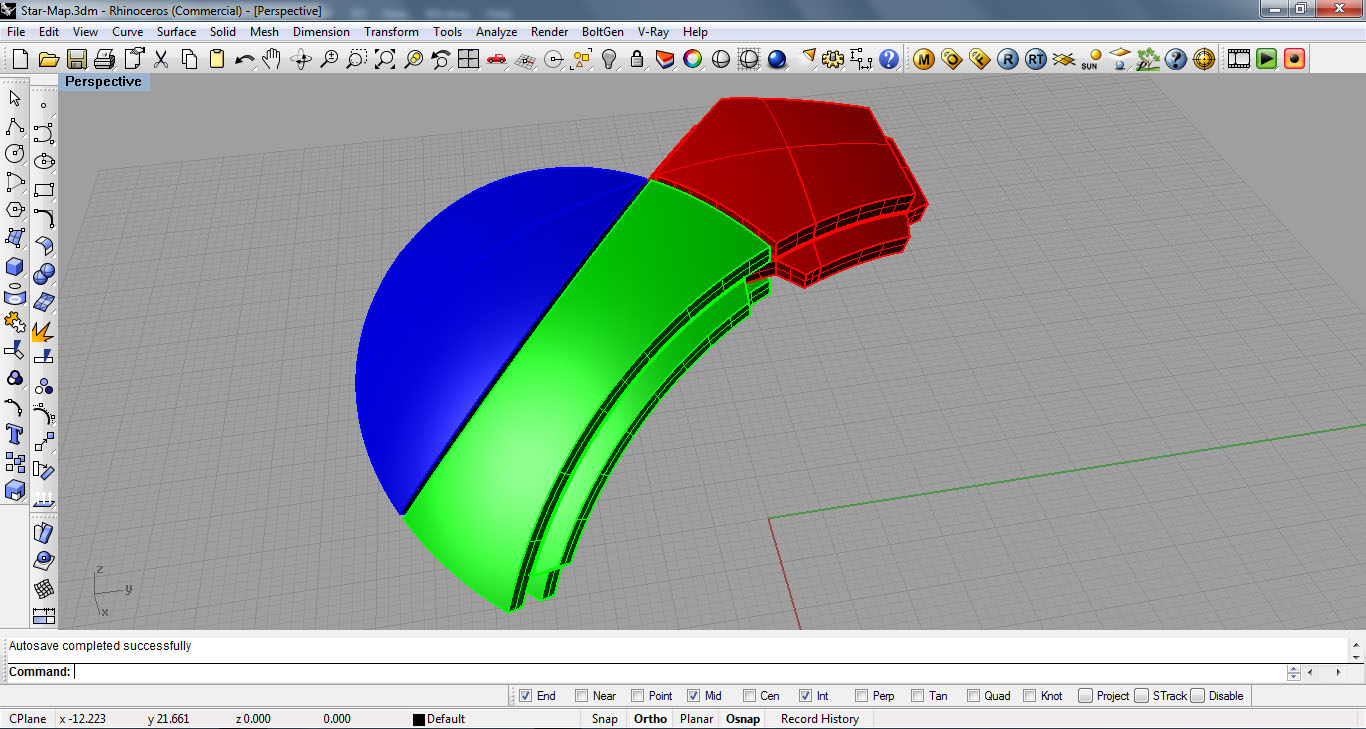
I started in Rhino with an 80mm sphere. The main pieces are just 3 parts, arrayed around the puzzle. The 5-sided shape is the cap at the axis of rotation. I called the 3-sided shape a “petal” and the 4-sided shape the “rib”.
My first iteration fit together, but wouldn’t spin or slide… so I ended up tweaking and revising until I got a version that would work.
Once I had printed a version that would work, I had to figure out how to draw the star map. Rhino only had a limited ability to draw a curve on the surface, so I had to draw a curve interpolated on the surface and then snap to the points on that curve to draw spheres that I could intersect to create the circles on the main sphere.
I piped a tube around those circular curves to create geometry that I could boolean subtract from the final pieces. Such a boolean operation would easily crash my computer in Rhino, so my plan was to export all of the geometry into ZBrush and use the Live Boolean feature.
From the Umesh results, I first autogrouped the parts and gave it a name before splitting it to subtools. this gave me each piece as a separate subtool, named sequentially. Then I used the 3Dprint Exporter to save as STL using the subtool names!
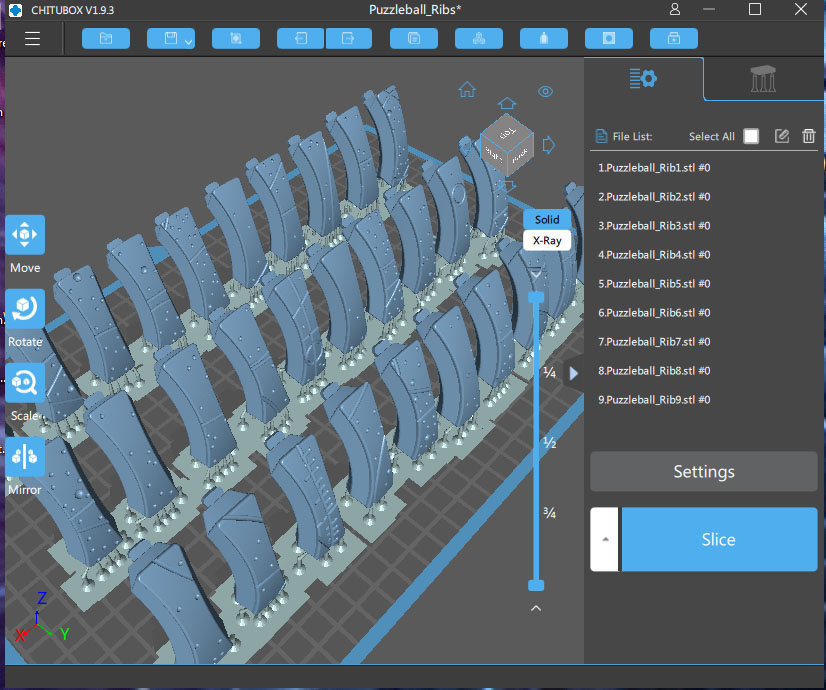
In Chitubox I created a separate project for each type of piece: Axis, Caps, Petals and Ribs. I 3Dprinted all of the pieces in ABS resin. I also saved the Chitubox projects with all of the supports, so that I could include the pre-supported files along with the STL files. Since all of the files exported in their final orientation on the model, they had to be rotated and positioned on the build plate–I didn’t want to make the customer have to do all of that!
Here is a video of how to assemble. I used some graphite lubricant (it is a very fine black powder) on a Q-Tip to swab the v-shaped notches on the Petals and Ribs, so that they would slide more freely.
I’m very happy with how it turned out! It works! all of the 62 moving parts slide and rotate just like the one in the show!
If you would like to 3Dprint this project, the files are available here on Cults3D.
For 3Dprintable files of my work, I have decided to sell the exclusively on Cults3D. I have been on there since they first started, and I think that it is the best platform.
Here are some facts about Cults, from their website:
Created in 2014, Cults is the 1st independent platform in the 3D printable files market (we do not belong to a group).
Today, we have 11.1 million international makers members registered on our platform.
We welcome more than 5,000 new members every day.
The platform currently hosts 2.07 million printable designs and a community of 176 thousand designers specialized in 3D printing.
Our platform is visited more than 200,000 times per day and we have an audience of 7.3 millions visits per month.
We have 55.4 millions page views per month and 3.2 millions unique visitors.
We are translated into 7 languages: English, German, Spanish, French, Brazilian Portuguese, Russian, and Simplified Chinese.
The geographic breakdown is as follows: 50% Europe – 40% America – 10% Asia & Oceania.
I have tried other platforms, like DriveThruRPG and MyMiniFactory, but they do not have the same reach and visibility as Cults, and it just made sense to me to have all of my STL files in one location.
STL files are used to 3Dprint miniatures and terrain at home on a personal 3Dprinter. For physical minis and figurines, those are available from my Etsy Shop.
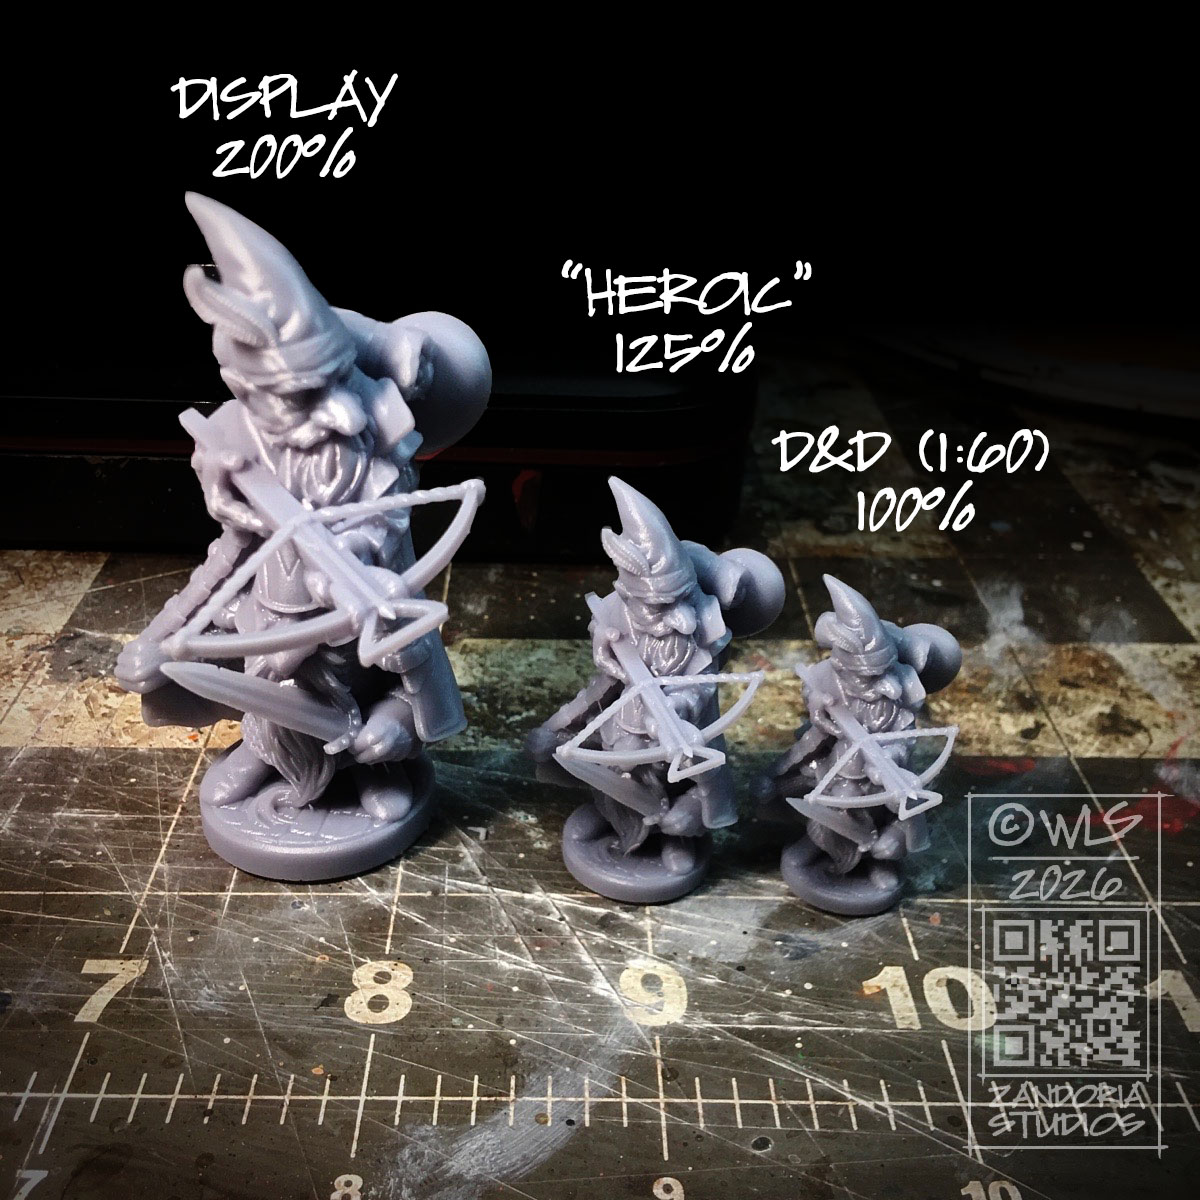
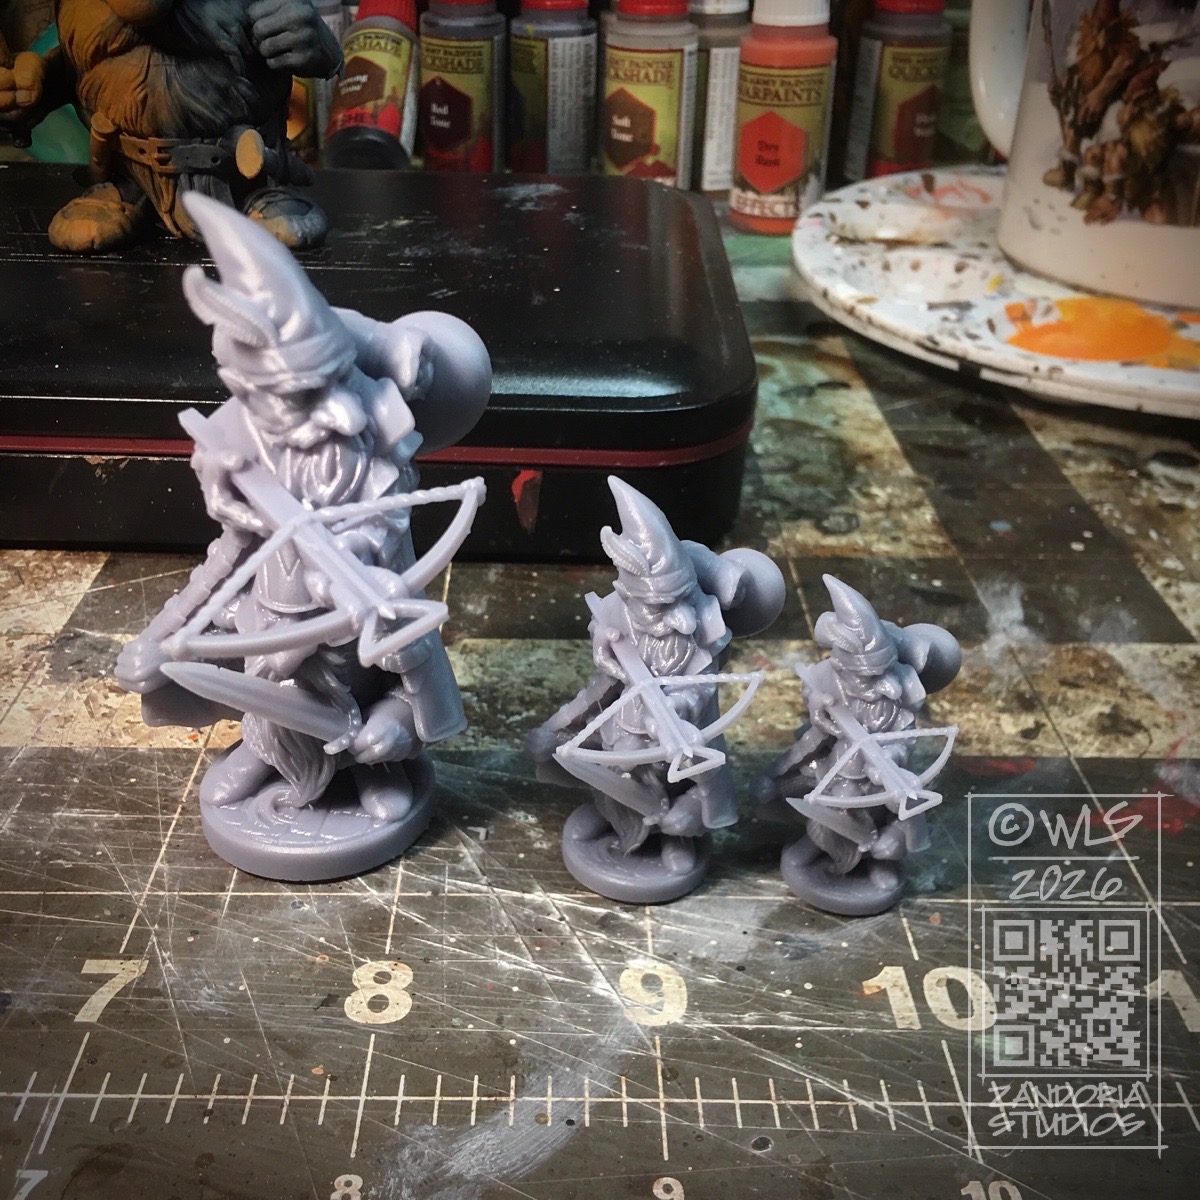
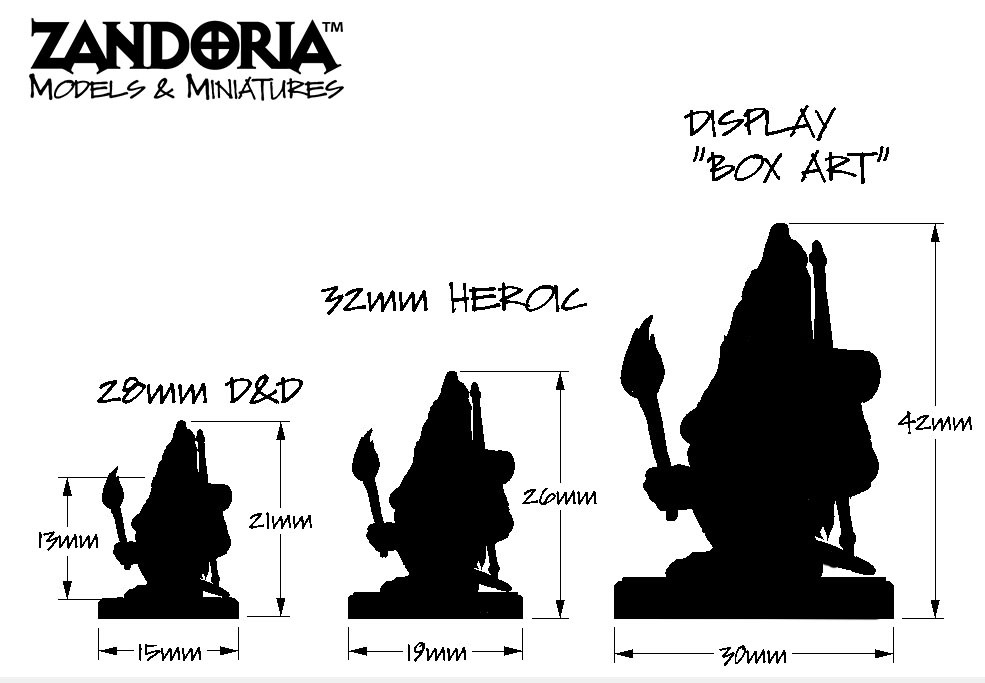
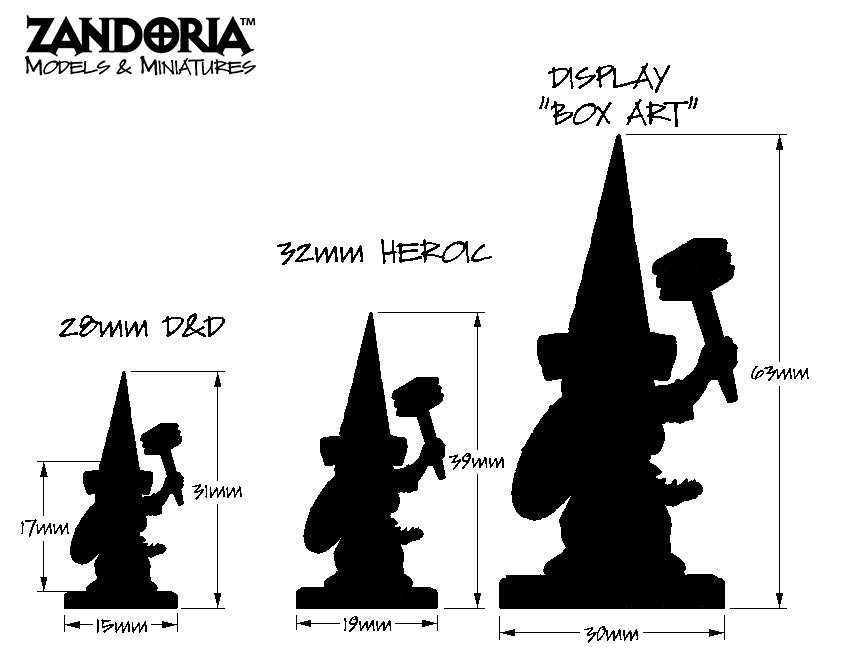
I’ve added these dimensioned drawings to all of the miniatures in my shop, because there can be a lot of confusion about scale when it comes to miniatures.
D&D is nominally 28mm scale, but what does that mean when it comes to miniature gnomes? The grid for D&D is 1″ squares, and each square represents 5′ (60 inches). So the actual scale is 1:60.
A 6′ tall (72″) human would be 1.2 inches (30.5mm) at this scale. Because of the history of wargaming, some people would measure from the bottom of the foot to the eyeline (ignoring hats and helmets) and see that is was around 28mm, while others might measure the whole figure and see it around 32mm…However, the true scale for the game is still 1:60
A Gnome is only around 3′ tall in D&D, and a Gonk Gnome maybe 2′-3′ which will mean that they are a lot shorter than a human. At 1:60 scale, a gnome might stand between 15-18mm tall (not including his cap)! A Gonk would be a little shorter, about 12-15mm without a cap.
Now what gets confusing is the “Scale creep” where the miniatures started getting bigger, and called “28mm Heroic”–which itself is not actually any scale! and then the oversized minis started to be called 32mm scale. And since the advent of 3Dprinting, the sizes of the minis has gotten all over the place!
This is the reason for the dimensions in my shop. The 28mm D&D is the default, which is true to 1:60 scale to match the grid. I am also selling the 32mm Heroic size (which is 125% of the original), and a Display/”Box Art” size which is 200% of the original–This is for miniature painters, and collectors who want to be able to see more details, rather than for playing the game.
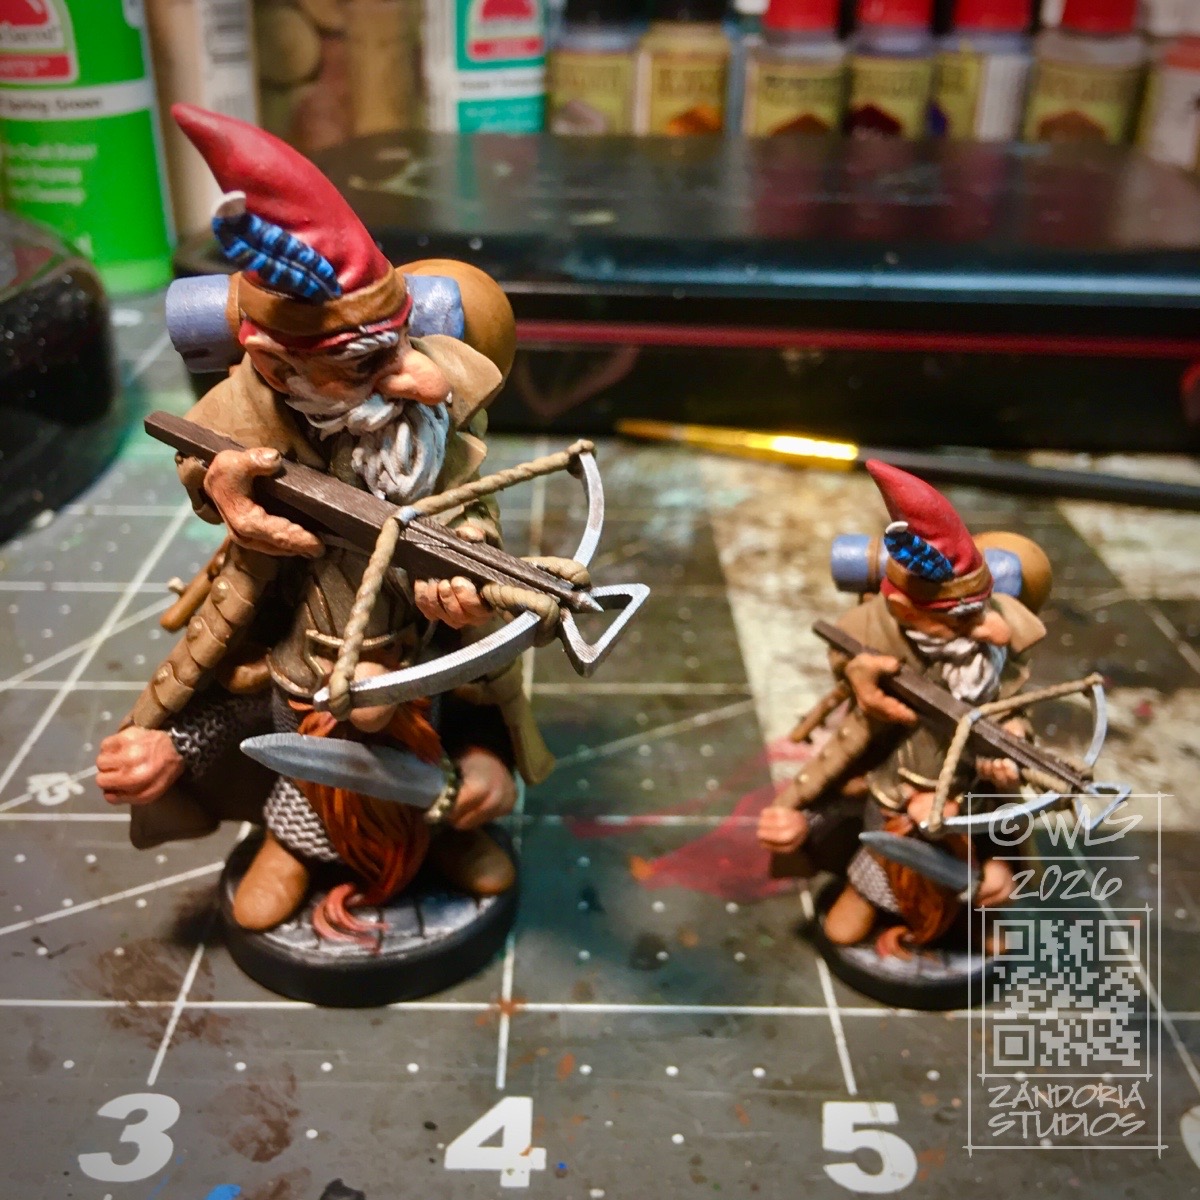
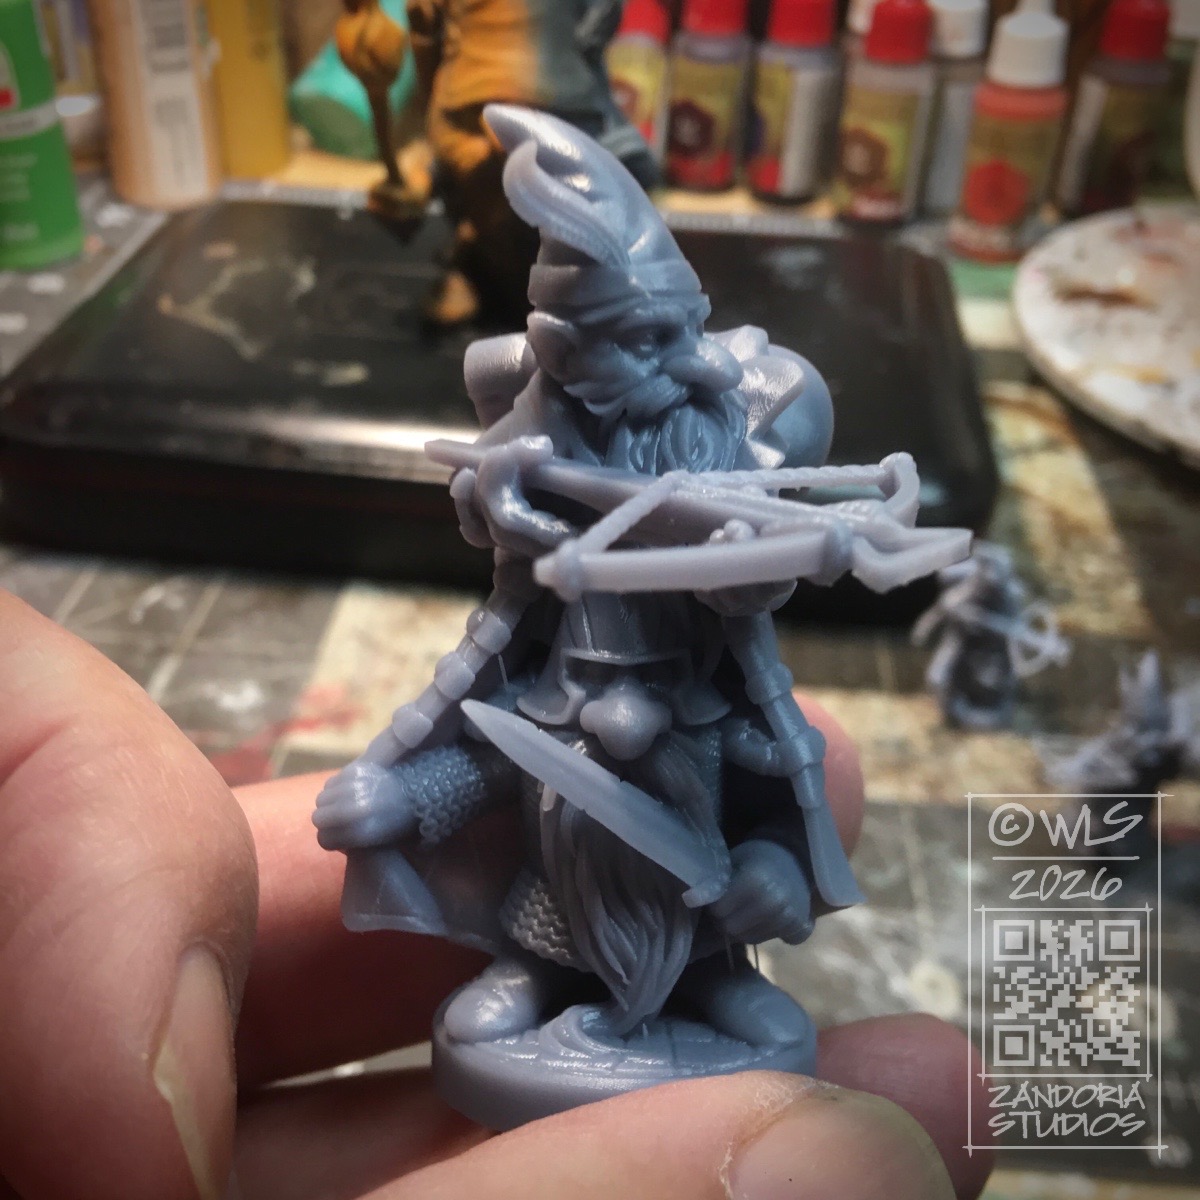
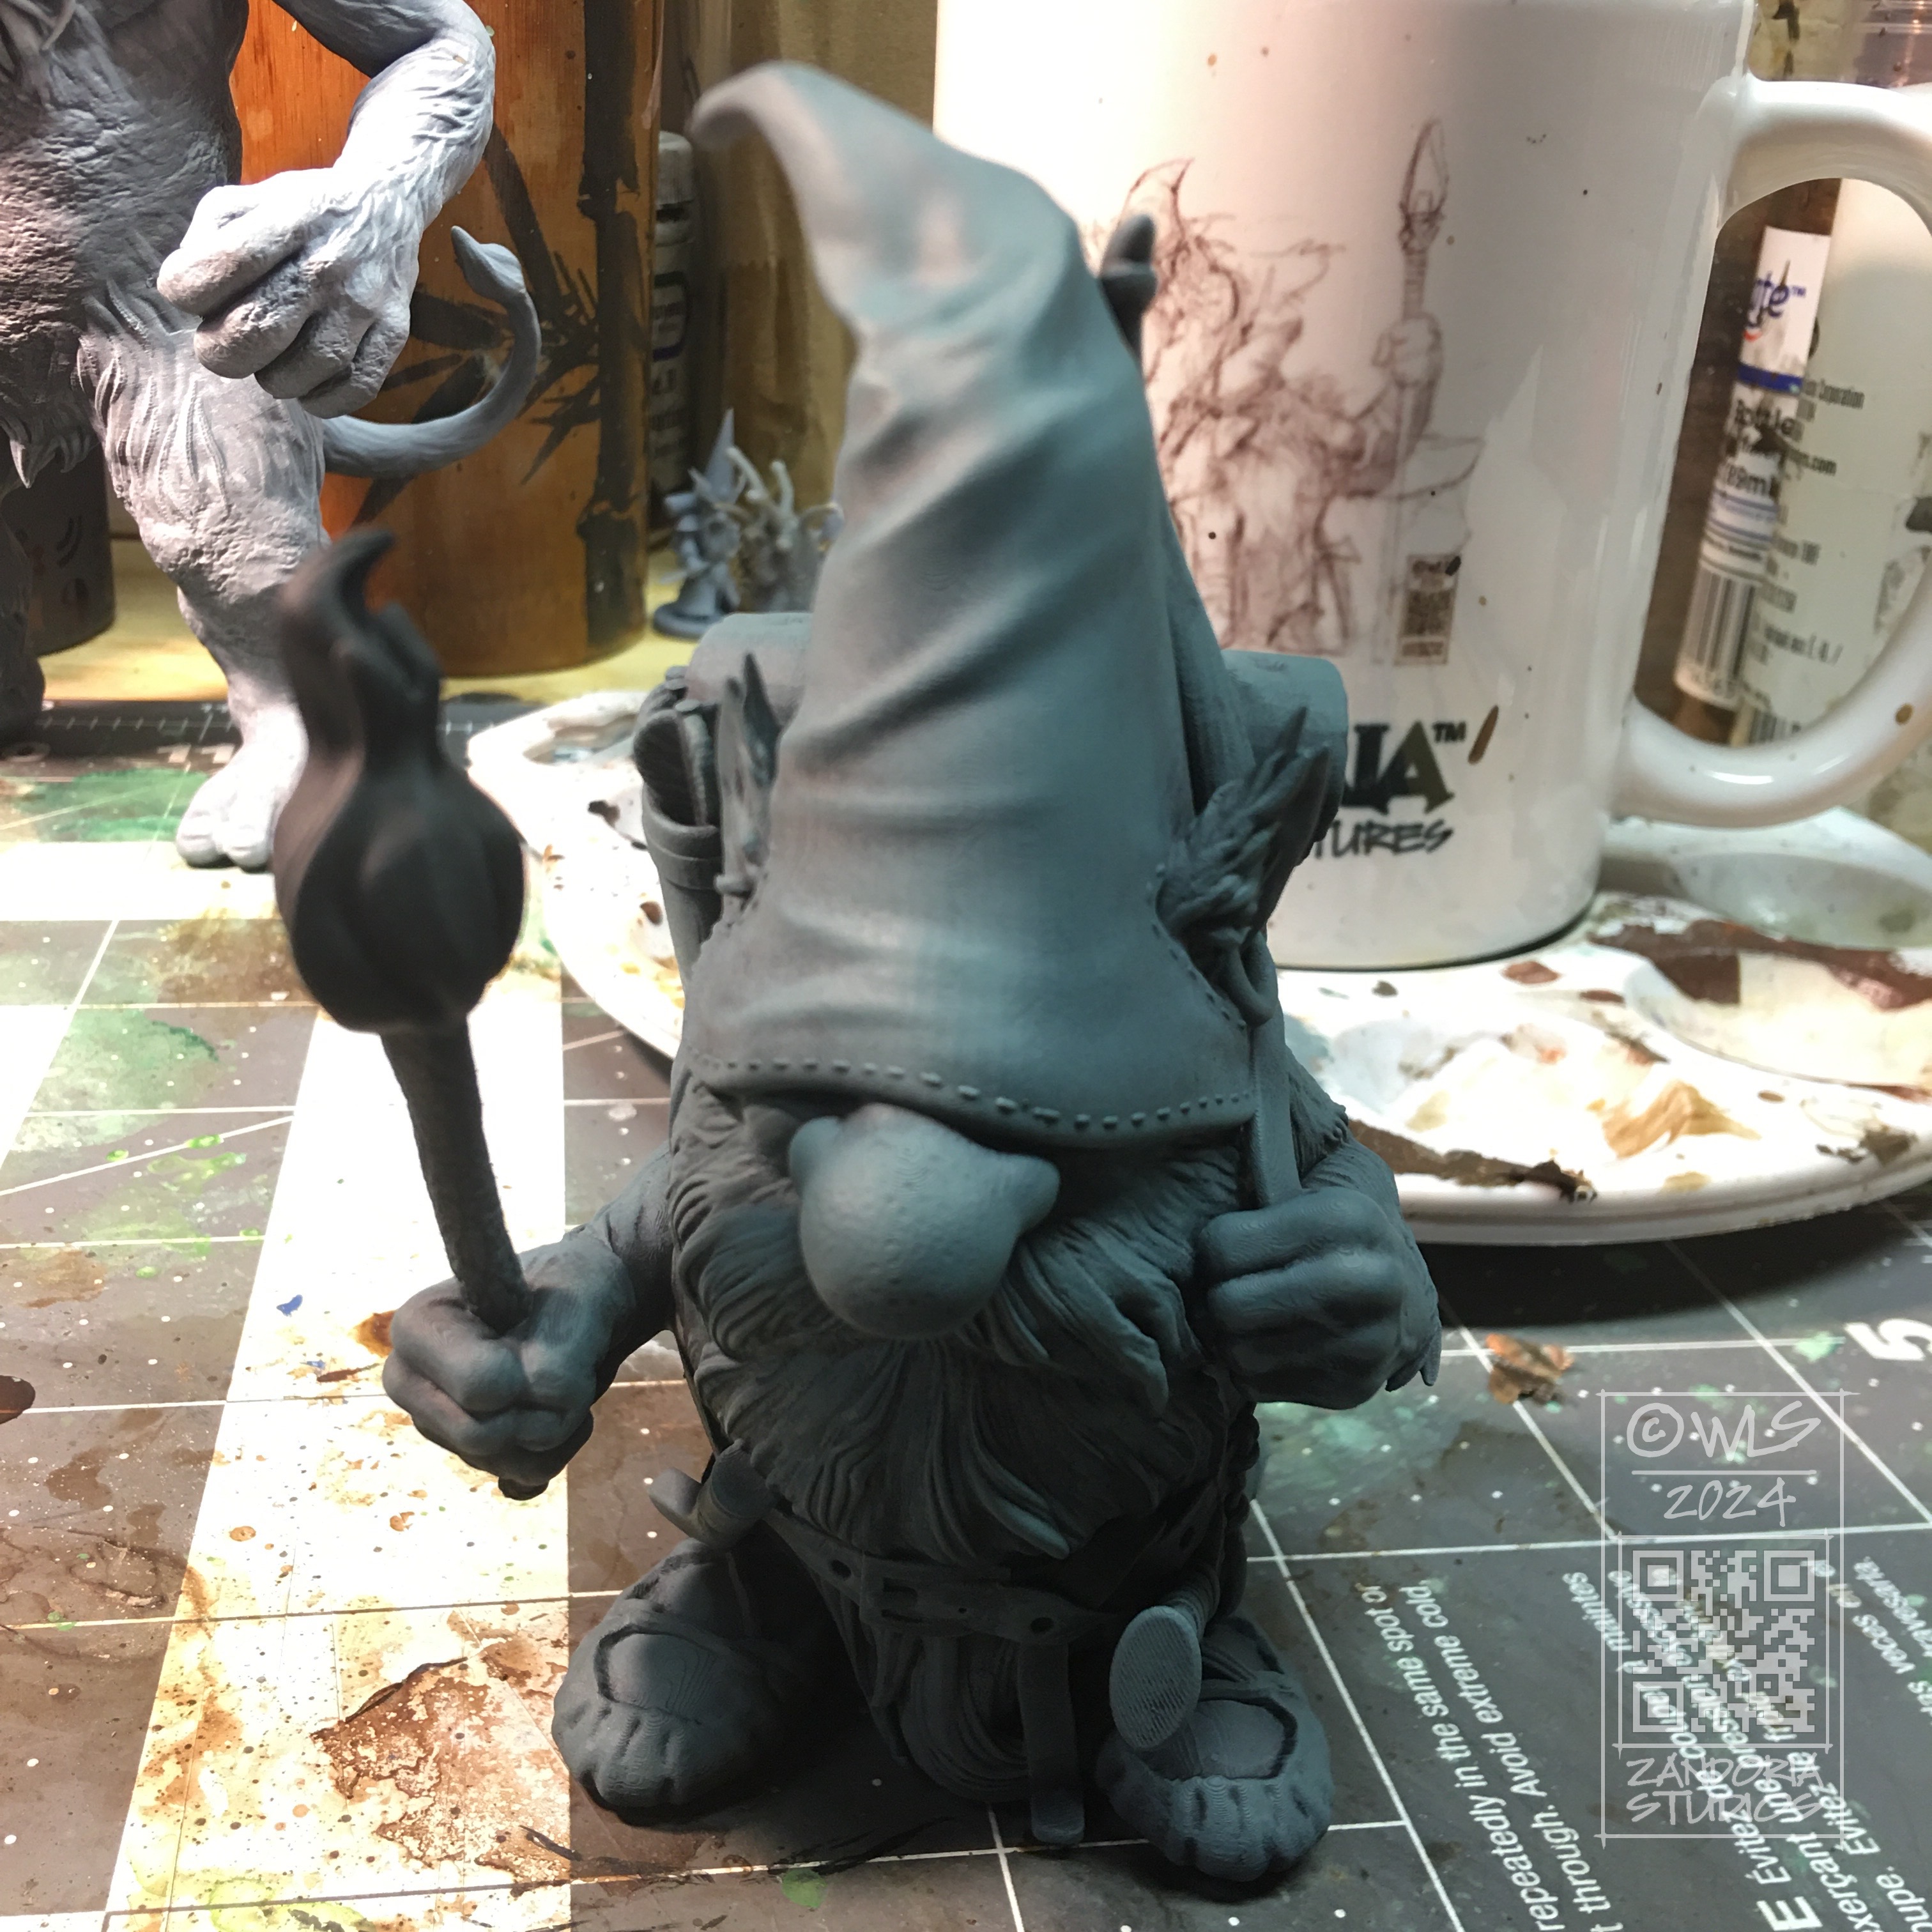
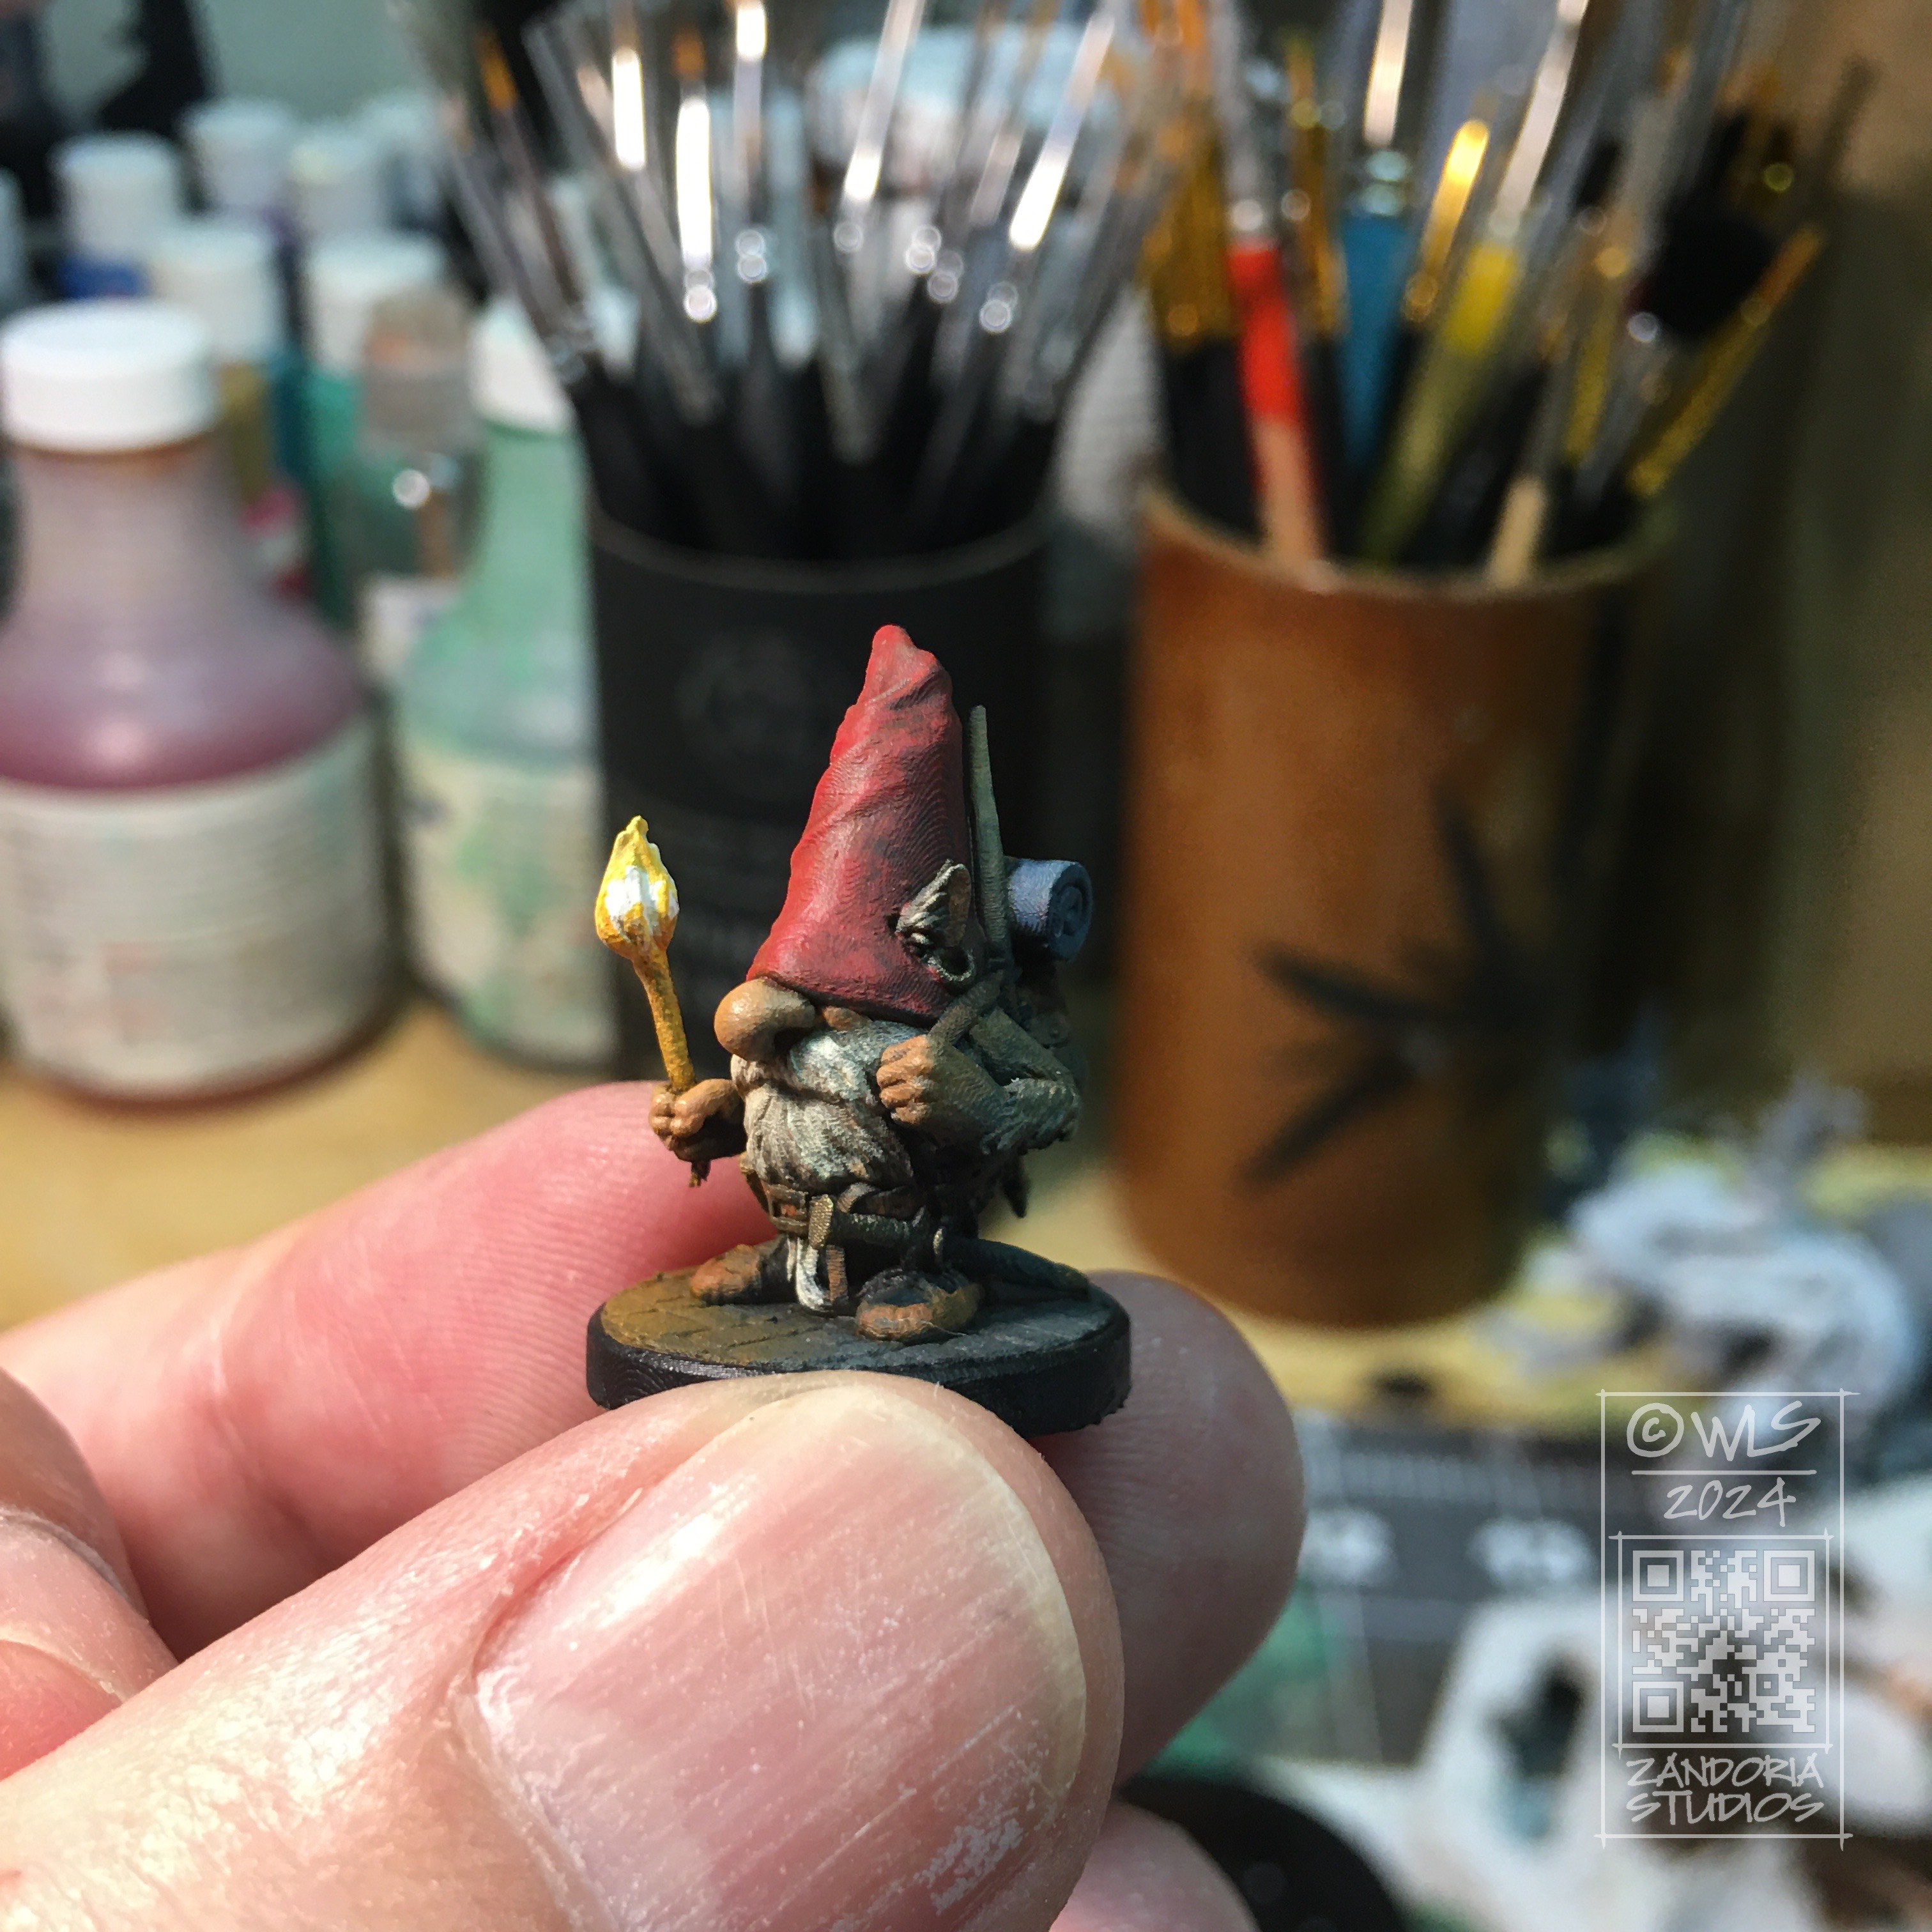
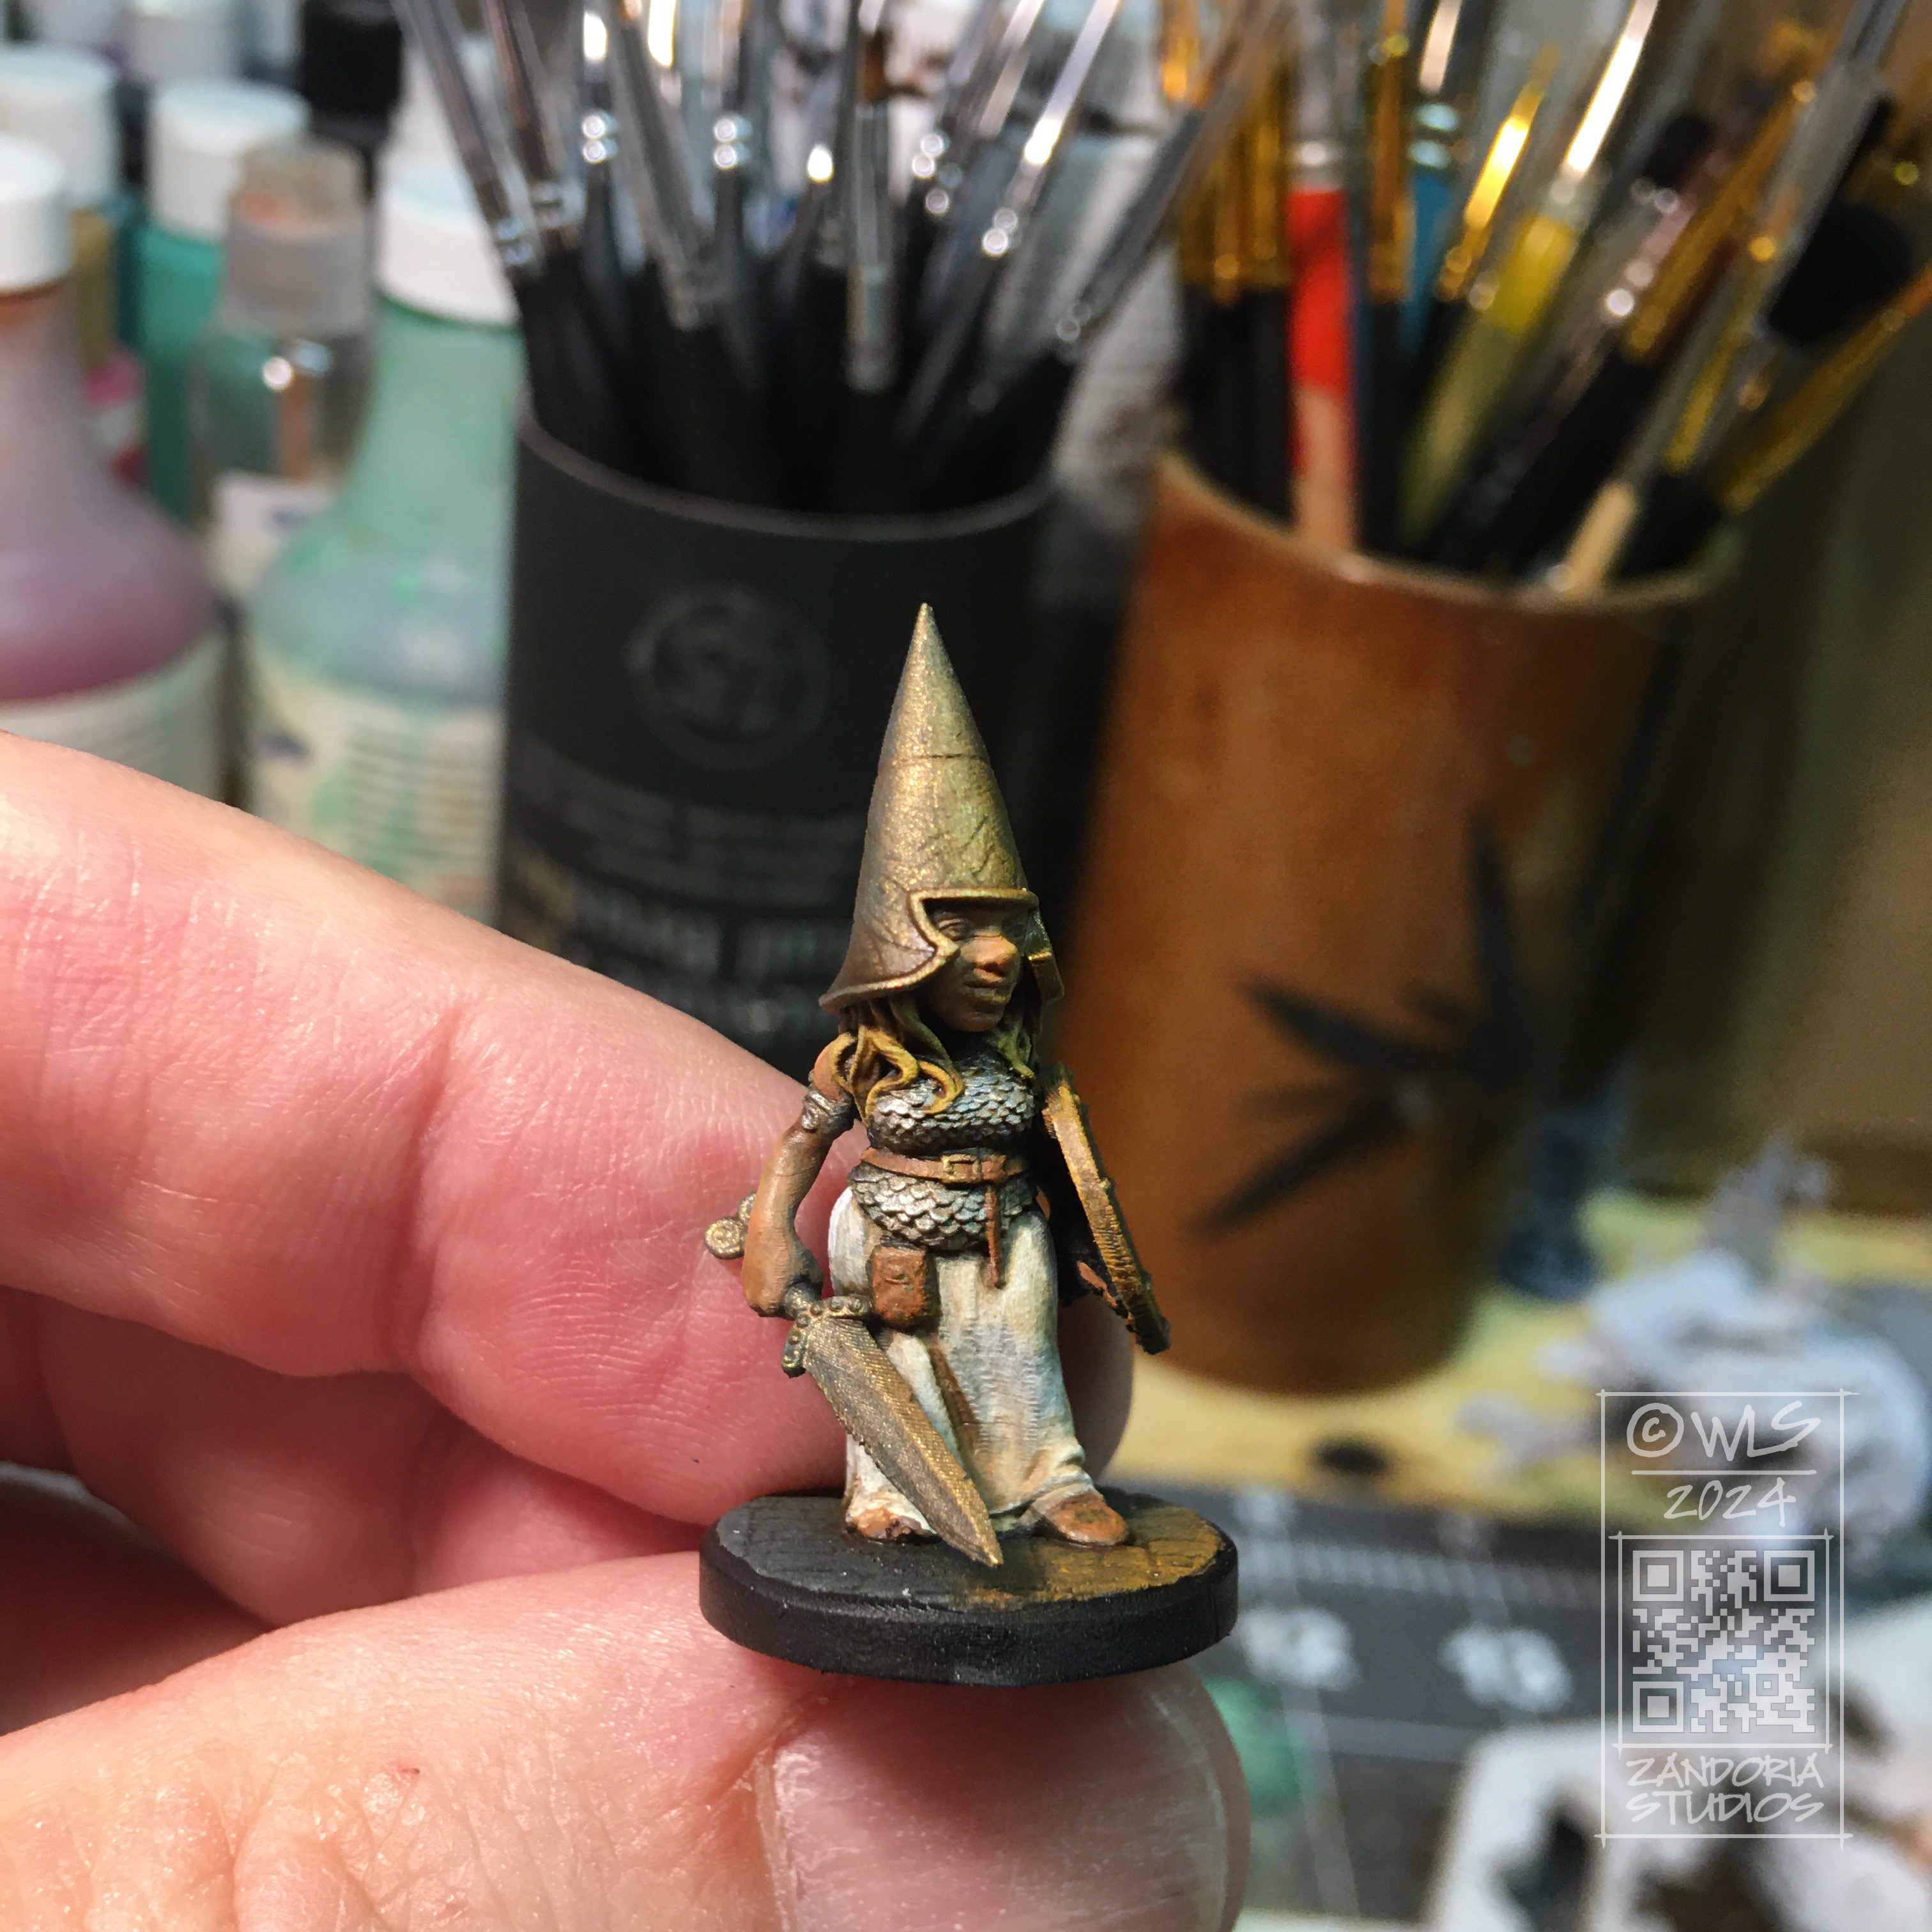
When I painted my PuzzleLock Dungeon, I simulated torchlight with drybrushed oranges and yellows. In the same way, I wanted to give a “dungeon vibe” to these minis by painting an undercoat to simulate torchlight. This is a variation on zenithal highlighting.
Starting with a black primer over the entire mini, then came back with a blue-gray ambient light which is drybrushed on top. Since the idea is to give it an ambient occlusion, I payed attention to the angle of my brush, leaving the underside and recessed areas black.
Next I used some oranges to start simulating the torchlight. I chose one side/direction for the mini which would be accented with torchlight, and carefully drybrushed the areas that would be hit by this light. Using the handle of the brush as the direction of the light, I was able to see where the light would hit, and where it would falloff.
I started with a pretty deep orange, and then added a little yellow to it as I went back over the areas that would be closest to the light. When I painted the actual torch, I went another shade lighter by adding more yellow, and finally white.
Here I’ve repeated the same steps on a larger figurine
I painted the colors in thin layers, allowing the underneath colors to influence it. The only place the color is almost the pure hue is on the bright side closest to the torchlight. The colors on the far side end up a bit muted and darker.
I used a wash of Army Painter Soft Tone over the paint job, which darkened the colors even more in the recessed areas.
Overall I am happy with the way it turned out. Even the minis not carrying a torch have one side accented with the torchlight, and they all fit together naturally as the under painted lighting ties them all together.
Give this a try on your next group of adventurers! Let me know what you think in the comments.
These minis and figurines are available in my Etsy shop. If you would like to 3Dprint them yourself, the STL files are available at Cults3D.
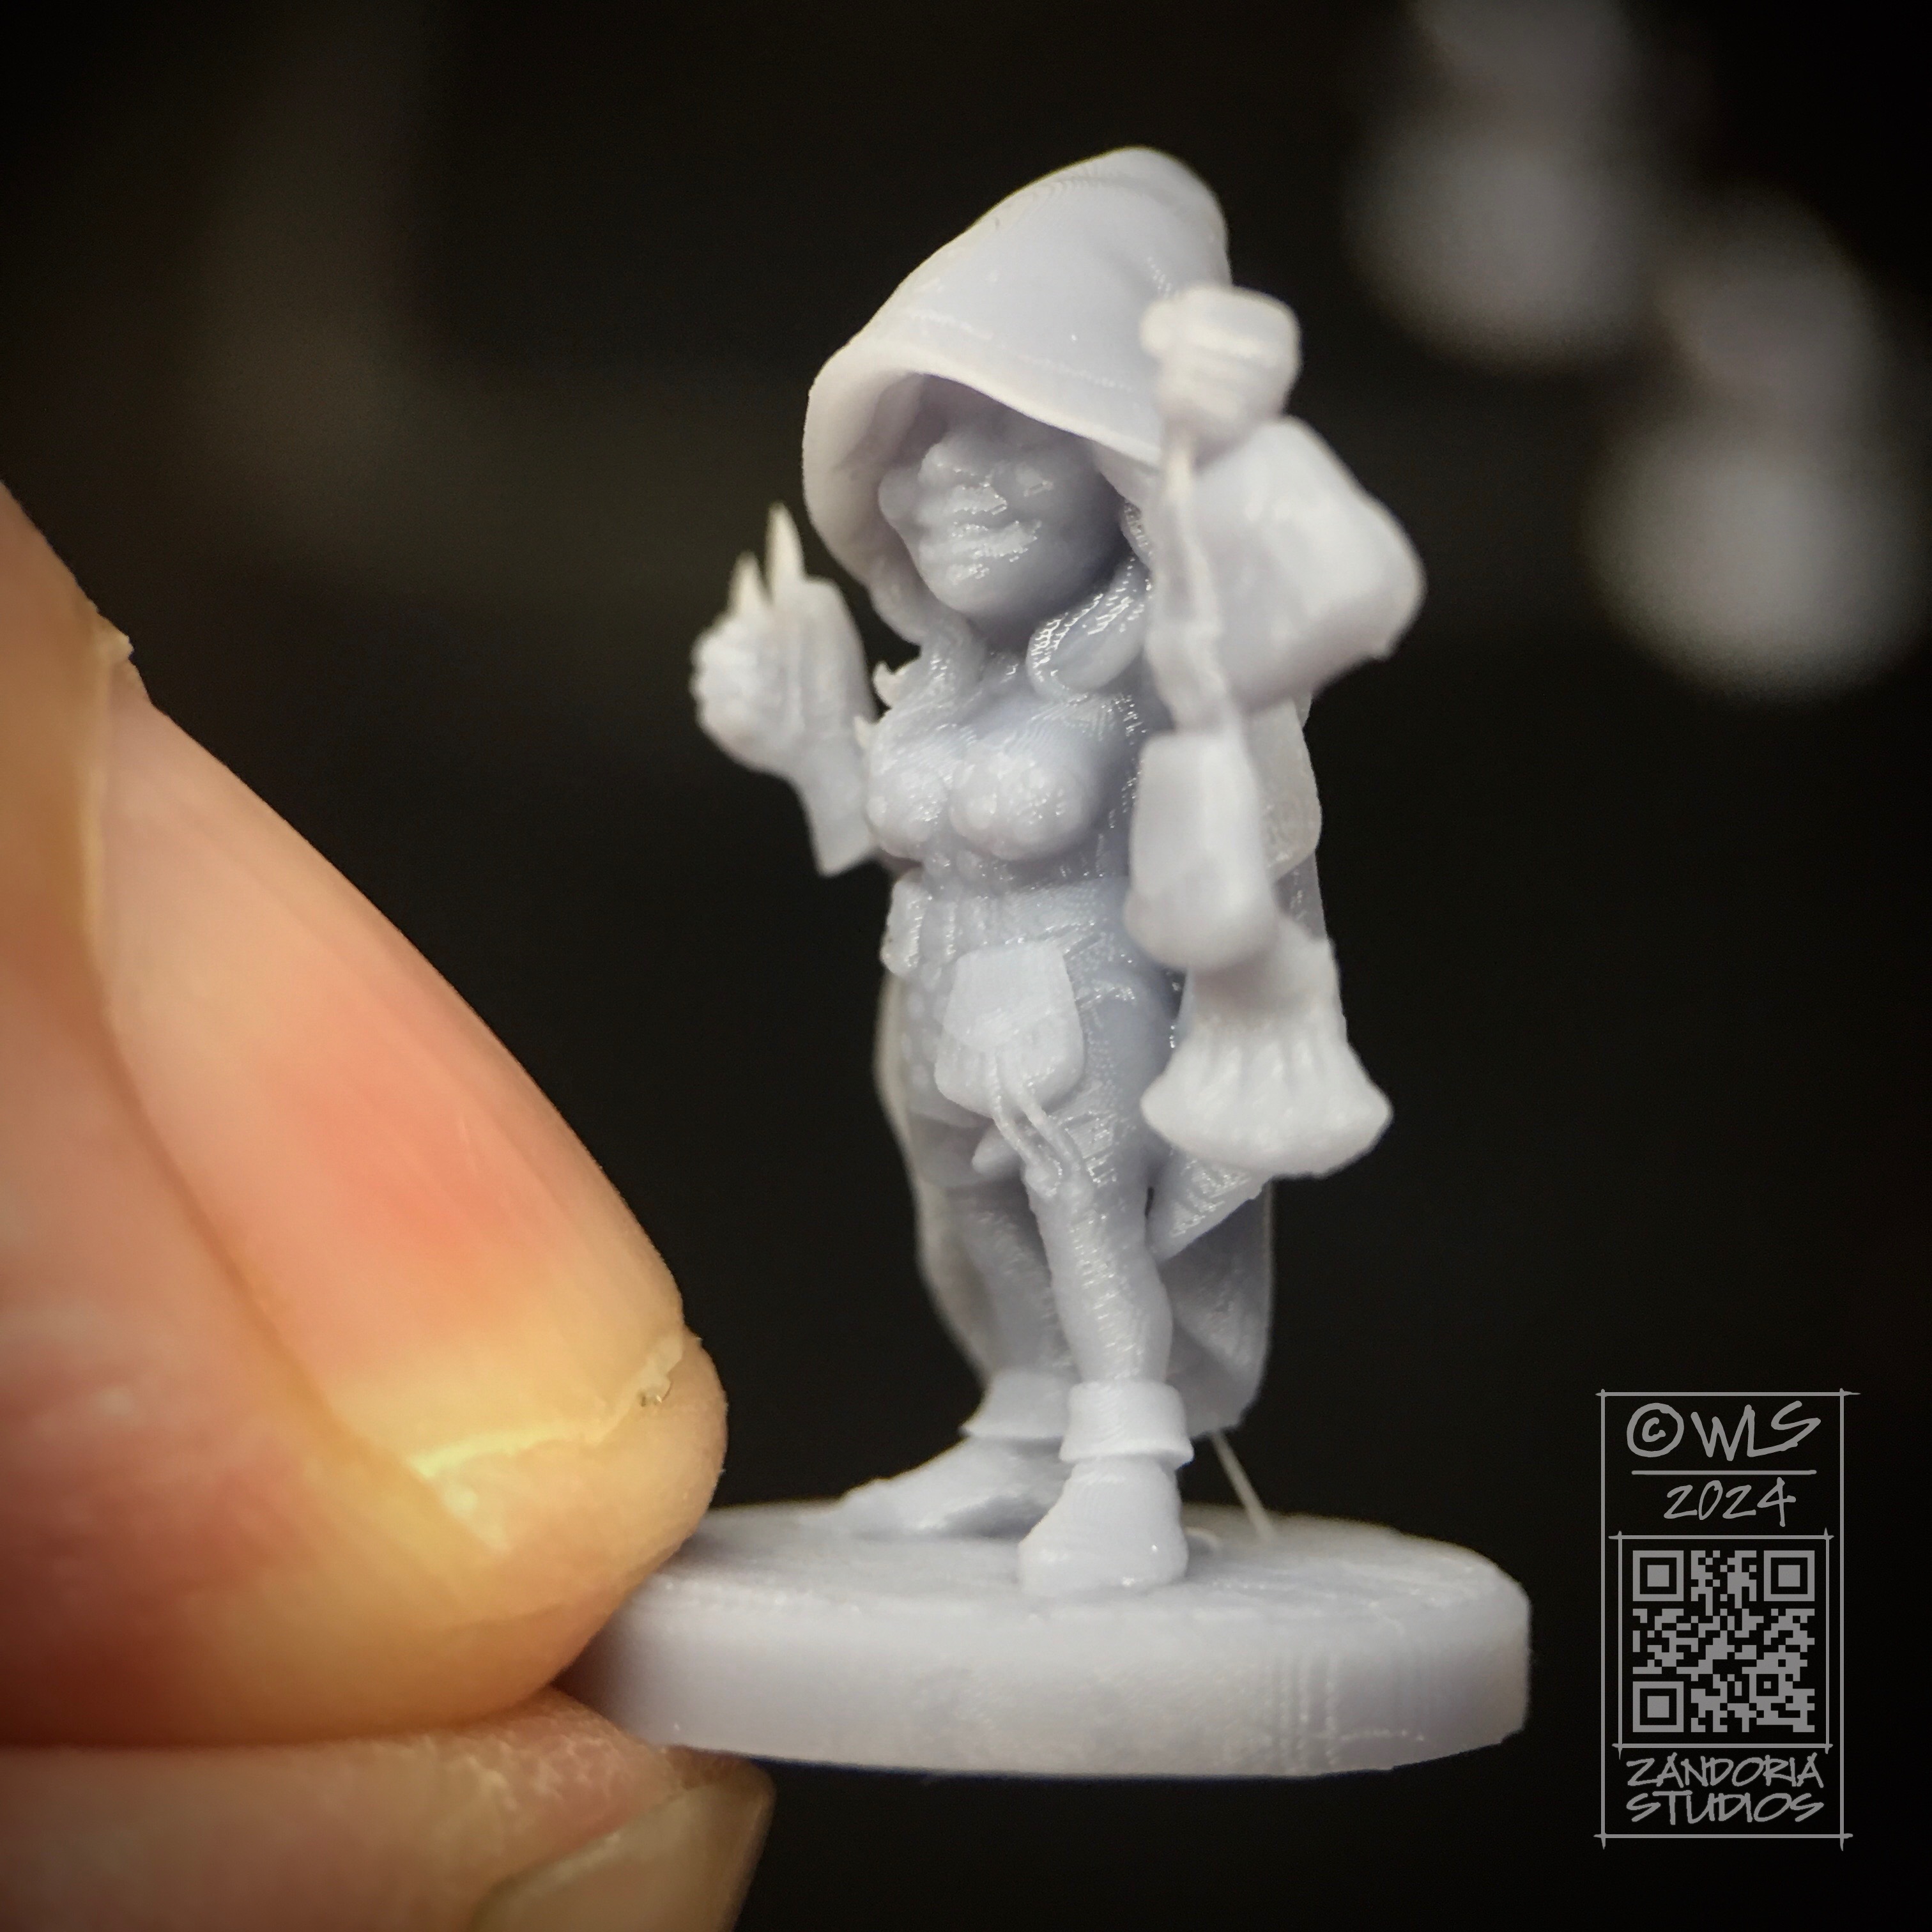
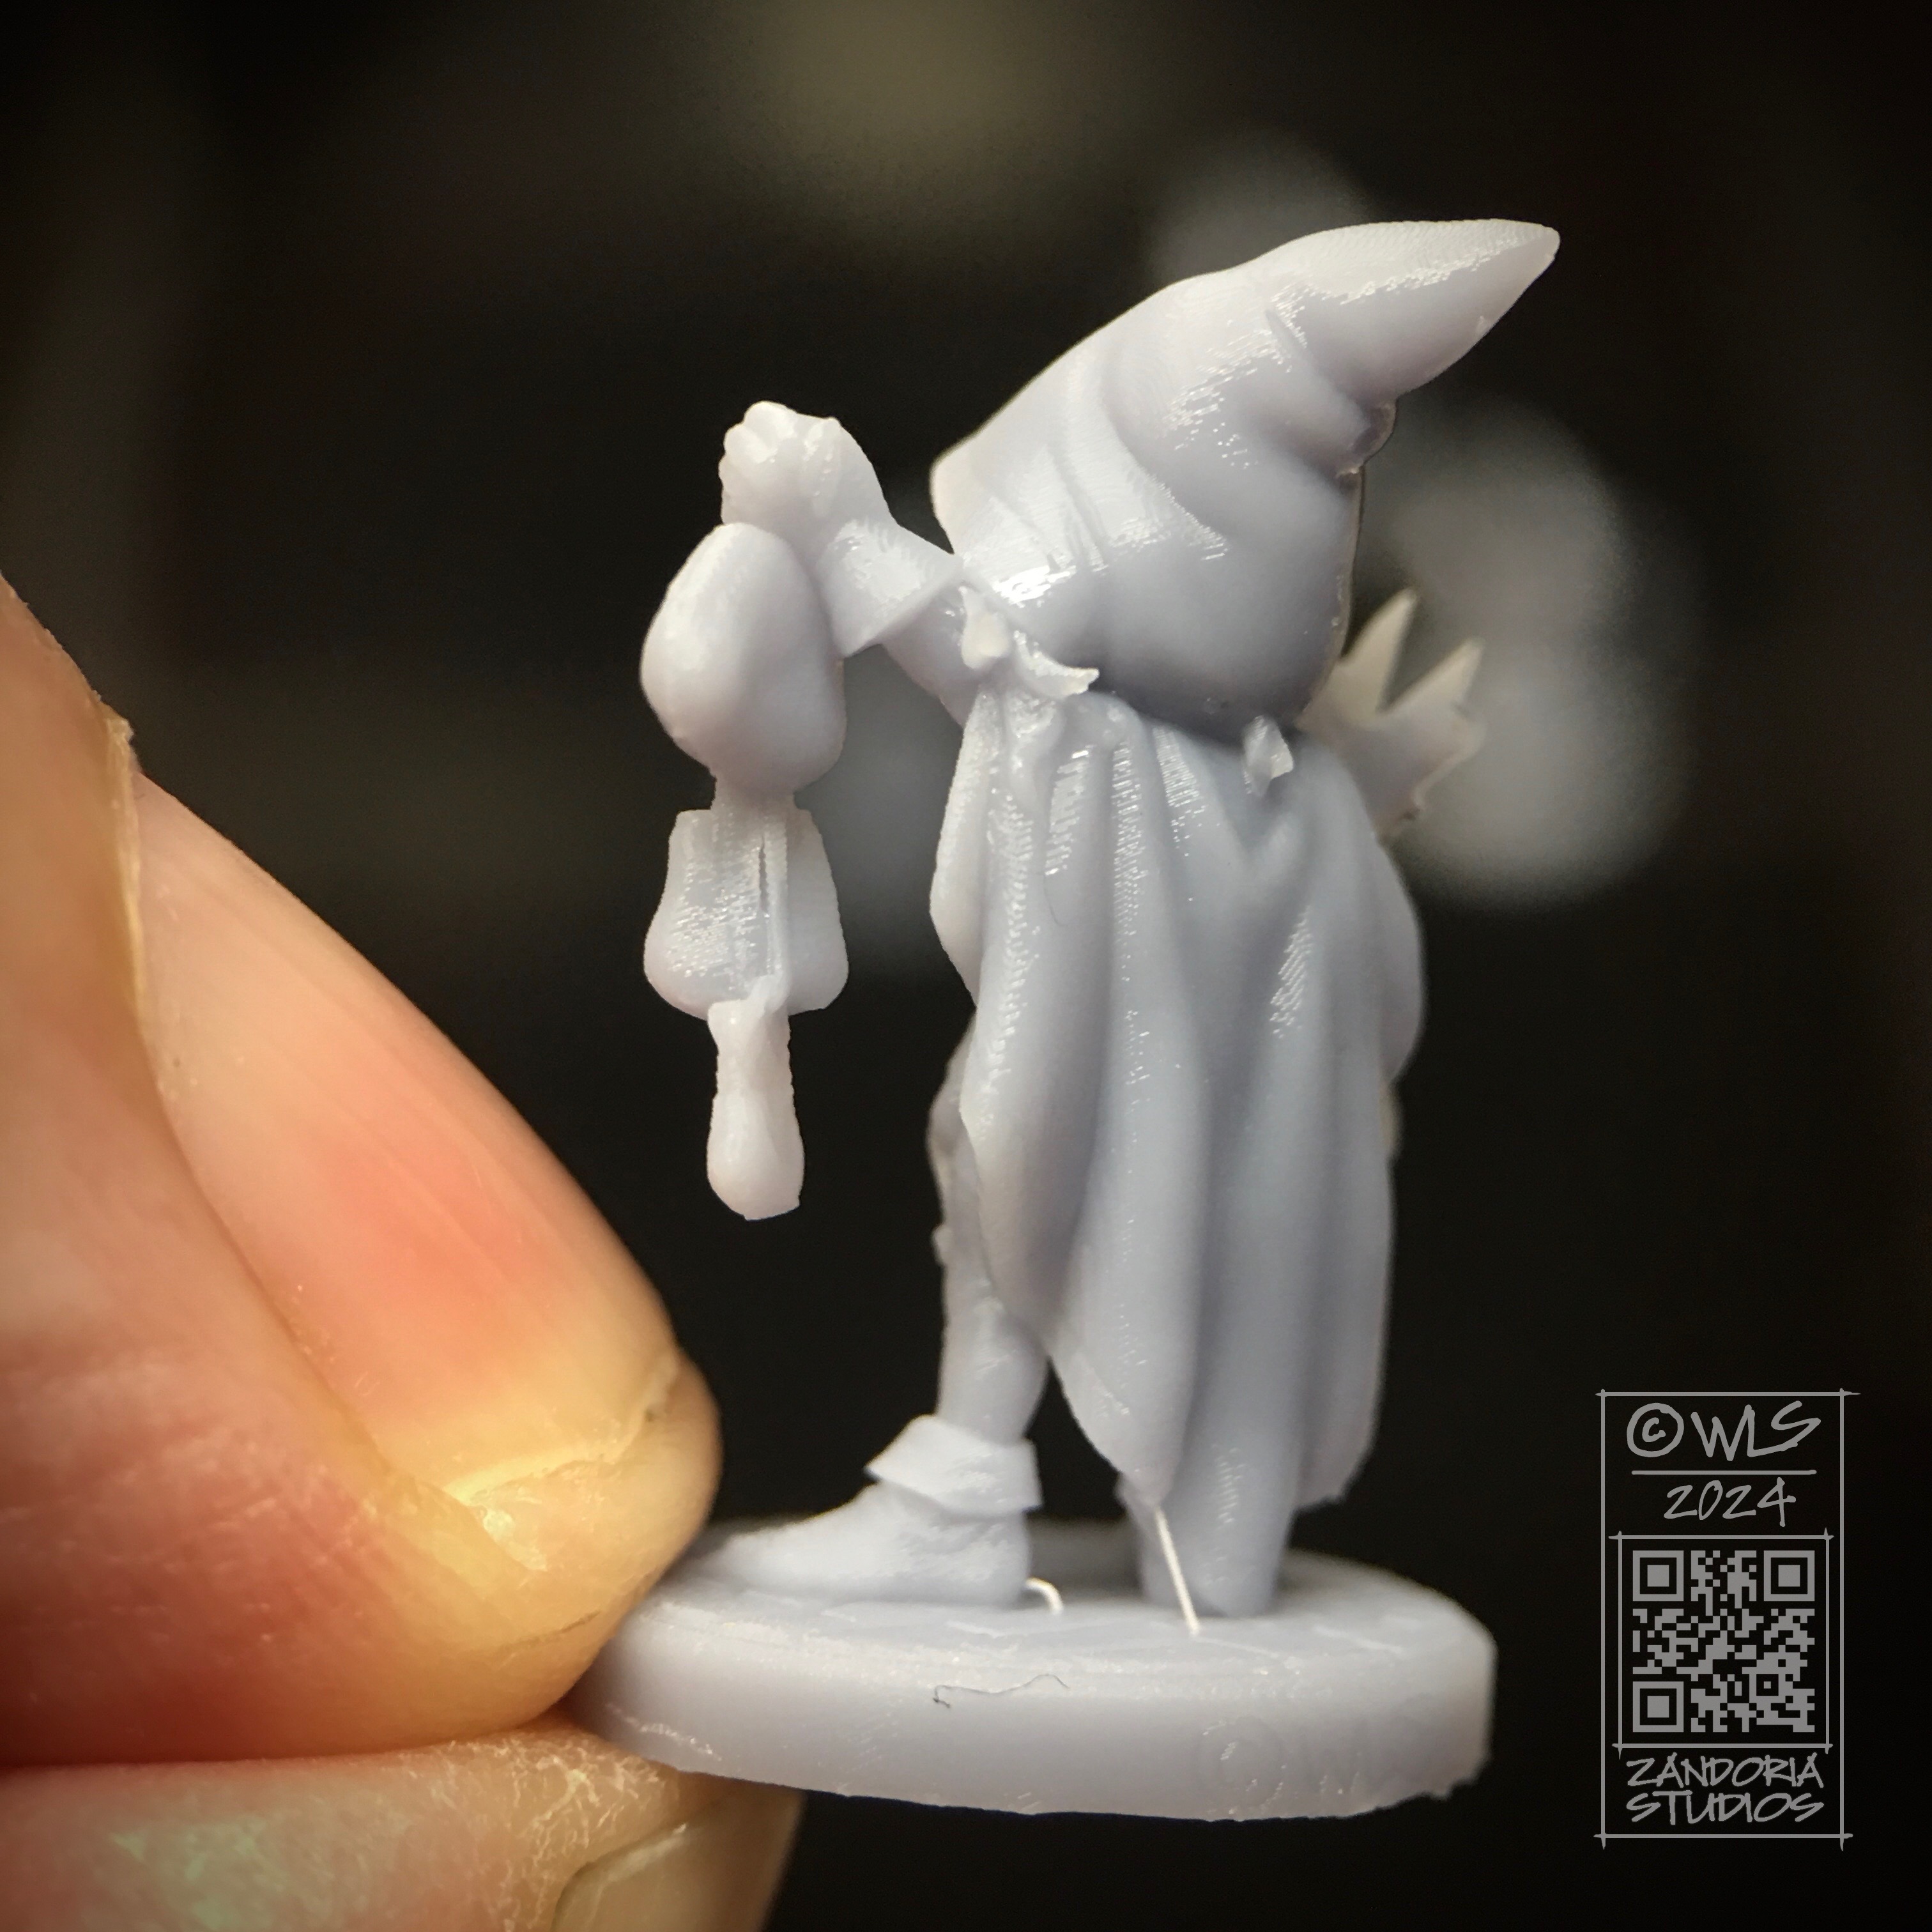
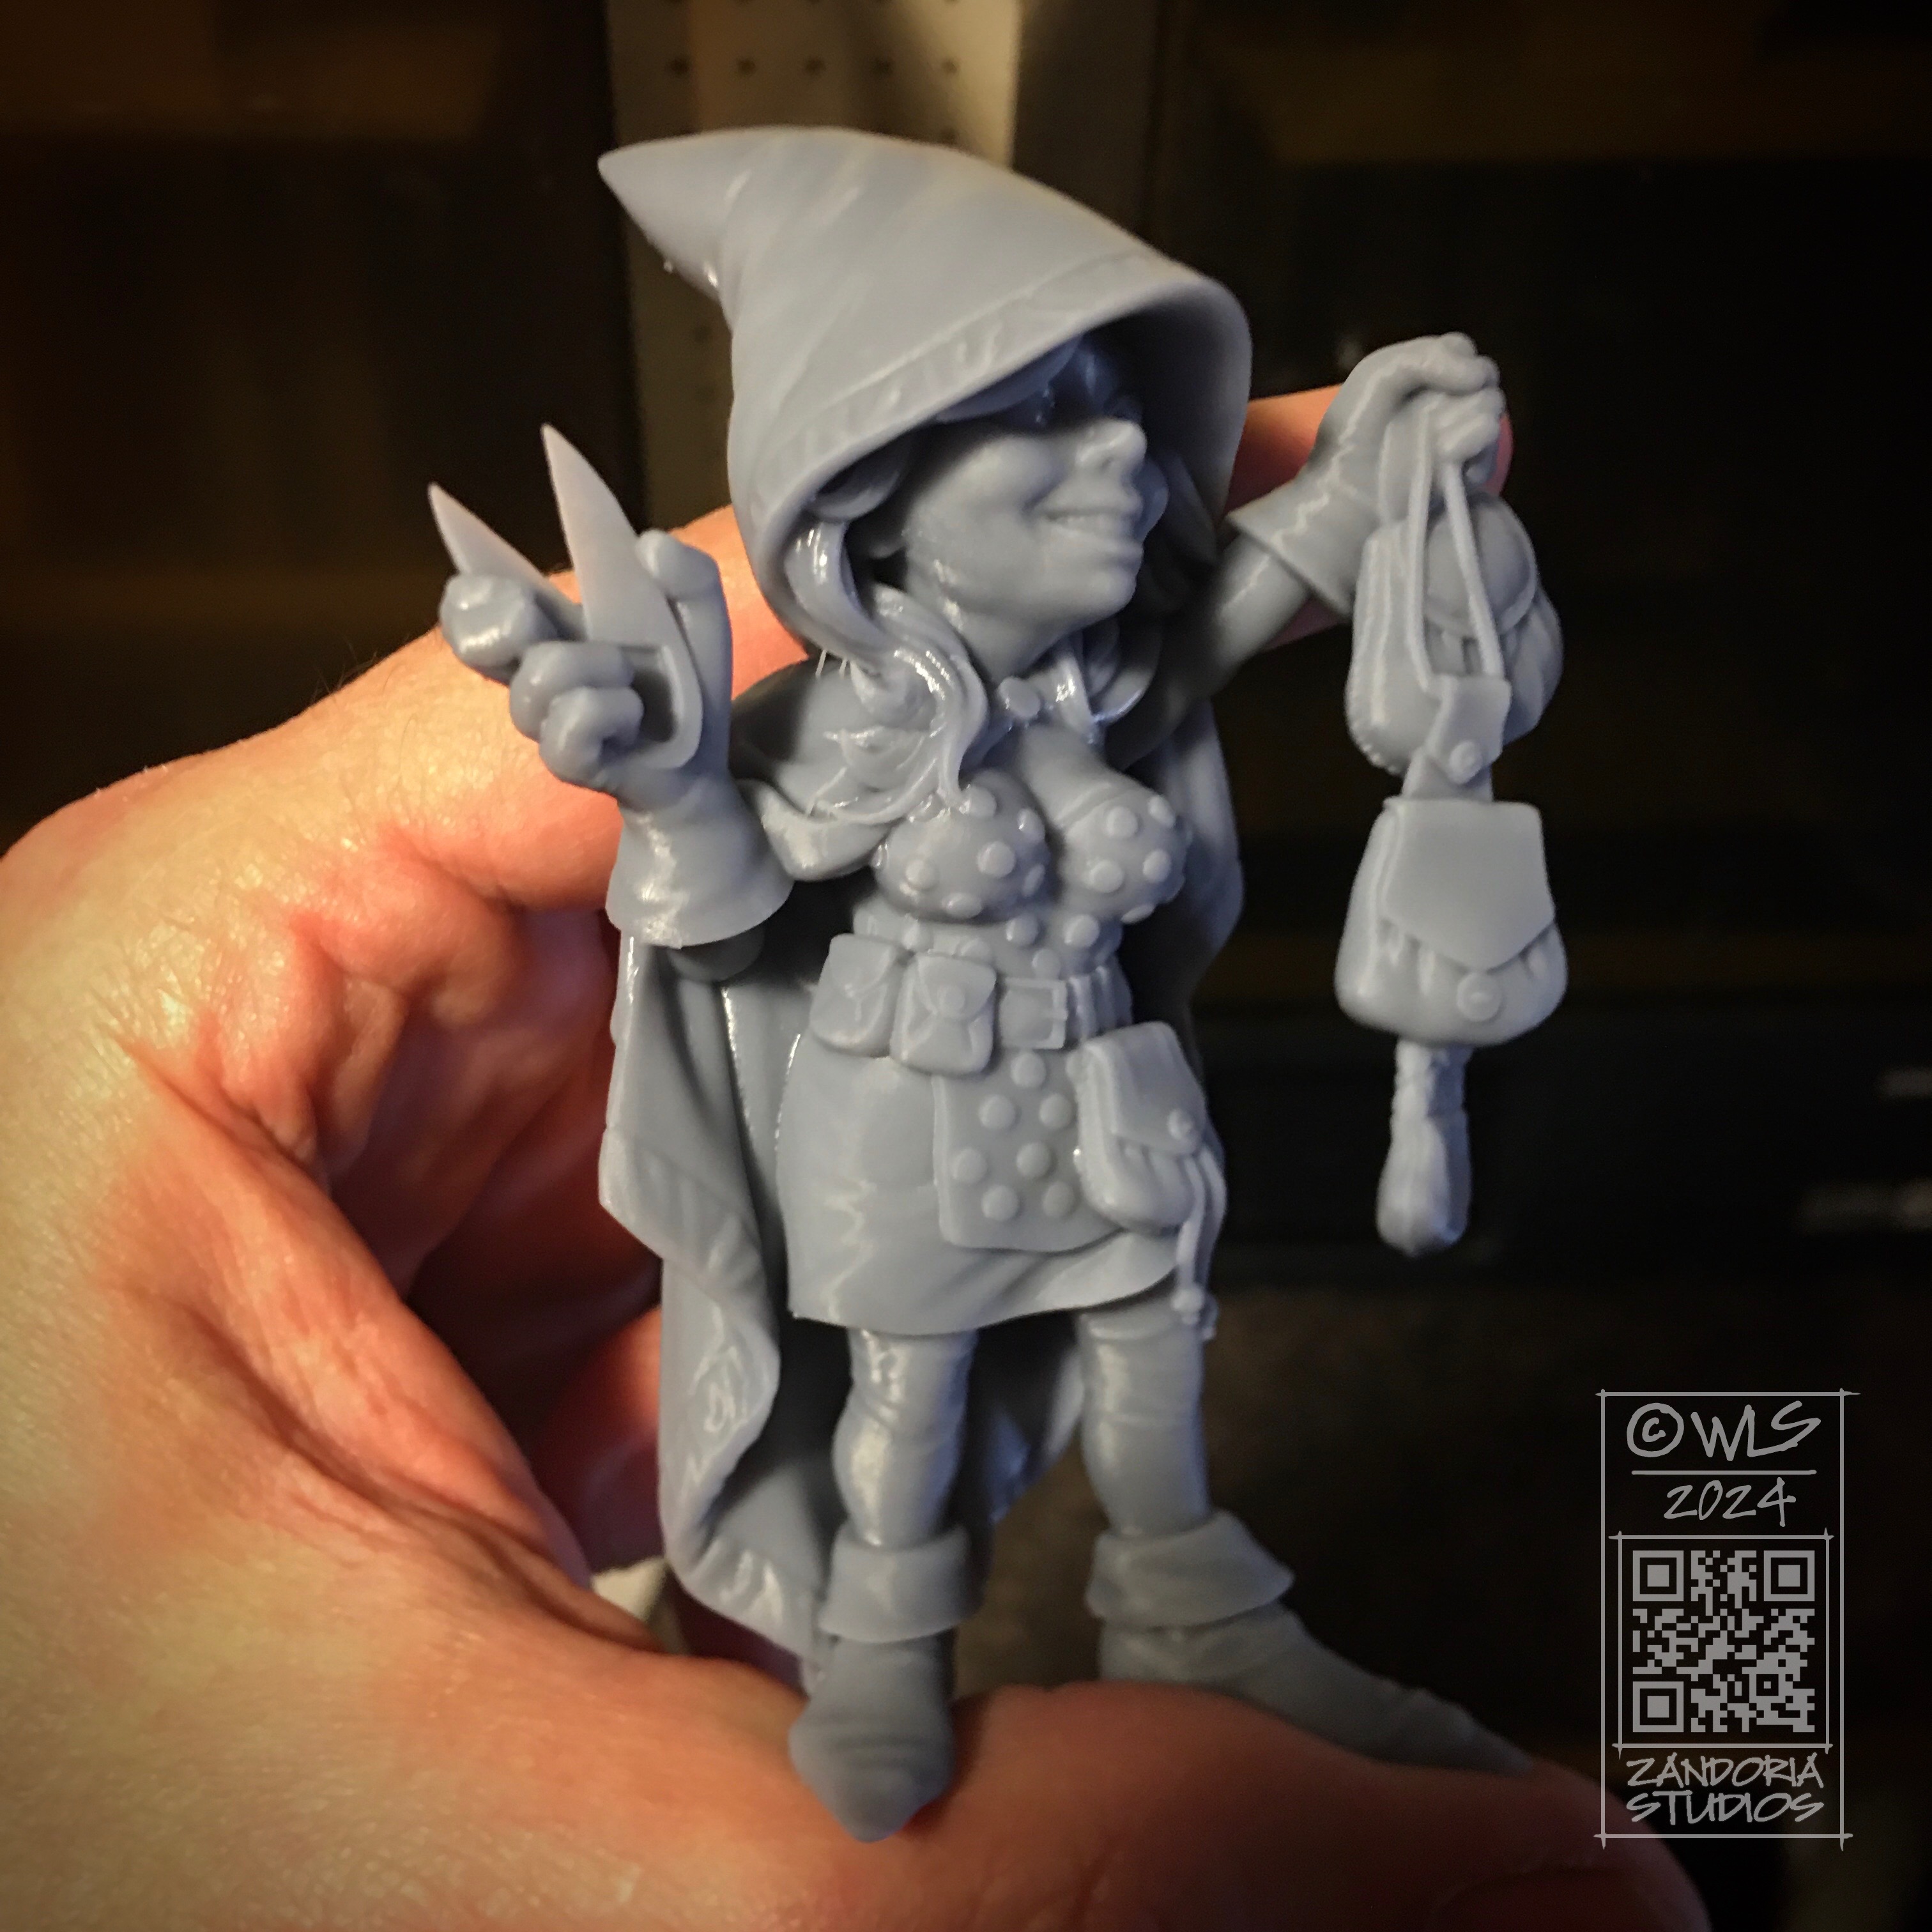
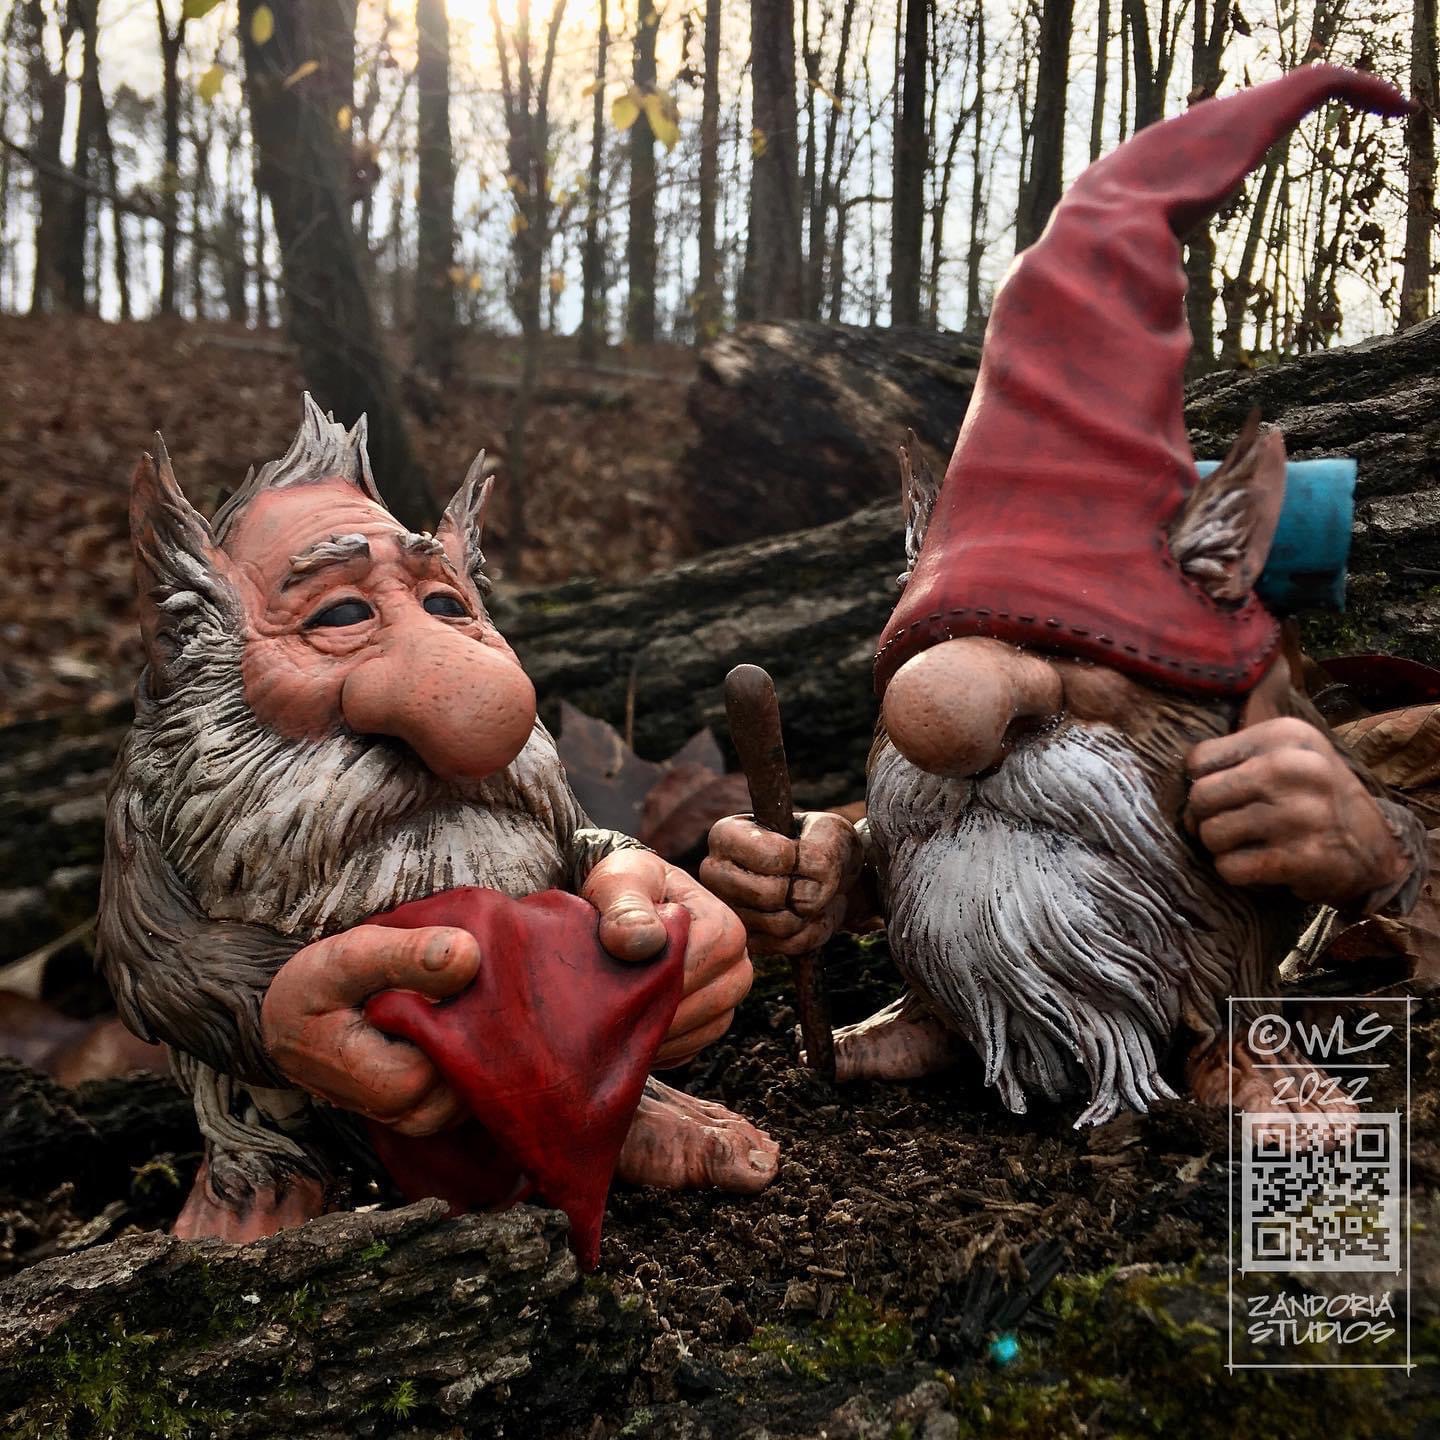
She is a little cutpurse female gnome that I sculpted for my Etsy shop. I offer her painted or unpainted, as a D&D sized miniature, or display sized–even Garden sized!
Are you a discerning gamer who demands the best? Do you want to take your tabletop experience to the next level? Look no further! My handcrafted gnomes are designed to bring a touch of magic to your game, with intricate details and textures that will amaze your players.
By choosing my gnomes, you’re not just buying a miniature – you’re making a statement. You’re showing that you have an eye for quality, a passion for the game, and a desire to create an unforgettable experience for your fellow players. My gnomes are not mass-produced or generic; each one is carefully crafted with love and attention to detail, ensuring that every aspect is a delight to behold.
Whether you’re a seasoned collector or a gamer looking to upgrade your game, my gnomes are the perfect choice. They’ll add a personal touch to your game, spark conversations, and inspire new adventures. So why settle for ordinary when you can have extraordinary? Choose my gnomes and elevate your game to new heights! #GnomeMiniatures #TabletopGaming #MiniatureCollectors #GamingWithStyle
When it comes to 3Dprinting there is a lot of confusion about resolution. It is important in different contexts, so I hope this post can help to demystify it.
Scanning is a method to capture geometry from real world objects to create a digital model. Here is a scan of my head, using a structured light scanner attached to an iPhone. On the right hand side, you can see a triangulated mesh of polygons. This mesh is the 3D model. Notice the lack of details in the face, especially the eyes. the Mesh is composed of 53,000 polygons.
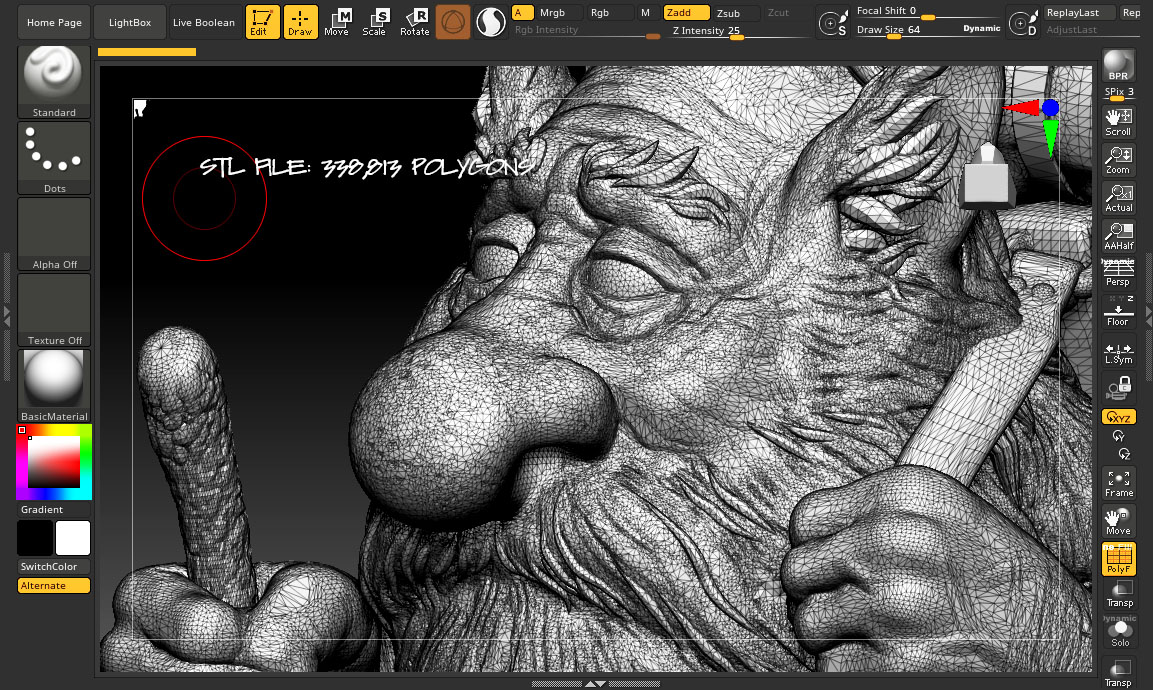
This Gonk Gnome is a digitally sculpted model for 3Dprinting. The STL file is what is used by the slicer to output the instructions to the printer. This polygon mesh is 338,813 polygons. The resolution is higher than the scan–meaning that the triangles are smaller, and denser.
In ZBrush, the original mesh that is the actual digital sculpture, is over 4 MILLION polygons! If you notice those darker gray areas around the eyes, those are even denser polygons than the rest of the mesh. Sculpting digitally, you can zoom in and add more detail, and resolution (to the limits of the computers memory).
The reason that the STL file is less polygons is that it is decimated from the higher resolution mesh. A 3Dprinter slicer will have a hard time with a mesh over 1 million polygons, so you have to balance the amount of detail you can reproduce with those constraints and the intended size that you will print.
Here is a picture of that model 3Dprinted in resin. the layer thickness for a resin printer is .05mm (about the thickness of a human hair), so you need a magnifying glass to be able to see the layer lines…
3Dprinters are advertised with 2K, 4K, 8K, 12K (even higher has been announced), which is referring to how dense the pixels in the LCD screen are. This can get confusing, because a small screen size that is 2K might have the same density of pixels as a larger screen that is 4K. So, in choosing between the different resolutions offered in 3Dprinters, it is important to choose a size that fits your needs, then worry about how much resolution in in that LCD screen. Ideally, the XY resolution (the LCD screen) and the Z (the layer height) should be the same.
This Gonk adventurer is the same model, but at different scales. the density of the polygons is high enough that even when printed larger the detail is there. If the gonk was printed even smaller than a D&D miniature, you will start to lose the finer details as the size of the triangles of the polygon mesh become smaller than the XYZ resolution of the printer. If you printed larger than a figurine, like a 4′ or taller statue, the size of the triangles of the polygon mesh would become visible.
Because there can be so much variation in size for the 3Dprints, I usually will decimate the mesh to between 300,000 and 600,000 polygons. That provides enough resolution to the polygon mesh, so that the detail is there even if you need some 2′ Guardin’ Gnomes.