Stylizing the look…
Have you noticed that the “look” of big budget animated movies has become homogenized? However beautiful those globally illuminated, sub-surface scattered, realistically simulated CG worlds have become, there is a common look to them…. I think it is because the artists and the tools are the same from studio to studio…
From what I understand about the industry, artists move from film to film, studio to studio, as each project ends (self described “pixel gypsies”)… The tools are similar between studios, the feature orgy in 3D software pushing in a Darwinian way towards a synthetic hyper realism.

The last animation that I posted suffered from this same look, and I had to stop and think about why…. I think there is an unconscious bias towards that style, because our tools favor it, and there is an expectation that for it to be accepted it has to have that look.
I am just one guy. Even if I thought that this homogenous CG look was great–there are hundreds of people involved in creating it–and if my work attempts to emulated it, then it will rightly be compared to it. The animation, the particles and effects, the lighting–everything has to be at Hollywood level…If it is not, then rather than being immersed in the story with the characters, the viewer is going to be distracted….
Realizing I needed to stylize the look–Dig a little deeper than what the tools want to give me–make them give me what I want, I started looking at my influences for TAR of Zandoria to see what it was that I liked (and figure out how to make the computer render it).
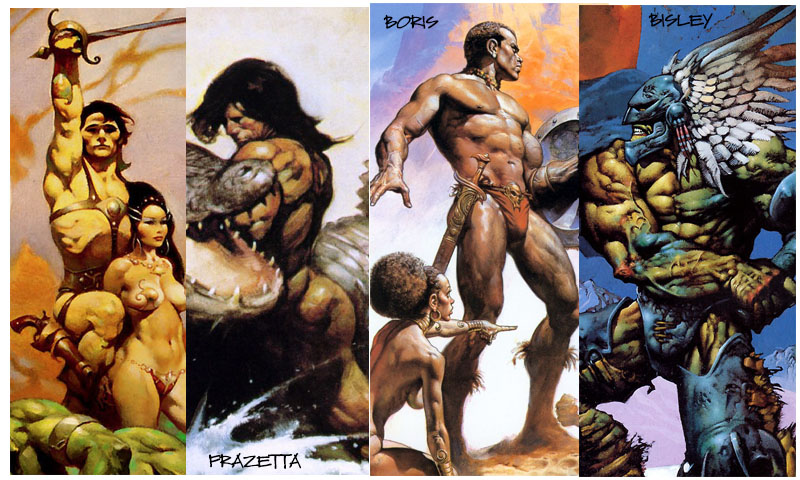
Frank Frazetta, Boris Vallejo, and Simon Bisley are my favorite fantasy artists. So I started looking at their paintings for stylistic cues that I could try to emulate–since that genre is the inspiration for TAR, if I could make it come to life that would be more satisfying….
The first thing that jumped out at me is the strong contrast between light and dark–It is called chiaroscuro in painting. The defined contours in Frazetta’s and Bisley’s work also stood out–I think this comes from their background in comics before they started painting…

The backgrounds are painted of course, and since I was already using a matte painting approach to creating my backgrounds for TAR, this is an easy shift–Even running a Photoshop filter was an improvement over the realistic matte painting…
I added toon shading to the edges of my objects, and I relighted the scene with a key light and a couple of fill lights. I think I am also going to tweak something with the diffuse falloff at the edges, to get a look for like my airbrushed version of TAR.


