Page 2 of 2

Channel accidentally deleted

My Zandoria YouTube Channel got accidentally deleted! So I will have to rebuild…All of the subscribers, statistics, etc. lost. I will have to recreate the playlists for the Siggraph Animation:Master tutorials, which may take me a few days. But I have re-uploaded the First Episode of TAR of Zandoria. Share it!

Shot 1(5)

I was watching some behind the scenes shots from the Blue Sky film “Epic”, and saw a lot of reference footage that was acted-out by the animators and used as a reference. I thought that the motion and timing was very naturalistic, and if a big studio can do it, then why not me?

1(5)-rotoscoping

So I opened up the iPad and filmed a couple of takes of me taking off my shield/hat and flipping my staff around to use as a club, as storyboarded.

TAR_SC1_6A

Dropping the footage into Animation:Master as a rotoscope, I was able to step forward in the timeline and see myself acting out the shot.  The timing and spacing was already worked out–I just stepped to where I needed to set keyframes and posed TAR to match….

One thing that had struck me as odd on the Blue Sky example is that the reference shot matched the finished shot exactly for the camera angle…. To me, I had thought of myself as TAR, standing looking into the shadows at Ninja Pass–preparing to charge into a fight! The best camera angle came after I had dropped TAR into the Choreography.

Landscapes

I have been a little torn between using somewhat realistic CG landscapes or digital paintings for this project. After doing a number of tests each way, I felt that a hybrid matte painted look was going to be better for the introduction of this character…

I started with a Digital Elevation Map (DEM) and exported a greyscale image from MicroDEM. The DEM files and software are available for free here.

ADAMANA, AZ

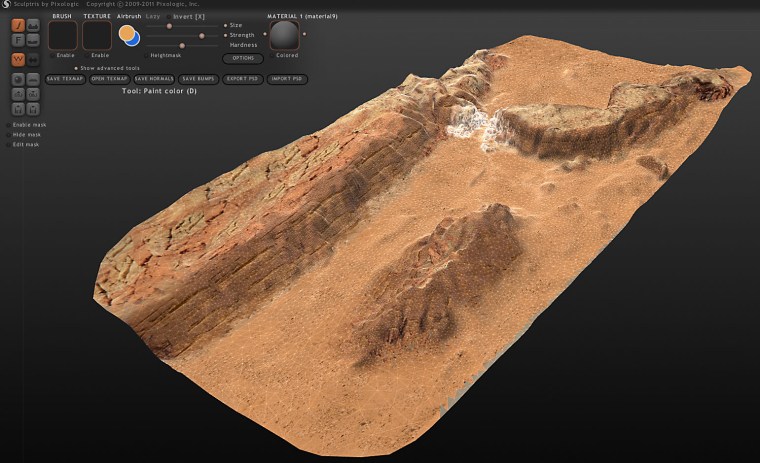
Using the greyscale values, it is pretty simple to generate a terrain mesh. In this case, I used Zbrush to generate the geometry, but I exported it to Sculptris to work on the detail and textures. The reason I wanted to use Sculptris is that I could use the Reduction brush to simplify the geometry in the distance. The detailed rocks in the pass is where the main action of the scene is, so I figured that I could just drop the landscape in as a PROP and render everything in A:M…

WIP_1-14-14

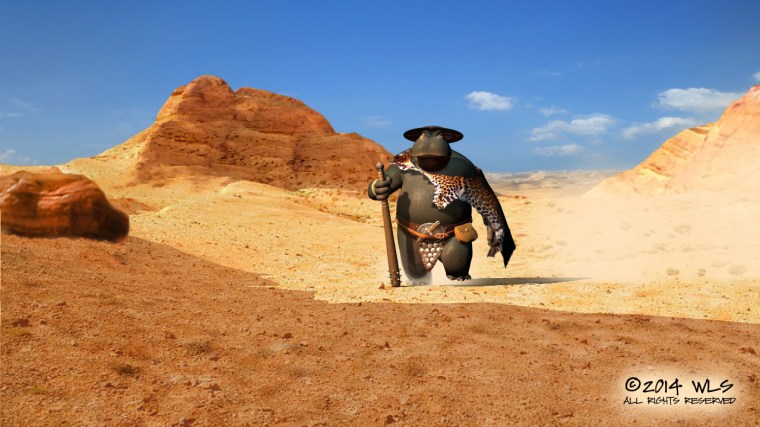
Unfortunately, the maximum texture resolution in Sculptris was too pixelated when rendering up close. So I decided to render the landscape by itself to get the lighting, and retouch it in Photoshop to create matte paintings to use as background rotoscopes in A:M.

I added the dunes in the distance, and the sky, as layers underneath the rendering. Then I added extra detail of the rocks and scrub as an overlay layer.

1(3)_retouched

I set the ground plane to Front Projection Target and Flat Shaded.

1(3)_wireframe

Now the only object in the shot is TAR. The dust particles are Sprites emitted with each step, and are drifting off to the right as though blown by the wind (actually there is a fan Force Emitter creating the wind).

I started rendering the shot (in HD, 1280 x 720), The first couple of frames took over 1-1/2 hours!  With over 400 frames in just this shot, that was way too long…I knew that I was going to have to make some compromises….  I eliminated global illumination, ambient occlusion, and multipass–relighted the scene with Z-buffered shadows instead of ray-tracing. The new render time was only 2 minutes per frame!

TAR_1(3)_342


Zbrush to Animation:Master

I’ve been learning to digitally sculpt in Zbrush, but that doesn’t mean that I’ve abandoned Animation:Master. I need to be able to take the sculpture back into my animation program to rig it and animate.

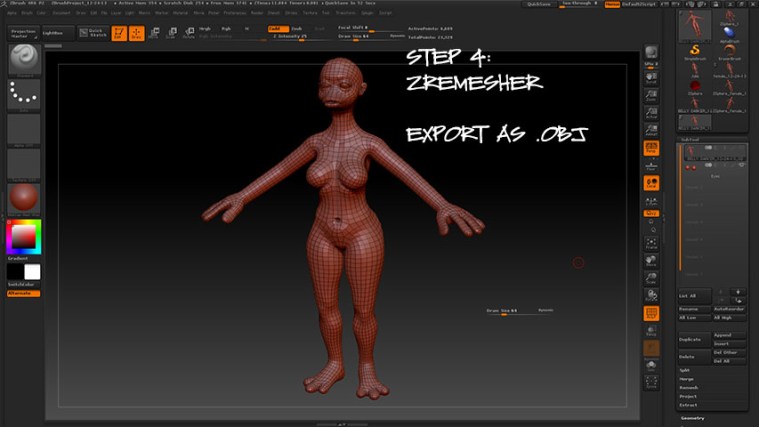
I’m still learning my way around Zbrush, but thought it might be helpful to some if I documented the steps to get a model from Zbrush to A:M:

ZB2AM-1

ZB2AM-2

ZB2AM-3

ZB2AM-4

ZB2AM-5

The Zremesher is really awesome–I went from almost 1/2 million polygons to a little over 6,000 patches! There are some retopology tools that I’m going to explore too (looks like I can manually redraw sections of the mesh if I don’t like the automatic results…)

Zbrush to A:M

I had an idea this evening to see whether I could combine Zbrush and Animation:Master by using the extract command in Zbrush to create equipment (in this case a helmet) and bring that geometry back into A:M as a PROP.

So I exported the Hyena as an .obj and imported it into Zbrush, painted a mask for the helmet and extracted the geometry. I then sculpted some detail–though  not too much, because I wasn’t sure it would work…

helmet

Before exporting the helmet, I ran the Decimation command on it to reduce the polygon count, then exported an .obj file. In A:M I imported the helmet and assigned a rusty steel DarkTree material to it. I dragged and dropped it into an Action and it perfectly aligned with the Hyena model! All I had to do was add a translate to and orient like constraint to the head controller and I was done:

hyena-helmet

I’m not sure if I will use this technique on some of the gear, or if I would just model from scratch in A:M. I just wanted to try it and see what happened. A:M has a reputation for not playing well with polygon-based programs, but I think you just have to understand the limits and work around them. For landscapes or hard-surface objects that don’t need to deform, use the PROP feature and you shouldn’t have any problem.

I recently experimented with modeling a simple landscape object in Sculptris, and it also worked great in A:M

sculptris_screencap

tar+hyena2.0

Storyboards

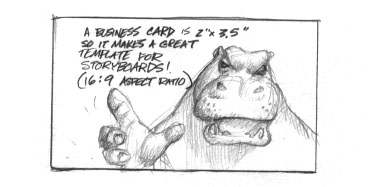
I’m working on storyboards for Tar of Zandoria, and by serendipity discovered that the business card that I was using as a template to draw rectangles in my sketchbook  is the correct aspect ratio for 16:9!

I just grabbed it because it was handy, and a good size for me. But it seems so obvious and simple–and readily available–you can draw storyboards anywhere! I don’t recall anyone ever sharing this as a tip before–so here it is 😉